Spring MVC Form Validation Example with Bean Validation API
- Details
- Written by Nam Ha Minh
- Last Updated on 10 February 2025 | Print Email
 Before walking through the detailed steps to build this application, let’s understand the Bean Validation API which is used to define validation constraints against properties of JavaBean objects.
 1. Bean Validation API and Hibernate Validator Implementation
In a nutshell, the Bean Validation API standardizes the way programmers declare validation constraints on object models via annotations. Here’s a quick example:public class User {
@NotNull
@Email
private String email;
@NotNull
@Size(min = 6, max = 15)
private String password;
// getters and setters
}The JSR 303 and JSR 349 defines specification for the Bean Validation API (version 1.0 and 1.1, respectively), and Hibernate Validator is the reference implementation. Download its JAR files from the following links:We will need the validation-api-1.1.0.Final.jar and hibernate-validator-5.0.1.Final.jar files in order to use the Bean Validation API in our Spring MVC application.If you are using Maven, add the following dependencies to your pom.xml file:- Bean Validation API 1.1:
<dependency>
	<groupId>javax.validation</groupId>
	<artifactId>validation-api</artifactId>
	<version>1.1.0.Final</version>
</dependency>
- Hibernate Validator 5.0.1.Final:
<dependency>
    <groupId>org.hibernate</groupId>
    <artifactId>hibernate-validator</artifactId>
    <version>5.0.1.Final</version>
 </dependency>
- Bean Validation API 1.1:
2. Spring MVC Support for Bean Validation API
<mvc:annotation-driven />Spring MVC will detect and enable the validation support automatically.Now in the controller class, annotate the model object that is backing the form by the @Valid annotation (javax.validation.Valid):
@Controller
public class LoginController {

 	@RequestMapping(value = "/login", method = RequestMethod.POST)
	public String doLogin(@Valid User user, BindingResult result) {
		// login logic here
	}
}
Spring MVC will validate the model object annotated by the @Valid annotation after binding its properties with inputs from JSP form that uses Spring’s form tags. Any constraint violations will be exposed as errors in the BindingResult object, thus we can check the violation in the controller’s method like this:if (result.hasErrors()) {
// form validation error
} else {
// form input is ok
}Typically, we would return the input form back to the user when any validation errors occurred. And in the JSP form, we can show validation error messages using the Spring’s form errors tag as follows:<form:errors path="email" />The error message can be specified in the validation annotation, for example:
@NotEmpty(message = "Please enter your email addresss.")
private String email;
If you want to localize the message, specify a key in the properties file in the following convention:
ConstraintName.CommandName.propertyName=validation error messageFor example:
NotEmpty.userForm.email=Please enter your e-mail.Now let’s apply the above principles to validate fields of a login form in the Spring MVC application mentioned previously.
3. Coding Model Class
Code the model class (User.java) as follows:package net.codejava.spring;
import javax.validation.constraints.Size;
import org.hibernate.validator.constraints.Email;
import org.hibernate.validator.constraints.NotEmpty;
/**
*
* @author www.codejava.net
*
*/
public class User {
@NotEmpty
@Email
private String email;
@NotEmpty(message = "Please enter your password.")
@Size(min = 6, max = 15, message = "Your password must between 6 and 15 characters")
private String password;
public String getEmail() {
return email;
}
public void setEmail(String email) {
this.email = email;
}
public String getPassword() {
return password;
}
public void setPassword(String password) {
this.password = password;
}
}As we can see, the validation constraint annotations used here are: @NotEmpty, @Email and @Size. For the complete list of Java Bean validation constraints, refer to this page.We don’t specify error messages for the email field here. Instead, the error messages for the email field will be specified in a properties file in order to demonstrate localization of validation error messages.
4. Coding JSP Input Form
Write LoginForm.jsp file with the following content:<%@ page language="java" contentType="text/html; charset=UTF-8"
pageEncoding="UTF-8"%>
<%@ taglib prefix="form" uri="http://www.springframework.org/tags/form"%>
<!DOCTYPE html PUBLIC "-//W3C//DTD HTML 4.01 Transitional//EN"
"http://www.w3.org/TR/html4/loose.dtd">
<html>
<head>
<meta http-equiv="Content-Type" content="text/html; charset=UTF-8">
<title>Login</title>
<style>
.error {
color: red; font-weight: bold;
}
</style>
</head>
<body>
<div align="center">
<h2>Spring MVC Form Validation Demo - Login Form</h2>
<table border="0" width="90%">
<form:form action="login" commandName="userForm">
<tr>
<td align="left" width="20%">Email: </td>
<td align="left" width="40%"><form:input path="email" size="30"/></td>
<td align="left"><form:errors path="email" cssClass="error"/></td>
</tr>
<tr>
<td>Password: </td>
<td><form:password path="password" size="30"/></td>
<td><form:errors path="password" cssClass="error"/></td>
</tr>
<tr>
<td></td>
<td align="center"><input type="submit" value="Login"/></td>
<td></td>
</tr>
</form:form>
</table>
</div>
</body>
</html>
5. Coding Controller Class
Code the controller class (LoginController.java) as follows:package net.codejava.spring;
import java.util.Map;
import javax.validation.Valid;
import org.springframework.stereotype.Controller;
import org.springframework.validation.BindingResult;
import org.springframework.web.bind.annotation.ModelAttribute;
import org.springframework.web.bind.annotation.RequestMapping;
import org.springframework.web.bind.annotation.RequestMethod;
/**
*
* @author www.codejava.net
*
*/
@Controller
public class LoginController {
@RequestMapping(value = "/login", method = RequestMethod.GET)
public String viewLogin(Map<String, Object> model) {
User user = new User();
model.put("userForm", user);
return "LoginForm";
}
@RequestMapping(value = "/login", method = RequestMethod.POST)
public String doLogin(@Valid @ModelAttribute("userForm") User userForm,
BindingResult result, Map<String, Object> model) {
if (result.hasErrors()) {
return "LoginForm";
}
return "LoginSuccess";
}
} 6. Coding JSP Result Page
The LoginSuccess.jsp page will be displayed in case the user enters valid email and valid password. Here’s its code:<%@ page language="java" contentType="text/html; charset=UTF-8"
pageEncoding="UTF-8"%>
<!DOCTYPE html PUBLIC "-//W3C//DTD HTML 4.01 Transitional//EN"
"http://www.w3.org/TR/html4/loose.dtd">
<html>
<head>
<meta http-equiv="Content-Type" content="text/html; charset=UTF-8">
<title>Welcome</title>
</head>
<body>
<div align="center">
<h2>Welcome ${userForm.email}! You have logged in successfully.</h2>
</div>
</body>
</html>
7. Configuring Spring MVC Application Context
Configure Spring MVC in its application context file (spring-mvc.xml) like this:<?xml version="1.0" encoding="UTF-8"?> <beans xmlns="http://www.springframework.org/schema/beans" xmlns:xsi="http://www.w3.org/2001/XMLSchema-instance" xmlns:context="http://www.springframework.org/schema/context" xmlns:mvc="http://www.springframework.org/schema/mvc" xsi:schemaLocation="http://www.springframework.org/schema/beans http://www.springframework.org/schema/beans/spring-beans-3.0.xsd http://www.springframework.org/schema/mvc http://www.springframework.org/schema/mvc/spring-mvc-3.0.xsd http://www.springframework.org/schema/context http://www.springframework.org/schema/context/spring-context-3.0.xsd"> <mvc:annotation-driven /> <context:component-scan base-package="net.codejava.spring" /> <bean id="viewResolver" class="org.springframework.web.servlet.view.InternalResourceViewResolver"> <property name="prefix" value="/WEB-INF/views/" /> <property name="suffix" value=".jsp" /> </bean> <bean id="messageSource" class="org.springframework.context.support.ReloadableResourceBundleMessageSource"> <property name="basename" value="/WEB-INF/messages" /> </bean> </beans>
8. Writing messages.propreties file
We localize validation error messages for the email field, so put the following key=value pairs in messages.properties file:NotEmpty.userForm.email=Please enter your e-mail. Email.userForm.email=Your e-mail is incorrect.
9. Configuring Spring framework in web.xml
Enable Spring dispatcher servlet in the web deployment descriptor file:<?xml version="1.0" encoding="UTF-8"?> <web-app xmlns:xsi="http://www.w3.org/2001/XMLSchema-instance" xmlns="http://java.sun.com/xml/ns/javaee" xmlns:web="http://java.sun.com/xml/ns/javaee/web-app_2_5.xsd" xsi:schemaLocation="http://java.sun.com/xml/ns/javaee http://java.sun.com/xml/ns/javaee/web-app_3_0.xsd" id="WebApp_ID" version="3.0"> <display-name>SpringMvcFormValidationExample</display-name> <servlet> <servlet-name>SpringController</servlet-name> <servlet-class>org.springframework.web.servlet.DispatcherServlet</servlet-class> <init-param> <param-name>contextConfigLocation</param-name> <param-value>/WEB-INF/spring-mvc.xml</param-value> </init-param> <load-on-startup>1</load-on-startup> </servlet> <servlet-mapping> <servlet-name>SpringController</servlet-name> <url-pattern>/</url-pattern> </servlet-mapping> </web-app>
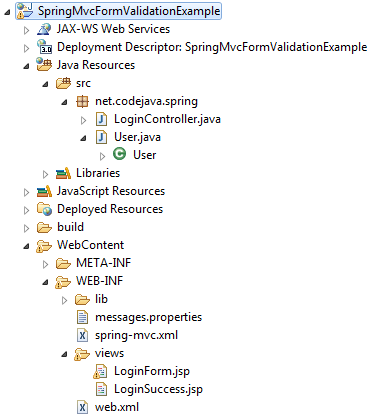
10. Reviewing project structure and required JAR files
Organize all the source files above in Eclipse IDE as shown below: The required JAR files under the WEB-INF\lib directory are:
- classmate-0.5.4.jar
- commons-logging-1.1.1.jar
- hibernate-validator-5.0.1.Final.jar
- jboss-logging-3.1.0.GA.jar
- spring-beans-3.2.4.RELEASE.jar
- spring-context-3.2.4.RELEASE.jar
- spring-core-3.2.4.RELEASE.jar
- spring-expression-3.2.4.RELEASE.jar
- spring-web-3.2.4.RELEASE.jar
- spring-webmvc-3.2.4.RELEASE.jar
- validation-api-1.1.0.Final.jar
11. Testing the Application
Type the following URL into your browser’s address bar:http://localhost:8080/SpringMvcFormValidationExample/login
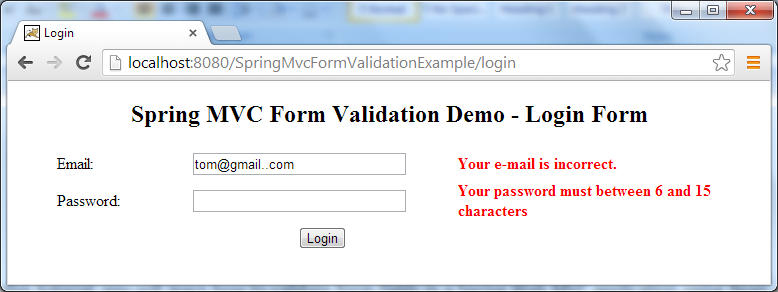
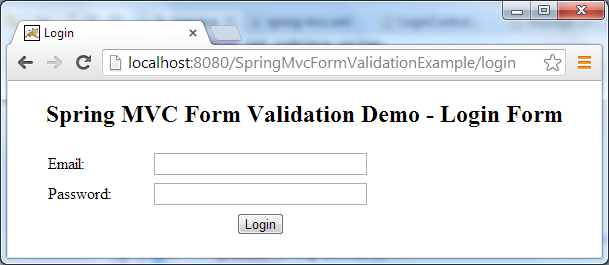
The login form appears: Try to enter an invalid email and a short password (e.g. 4 characters), and then click Login. We’ll see validation error messages in red to the right of the form, as shown below:
 Now try to enter a valid email and valid password (between 6 and 15 characters), and hit Enter. The login success page appears:
 For form validation with Spring Boot, refer to this tutorial: Spring Boot Form Validation Tutorial. And you can clone the sample project on GitHub, or download it under the Attachments section below.
 Related Form Handling Tutorials:
- Spring MVC Form Handling Tutorial and Example
- Handling HTML form data with Java Servlet
- Handling form data in Struts
Other Spring Tutorials:
- Understand the core of Spring framework
- Understand Spring MVC
- Understand Spring AOP
- Spring Dependency Injection Example (Annotations)
- Spring MVC beginner tutorial with Spring Tool Suite IDE
- 14 Tips for Writing Spring MVC Controller
- Spring Web MVC Security Basic Example (XML Configuration)
- Understand Spring Data JPA with Simple Example
About the Author:
 Nam Ha Minh is certified Java programmer (SCJP and SCWCD). He began programming with Java back in the days of Java 1.4 and has been passionate about it ever since. You can connect with him on Facebook and watch his Java videos on YouTube.