Spring MVC Form Handling Tutorial and Example
- Details
- Written by Nam Ha Minh
- Last Updated on 31 May 2023 | Print Email
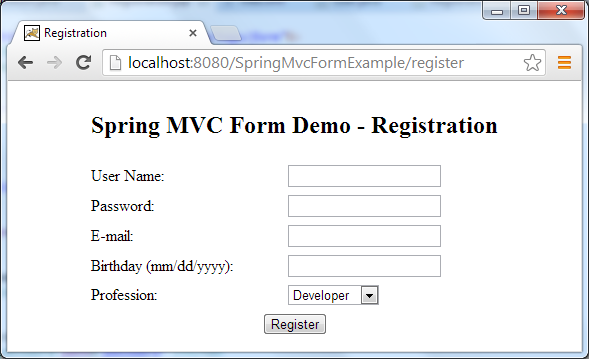
For most programmers, form handling is the day-to-day task in general web development as well as in Spring MVC development. A typical scenario would be like this: the user fills in a web form and click Submit button. The server receives the user’s request, validates inputs, processes some business logic and finally returns a response/message back to the user. In this tutorial, we’ll see how the Spring MVC framework supports form handling, and then build a sample application that handles a registration form which looks like this:
First, let’s see how form handling is supported in Spring MVC.
1. Form Handling Support in Spring MVC
Spring MVC is a Model-View-Controller framework so it handles form submission by the three key components: model, view and controller.
- Model: basically a POJO (Plain Old Java Object) class is created to bind form fields with properties of the object. This object will be put into the model (model object).
- View: Spring MVC form tags are used to render the equivalent HTML form fields, and most importantly, bind the object in the model with the form.
- Controller: alongside with handling requests, the controller binds the model object with the view and vice-versa, and delegates processing to dedicated business/service class.
Now let’s walk through the steps of building a sample application (registration form).
2. Coding Model Class (form-backing object)
Create User.java class with the following code:
File: src/main/java/net/codejava/spring/model/User.java
package net.codejava.spring.model;

import java.util.Date;

public class User {
	private String username;
	private String password;
	private String email;
	private Date birthDate;
	private String profession;

	// getters and setters...

}
As we can see, this model class has five fields (username, password, email, birthDate and profession) which bind to the corresponding fields in the view (JSP page). When an object of a model class is bound to a form, it is called form-backing object.
3. Coding Registration Form using Spring Form Tags
Write code for the registration form (Registration.jsp) as follows:
File: src/main/webapp/WEB-INF/views/Registration.jsp
<%@ page language="java" contentType="text/html; charset=UTF-8"
    pageEncoding="UTF-8"%>
<%@ taglib prefix="form" uri="http://www.springframework.org/tags/form"%>
<!DOCTYPE html PUBLIC "-//W3C//DTD HTML 4.01 Transitional//EN"
	"http://www.w3.org/TR/html4/loose.dtd">
<html>
<head>
<meta http-equiv="Content-Type" content="text/html; charset=UTF-8">
<title>Registration</title>
</head>
<body>
	<div align="center">
		<form:form action="register" method="post" commandName="userForm">
			<table border="0">
				<tr>
					<td colspan="2" align="center"><h2>Spring MVC Form Demo - Registration</h2></td>
				</tr>
				<tr>
					<td>User Name:</td>
					<td><form:input path="username" /></td>
				</tr>
				<tr>
					<td>Password:</td>
					<td><form:password path="password" /></td>
				</tr>
				<tr>
					<td>E-mail:</td>
					<td><form:input path="email" /></td>
				</tr>
				<tr>
					<td>Birthday (mm/dd/yyyy):</td>
					<td><form:input path="birthDate" /></td>
				</tr>
				<tr>
					<td>Profession:</td>
					<td><form:select path="profession" items="${professionList}" /></td>
				</tr>
				<tr>
					<td colspan="2" align="center"><input type="submit" value="Register" /></td>
				</tr>
			</table>
		</form:form>
	</div>
</body>
</html>
The <form:form> tag plays an important role here. It’s very similar to the regular HTLM <form> tag but the commandName attribute is the key which specifies name of the model class object that acts as a backing object for this form:
<form:form action="register" method="post" commandName="userForm">
NOTE: if you use Spring framework 5, use the modelAttribute attribute instead:
<form:form action="register" method="post" modelAttribute="userForm">
We’ll see how to set a model class object as the form-backing object when coding the controller class.
Also in this JSP page, we are using few Spring form tags to generate equivalent HTML form input tags and bind these form fields with corresponding properties of the model class Userabove, including:
- <form:input>: generates HTML <input type=”text”> tag.
- <form:password>: generates HTML <input type=”password”> tag.
- <form:select>: generates HTML <select> tag and its items in <option> tags.
Here, the noteworthy attribute of each tag is path - which specifies name of a property of the model class. See a complete list of form tags provided by Spring MVC here.
4. Coding Controller Class
Write code for the controller class (RegisterController.java) as follows:
File: src/main/java/net/codejava/spring/controller/RegisterController.java
package net.codejava.spring.controller;

import java.util.ArrayList;
import java.util.List;
import java.util.Map;

import net.codejava.spring.model.User;

import org.springframework.stereotype.Controller;
import org.springframework.web.bind.annotation.ModelAttribute;
import org.springframework.web.bind.annotation.RequestMapping;
import org.springframework.web.bind.annotation.RequestMethod;

@Controller
@RequestMapping(value = "/register")
public class RegisterController {

	@RequestMapping(method = RequestMethod.GET)
	public String viewRegistration(Map<String, Object> model) {
		User userForm = new User();
		model.put("userForm", userForm);

		List<String> professionList = new ArrayList<>();
		professionList.add("Developer");
		professionList.add("Designer");
		professionList.add("IT Manager");
		model.put("professionList", professionList);

		return "Registration";
	}

	@RequestMapping(method = RequestMethod.POST)
	public String processRegistration(@ModelAttribute("userForm") User user,
			Map<String, Object> model) {

		// implement your own registration logic here...

		// for testing purpose:
		System.out.println("username: " + user.getUsername());
		System.out.println("password: " + user.getPassword());
		System.out.println("email: " + user.getEmail());
		System.out.println("birth date: " + user.getBirthDate());
		System.out.println("profession: " + user.getProfession());

		return "RegistrationSuccess";
	}
}
We can see that this controller is designed to handle the request URL /register:
@RequestMapping(value = "/register")
We implement two methods viewRegistration() and processRegistration() to handle the GET and POST requests, respectively. Writing handler methods in Spring is very flexible, as we can freely choose our own method names and necessary parameters. Let’s look at each method of the above controller class in details:
- viewRegistration(): in this method we create a model object and put it into the model map with the key “userForm”:
User userForm = new User();
model.put("userForm", userForm);
This creates a binding between the specified object with the form in the view returned by this method (which is the registration form). Note that the key “userForm” must match value of the commandNameattribute of the <form:form> tag.
Another interesting point is that we create a list of Strings and put it into the model map with the key “professionList”:
List<String> professionList = new ArrayList<>();
professionList.add("Developer");
professionList.add("Designer");
professionList.add("IT Manager");
model.put("professionList", professionList);
This collection will be used by the <form:select> tag in the Registration.jsp page in order to render the profession dropdown list dynamically.
Finally this method returns a view name (“Registration”) which will be mapped to the registration form page above.
- processRegistration(): this method handles the form submission (via POST request). The important parameter here is:
@ModelAttribute("userForm") User userThis will make the model object which is stored under the key “userForm” in the model map available to the method body. Again, the key “userForm” must match value of the commandNameattribute of the <form:form> tag.
When the form is submitted, Spring automatically binds the form’s field values to the backing object in the model, thus we can access the form values inputted by the user through this backing object like this:
System.out.println("username: " + user.getUsername());For demo purpose, this method only prints out details of the Userobject, and finally returns a view name of the success page (“RegistrationSuccess”).
5. Coding Registration Success Page
Write code for the success page (RegistrationSuccess.jsp) as follows:
File: src/main/webapp/WEB-INF/views/RegistrationSuccess.jsp
<%@ page language="java" contentType="text/html; charset=UTF-8"
    pageEncoding="UTF-8"%>
<%@ taglib prefix="form" uri="http://www.springframework.org/tags/form"%>
<!DOCTYPE html PUBLIC "-//W3C//DTD HTML 4.01 Transitional//EN"
	"http://www.w3.org/TR/html4/loose.dtd">
<html>
<head>
<meta http-equiv="Content-Type" content="text/html; charset=UTF-8">
<title>Registration Success</title>
</head>
<body>
	<div align="center">
		<table border="0">
			<tr>
				<td colspan="2" align="center"><h2>Registration Succeeded!</h2></td>
			</tr>
			<tr>
				<td colspan="2" align="center">
					<h3>Thank you for registering! Here's the review of your details:</h3>
				</td>
			</tr>
			<tr>
				<td>User Name:</td>
				<td>${userForm.username}</td>
			</tr>
			<tr>
				<td>E-mail:</td>
				<td>${userForm.email}</td>
			</tr>
			<tr>
				<td>Birthday:</td>
				<td>${userForm.birthDate}</td>
			</tr>
			<tr>
				<td>Profession:</td>
				<td>${userForm.profession}</td>
			</tr>

		</table>
	</div>
</body>
</html>
This JSP page simply uses EL expressions to display values of properties of the Userobject in the model.
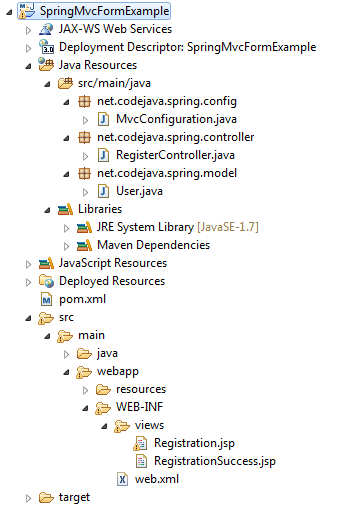
6. Reviewing Eclipse project structure and pom.xml
We use Eclipse IDE and Maven to build this application so the project structure would look like this:
See the article Creating a Spring MVC project using Maven and Eclipse in one minute to know how to setup the project.
Here’s the Maven’s pom.xml file used:
<?xml version="1.0" encoding="UTF-8"?>
<project xmlns="http://maven.apache.org/POM/4.0.0"
	xmlns:xsi="http://www.w3.org/2001/XMLSchema-instance"
	xsi:schemaLocation="http://maven.apache.org/POM/4.0.0
	http://maven.apache.org/xsd/maven-4.0.0.xsd">

	<modelVersion>4.0.0</modelVersion>

	<groupId>SpringMvcFormExample</groupId>
	<artifactId>SpringMvcFormExample</artifactId>
	<version>1.0</version>
	<packaging>war</packaging>

	<name>SpringMvcFormExample</name>
	<url>http://maven.apache.org</url>

	<properties>
		<java.version>1.7</java.version>
		<spring.version>3.2.4.RELEASE</spring.version>
		<cglib.version>2.2.2</cglib.version>
	</properties>

	<dependencies>
		<!-- Spring core & mvc -->
		<dependency>
			<groupId>org.springframework</groupId>
			<artifactId>spring-context</artifactId>
			<version>${spring.version}</version>
		</dependency>

		<dependency>
			<groupId>org.springframework</groupId>
			<artifactId>spring-webmvc</artifactId>
			<version>${spring.version}</version>
		</dependency>


		<!-- CGLib for @Configuration -->
		<dependency>
			<groupId>cglib</groupId>
			<artifactId>cglib-nodep</artifactId>
			<version>${cglib.version}</version>
			<scope>runtime</scope>
		</dependency>


		<!-- Servlet Spec -->
		<dependency>
			<groupId>javax.servlet</groupId>
			<artifactId>javax.servlet-api</artifactId>
			<version>3.0.1</version>
			<scope>provided</scope>
		</dependency>
	</dependencies>

	<repositories>
		<repository>
			<id>springsource-milestones</id>
			<name>SpringSource Milestones Proxy</name>
			<url>https://oss.sonatype.org/content/repositories/springsource-milestones</url>
		</repository>
	</repositories>

	<build>
		<finalName>SpringMvcFormExample</finalName>
		<plugins>
			<plugin>
				<groupId>org.apache.maven.plugins</groupId>
				<artifactId>maven-compiler-plugin</artifactId>
				<version>2.0.2</version>
				<configuration>
					<source>${java.version}</source>
					<target>${java.version}</target>
				</configuration>
			</plugin>
		</plugins>
	</build>
</project>
That indicates we are using Spring 3.2.4.RELEASE, Java 1.7 and Servlet 3.0 - the latest technologies at time of this writing.
UPDATE: If you use Spring framework version 5, the cglib dependency is no longer needed - so remove it. For handling form in Spring 5, refer to the video below and the attached project for Spring 5.
7. Testing the Application
Suppose the application is deployed on Tomcat under the context path /SpringMvcFormExample, type the following URL to access the registration page:
http://localhost:8080/SpringMvcFormExample/register
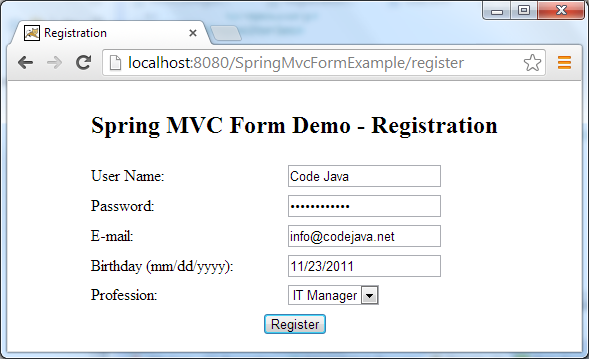
Enter some dummy data into the registration form as seen below:
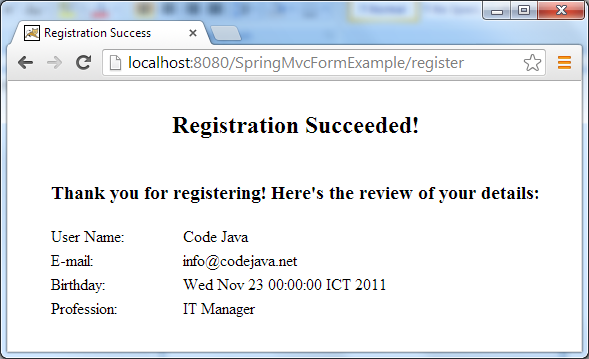
Click Register button, we would see the registration success page as shown below:
That’s all! So far we have learnt how form handling is supported Spring MVC and built a sample application, and seen that Spring makes that really easy and flexible. You can clone sample project on GitHub or download it in the Attachments section below.
You can also learn form handling with Spring framework 5 by the video below:
Related Form Handling Tutorials:
- Spring MVC Form Validation Example with Bean Validation API
- Handling HTML form data with Java Servlet
- Handling form data in Struts
Other Spring Tutorials:
- Understand the core of Spring framework
- Understand Spring MVC
- Understand Spring AOP
- Spring Dependency Injection Example (Annotations)
- Spring MVC beginner tutorial with Spring Tool Suite IDE
- 14 Tips for Writing Spring MVC Controller
- Spring Web MVC Security Basic Example (XML Configuration)
- Understand Spring Data JPA with Simple Example
About the Author:
 Nam Ha Minh is certified Java programmer (SCJP and SCWCD). He began programming with Java back in the days of Java 1.4 and has been passionate about it ever since. You can connect with him on Facebook and watch his Java videos on YouTube.
| [For Spring 5] | 21 kB | |
| [Deployable WAR file] | 3934 kB | |
| [Eclipse-Maven project] | 3953 kB |