Introduction to JSP Standard Tag Library (JSTL)
- Details
- Written by Nam Ha Minh
- Last Updated on 22 July 2019 | Print Email
Table of contents
- Introduction
- Expression Language
- Using JSTL
- JSTL Resources
- Setup a Java web project to use JSTL with Eclipse IDE
- Adding Tomcat as Server Runtime
Introduction
In the web applications, the most preferred choice of presenting content is JSPs. The JSPs are responsible for rendering the content received from various sources. Before the advent of JSTL (Java Standard Tag Library), developers used scriptlets and expressions to code the presentation logic. Due to the usage of scriptlets and expressions, the JSP code is mixed with Java and HTML which leads to difficulty in understanding the presentation logic and leads to maintenance nightmares. Also, developers are tempted to write business logic code in the JSPs thus violating the best practice of separating business logic with presentation logic.
The JSTL solves these issues by introducing set of tag libraries for presenting the content in precise and clean manner. By using JSTL tags we can completely avoid using scriptlets and expressions and we can have clean and maintainable code.
JSTL is composed of:
- An expression language
- Tag libraries
- Tag library validators
We can use expression language to access implicit objects (like request, response, session) and scoped objects (objects stored in various scopes i.e., page scope, request scope, session scope and application scope).
The standard tag libraries provides web application functionality like iterating over collections, internationalization, retrieve data from databases or access databases and deal with XML etc. There are four different types of tag libraries exist. i.e., Core, Formatting, SQL and XML.
The tag library validators can restrict the use of scriptlets and tag libraries in the JSP pages; however these validators are not part of core JSTL implementation.
Expression Language
The expression language provides arithmetic, logical and relational operators, access to collections, beans, arrays, lists and maps, access to implicit objects and scoped objects along with servlet properties. Majority of the JSTL tags have one or more attributes that we can specify using an EL expression. For example, to display the value of a variable message we may use JSTL tag as below:
<c:out value=”${message}”/>In the above example, we used EL expression ${…} to specify the variable name as an attribute to the JSTL tag. The variable ‘message’ can be set in either request scope or session scope from the business logic. We can also use EL expressions to do conditional tests.
EL expressions are invoked with syntax ${expr}, where expr represents an expression.
Using JSTL
To use JSTL in our JSPs, we need to declare the tag library in the top section of the JSPs. The following code snippet demonstrates the usage of JSTL and declaration.
<%@ taglib uri="http://java.sun.com/jsp/jstl/core" prefix="c" %>
<%@ taglib uri="http://java.sun.com/jsp/jstl/fmt" prefix="fmt" %>
This specifies the declaration of JSTL in the JSP and this example uses two types of JSTL tag libraries. The first declaration is to specify JSTL core tag libraries and the second declaration is to specify JSTL formatting tag libraries.
Once we declare the JSTL as in above example, we can refer the various tags using the namespace prefix we mentioned. For example, ‘c’ is the namespace prefix for using core tags and ‘fmt’ is the namespace prefix for using formatting tags.
The follows are the brief examples of the four types of JSTL tags.
Core:
<c:out value=”${message}”/>The above example prints the value of the variable message to the standard output.
Formatting:
<c:set var="now" value="<%=new java.util.Date()%>" />
Current date: <fmt:formatDate value="${now}" type="date" /><br/>
Current time: <fmt:formatDate value="${now}" type="time" />
The above example prints the current day’s date and time using JSTL format tags. Please note how the variable now has been assigned with current date using <c:set> tag.
SQL:
The following is a brief example to demonstrate the usage of JSTL SQL tag. Please note that some prior steps like creating database schema and setting up datasource are required to make this example functional. This is an example for illustration purposes only.
<sql:setDataSource dataSource="jdbc/codejavaDS"/>
<sql:query var="employees" sql="SELECT * FROM CODEJAVA.EMPLOYEES"></sql:query>
<table border="0" align="center" valign="center">
    <c:forEach var="employee" items="${employees.rows}">
        <tr>
          <td><c:out value="${employees.empId}"/></td>
          <td><c:out value="${employees.empName}"/></td>
          <td><c:out value="${employees.empSal}"/></td>
          <td><c:out value="${employees.empEmail}"/></td>
       </tr>
    </c:forEach>
</table>
In the above example, we used <sql:DataSource> tagto specify the data source we’re going to use to retrieve the data from the database. We used <sql:query> tag to specify the SQL query we wanted to execute against the database table. The result set obtained after execution of the query is stored in the variable named employees. Finally, we used <c:forEach> tag to iterate over results and to display employee information.
XML:
The following sample snippet of code parses an XML file named Employee.xml and assigns data to various JSTL variables.
<c:import var="employee" url="Employee.xml"/>
<x:parse varDom="dom" xml=""/>
<x:set var="empId" select="string($dom/employee/@id)"/>
<x:set var="empName" select="string($dom/employee/name/text())"/>
<x:set var="empSal" select="string($dom/employee/sal/text())"/>
<x:set var="empEmail" select="string($dom/employee/email/text())"/>
The following sections discuss in detail on the available JSTL resources and to setup a project which uses JSTL for presentation layer.
JSTL Resources
- Home page: http://jstl.java.net
- Specification: http://jcp.org/aboutJava/communityprocess/final/jsr052
- API Documentation: http://docs.oracle.com/javaee/5/jstl/1.1/docs/tlddocs
- Implementation Download: from http://jakarta.apache.org/taglibs/doc/standard-doc/intro.html
The current version of JSTL is 1.1 developed under the JCP (Java Community Process). The JSTL 1.1 version requires a servlet container which supports Servlet 2.4 and JSP 2.0 specification. JSTL 1.1 works well with Tomcat 5 and later versions of Tomcat.
The older version of JSTL specification (1.0) requires servlet container that supports Servlet 2.3 and JSP 1.2 specifications. JSTL 1.0 version has been tested with Tomcat 4.
Setup a Java Web Project to use JSTL with Eclipse IDE
The following sample web application demonstrates the usage of JSTL in JSP pages. Please follow the screen captures to create a web project in Eclipse and to deploy the sample application to Tomcat or any other servlet container. This example assumes you’ve installed Eclipse IDE and Tomcat servlet container.
- In Eclipse IDE, select File > New > Dynamic Web Project from Eclipse's main menu. This option is visible once you change to JavaEE perspective.
- Enter ‘JSTL-Demo’ or any other meaningful name as project name. Click Next to proceed to the next step.
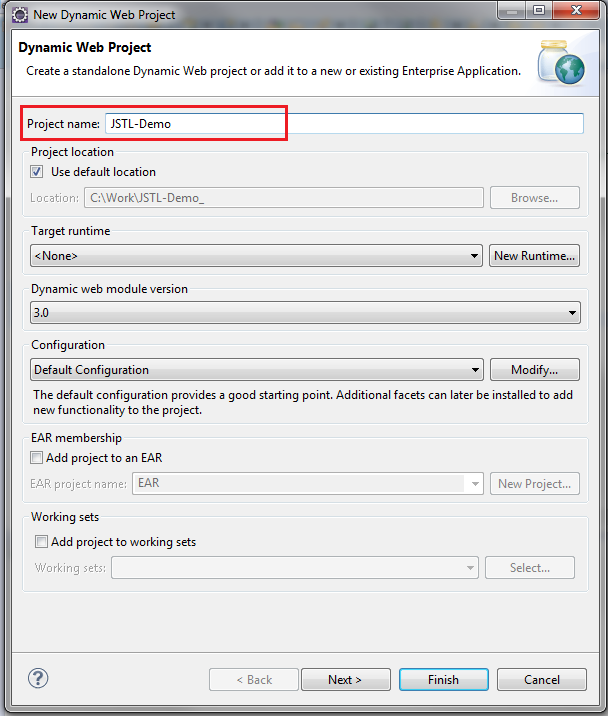
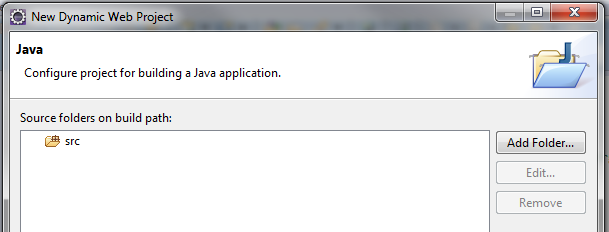
- In this step, select project source folder or leave to default location (src). This folder essentially contains all the source files we are going to create. Click Next button to proceed to next step.
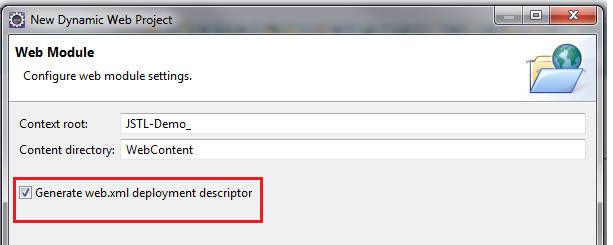
- Check the option to generate web.xml automatically. If we choose this option, the web.xml deployment descriptor with basic starting and ending tags are created under WEB-INF directory. Click Finish to complete the project creation.
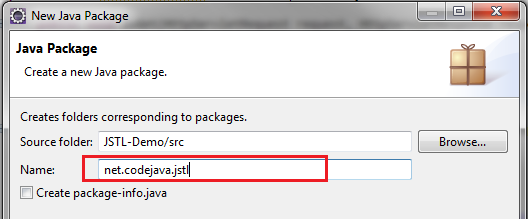
- Once our new project ‘JSTL-Demo’ has been created, we need to create a new Java package under source folder we’ve selected in the previous steps. Right click on ‘src’ folder in the JSTL-Demo project then choose New > Package. The new package creation dialogue appears.
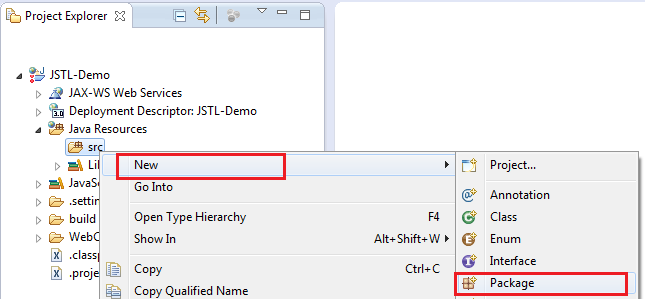
- In the new package creation dialogue, enter the package name as net.codejava.jstlor any other meaningful name and then click Finish.
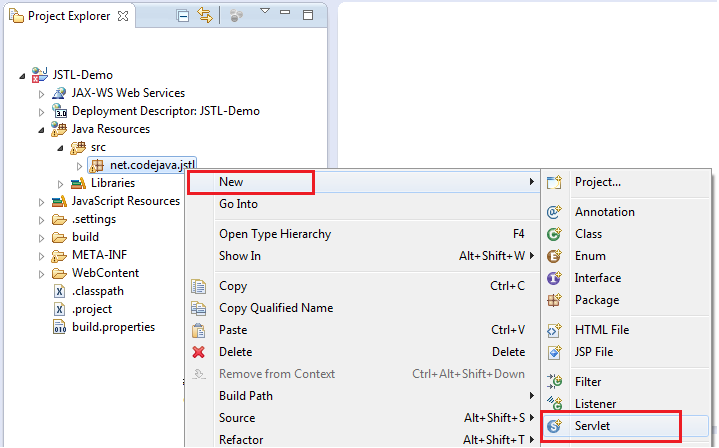
- Once the Java package has been created in the previous step, right click on the created package to create a new servlet.
Since this is a demo application it is indeed enough to have a servlet; however in web applications based on various frameworks like Struts or Spring, we may have to create various types of classes like Action classes or Controller classes to deal with business logic or control flow.
Right click on the package net.codejava.jstl then select New > Servlet. The new servlet creation dialogue appears.
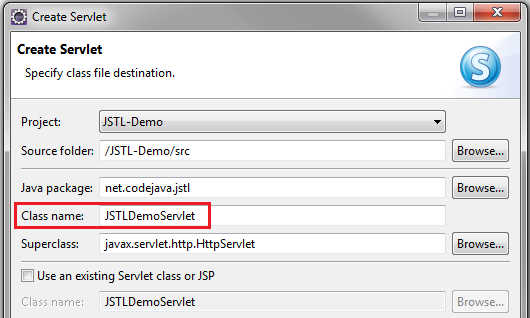
- Provide class name as ‘JSTLDemoServlet’ and click on Finish.
- After typing some servlet specific code in the just created class, we noticed that the compiler showing errors. This is due to lack of servlet specific libraries. In the next few steps we add JAR files required for the below code to compile.
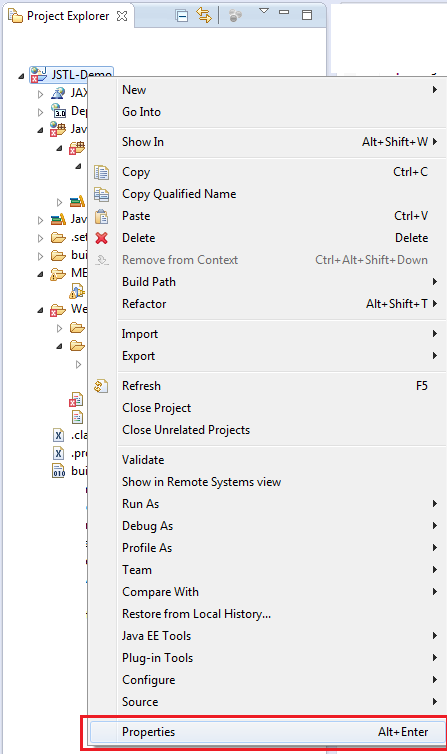
- Right click on project and select Properties. The project properties dialogue is shown as below:
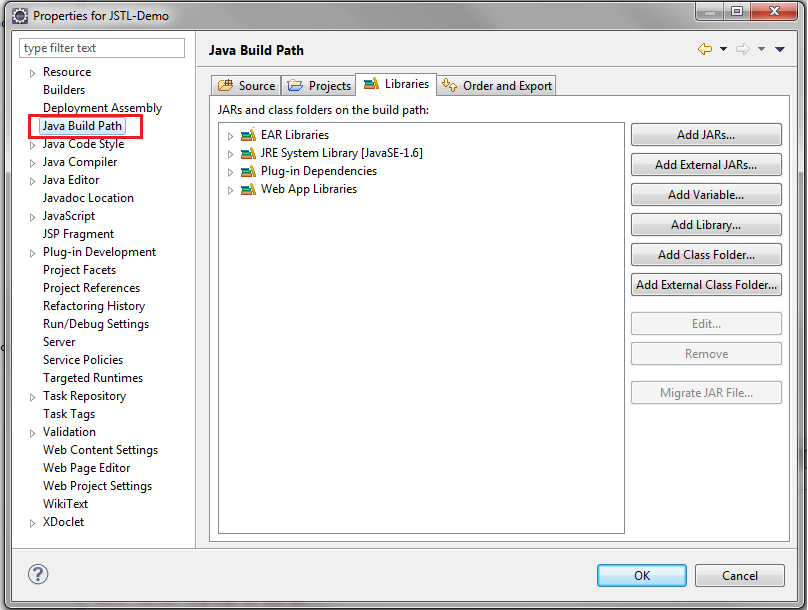
- In the project properties window, select Java Build Path.
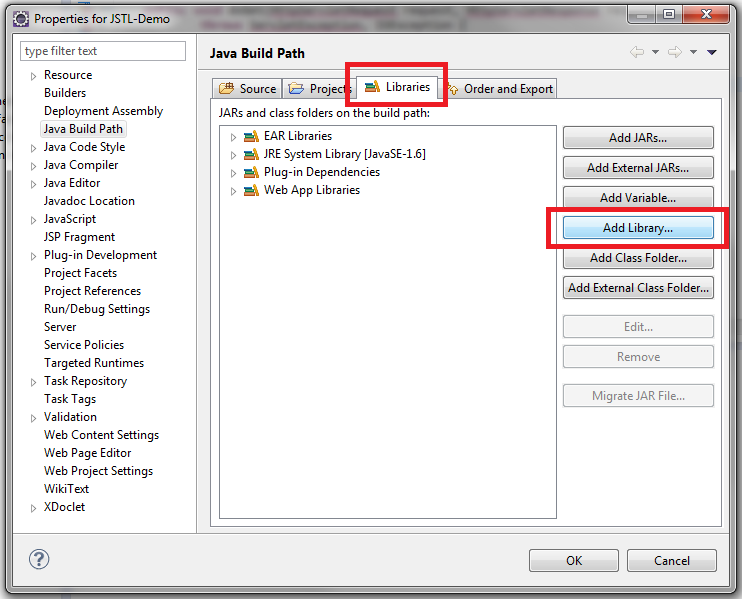
- In the project properties, click on tab Libraries, and then click on button Add Library.
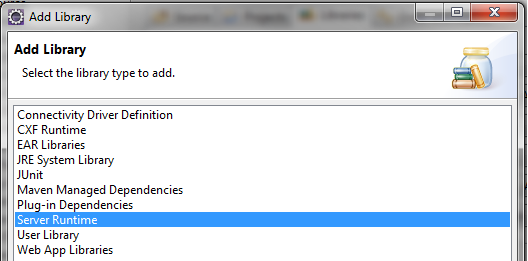
- In the ‘Add Library’ dialogue, choose Server Runtime and then click on Next button.
- Select the server you have installed. In this case, we are selecting Tomcat 6.0. Click Finish button.
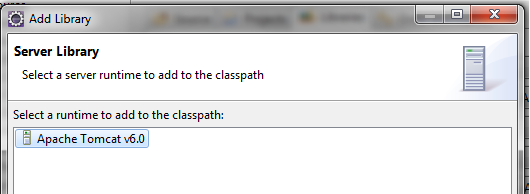
If you cannot see the Apache Tomcat runtime library as indicated in the above screen, the reason could be that you’ve not added the Tomcat as a server in your IDE. Please refer to the section Adding Tomcat as Server Runtime for the steps on how to add Tomcat as a runtime.
- We can see that Tomcat 6.0 runtime library has been added to the project. Click OK to continue.
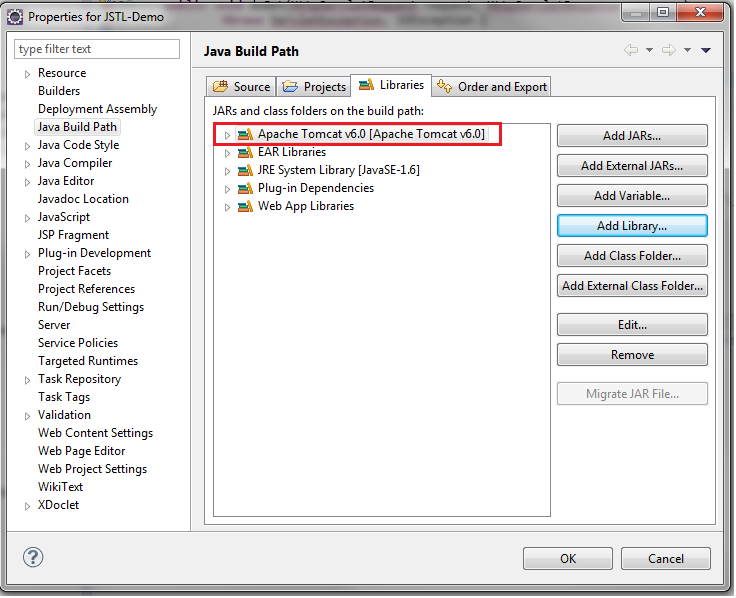
- Note that the compilation errors were disappeared since we’ve added Tomcat 6.0 runtime library.
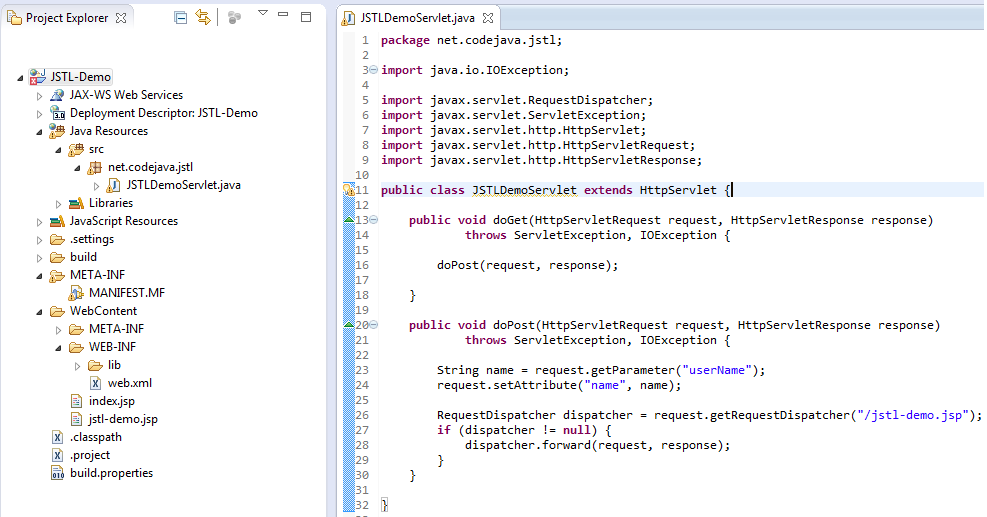
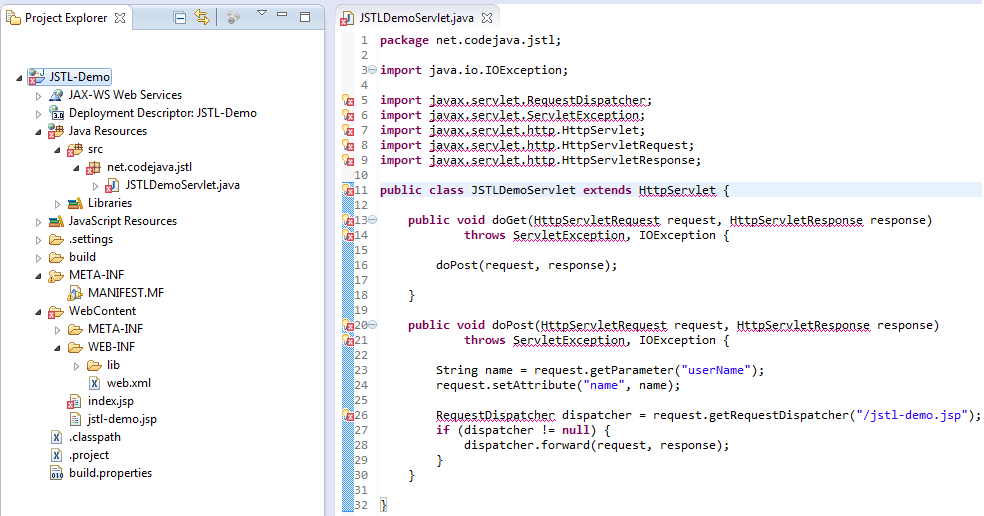
- We need to complete the JSTLDemoServlet code as shown in the below.
In the source code below, we are getting the user entered name from request, and setting the same value to the request as attribute. Finally, the request is being forwarded to /jstl-demo.jsp. The complete source code for JSTLDemoServlet.java is here below:
package net.codejava.jstl;

import java.io.IOException;

import javax.servlet.RequestDispatcher;
import javax.servlet.ServletException;
import javax.servlet.http.HttpServlet;
import javax.servlet.http.HttpServletRequest;
import javax.servlet.http.HttpServletResponse;

public class JSTLDemoServlet extends HttpServlet {

      public void doGet(HttpServletRequest request, HttpServletResponse response)
                  throws ServletException, IOException {

            doPost(request, response);

      }

      public void doPost(HttpServletRequest request, HttpServletResponse response)
                  throws ServletException, IOException {

            String name = request.getParameter("userName");
            request.setAttribute("name", name);

            RequestDispatcher dispatcher = request.getRequestDispatcher("/jstl-demo.jsp");
            if (dispatcher != null) {
                  dispatcher.forward(request, response);
            }
      }
 }
The standard convention to handle both doGet(…) and doPost(…) is to call doPost(…) from doGet(…) as shown in the above code example. By this way, we can make sure that doPost(…) is invoked even when the user sends a GET request.
- We need to create two JSPs by right clicking on ‘Web Content’ folder, choosing New > JSP File.
The source code for the two JSPs has been given below.
- Source code for jstl-demo.jsp.
<%@ page language="java" contentType="text/html; charset=ISO-8859-1" pageEncoding="ISO-8859-1"%>
<%@ taglib uri="http://java.sun.com/jsp/jstl/core" prefix="c" %>
<!DOCTYPE html PUBLIC "-//W3C//DTD HTML 4.01
Transitional//EN" "http://www.w3.org/TR/html4/loose.dtd">
<html>
    <head>
        <meta http-equiv="Content-Type" content="text/html; charset=ISO-8859-1">
        <title>JSTL Demo</title>
    </head>
    <body>
        Hello <c:out value="${name}"/>! JSTL Welcomes you!!
    </body>
</html>
In the above JSP code example, we used <c:out tag to display the value of scoped variable ‘name’. Please note that this variable has been set with user supplied request parameter in the JSTLDemoServlet from the earlier step.
- We need index.jsp to begin the demo. The follow is the index.jsp.
<%@ page language="java" contentType="text/html; charset=ISO-8859-1" pageEncoding="ISO-8859-1"%>
<%@ taglib uri="http://java.sun.com/jsp/jstl/core" prefix="c" %>
 <!DOCTYPE html PUBLIC "-//W3C//DTD HTML 4.01
Transitional//EN" "http://www.w3.org/TR/html4/loose.dtd">
<html>
    <head>
        <meta http-equiv="Content-Type" content="text/html; charset=ISO-8859-1">
        <title>JSTL Demo - Index</title>
    </head>
    <body>
      <form name="jstlDemoForm" action="${pageContext.request.contextPath}/JSTLDemoServlet"
              method="post">
          <input type="text" name="userName"/>
          <input type="submit"/>
      </form>
    </body>
</html>
pageContext
Take notice of how the JSP EL (Expression Language) is used to get the project context path. The pageContext is one of the implicit objects of JSP and is of type javax.servlet.jsp.PageContext. This implicit variable stores the value of the PageContext object associated with the current page. This object provides access to various page attributes and other implicit objects. The implicit objects (servletContext, request, response, session, out) are added to the pageContext automatically and are accessible through pageContext in JSP EL.
In the above code, we are retrieving request object which triggered the current JSP from pageContext, and accessing contextPath from request object. The motivation behind this expression usage is to avoid hard coding of web application’s context path and to shield from changes to the application path in future.
- Here is the code for web.xml deployment descriptor for our JSTLDemo web application.
<?xml version="1.0" encoding="UTF-8"?>
<web-app xmlns:xsi="http://www.w3.org/2001/XMLSchema-instance"
xmlns="http://java.sun.com/xml/ns/javaee"
xmlns:web="http://java.sun.com/xml/ns/javaee/web-app_2_5.xsd"
xsi:schemaLocation="http://java.sun.com/xml/ns/javaee
  http://java.sun.com/xml/ns/javaee/web-app_3_0.xsd"
id="WebApp_ID" version="3.0">
<display-name>JSTL-Demo</display-name>
<welcome-file-list>
   <welcome-file>index.jsp</welcome-file>
</welcome-file-list>
<servlet>
   <servlet-name>JSTLDemoServlet</servlet-name>
   <servlet-class>net.codejava.jstl.JSTLDemoServlet</servlet-class>
</servlet>
<servlet-mapping>
   <servlet-name>JSTLDemoServlet</servlet-name>
   <url-pattern>/JSTLDemoServlet</url-pattern>
</servlet-mapping>
</web-app>
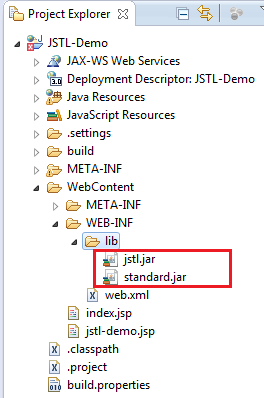
- Now, we have completed the code for JSTL-Demo web application. To successfully deploy the application to Tomcat we need to add two JAR files to the web application’s WEB-INF/lib folder. Please click this link to download the two JAR files i.e., jstl.jar and standard.jar (or) alternatively you can download these JAR files from the attachments section at the bottom of this article.
Once you have downloaded the JAR files, please add them to the JSTL-Demo web application’s WEB-INF/lib folder. You can copy the two JAR files from your local folder and paste them to WEB-INF/lib folder.
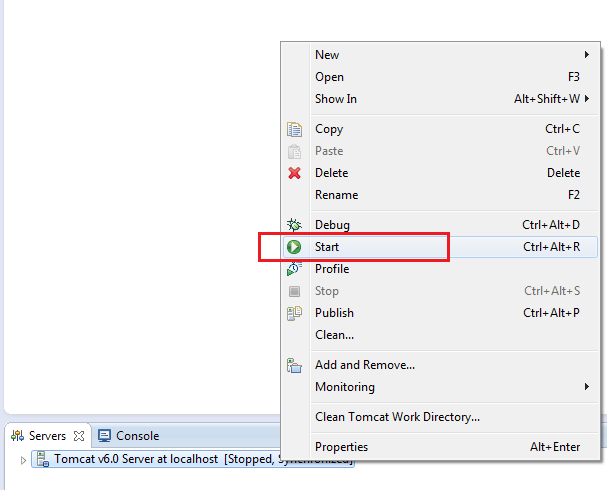
- Now, we have a sample JSTL application ready for deployment. Typically, there are many available deployment choices like having Ant script for Maven deployments. Since we had already added Tomcat 6.0 as our server and also had added our JSTL-Demo project as one of the Tomcat 6.0 deployment target, we can simply start the server by right clicking on Tomcat v6.0 and then selecting Start.
- Tomcat 6.0 is up and running. We are ready to test our first JSTL application.

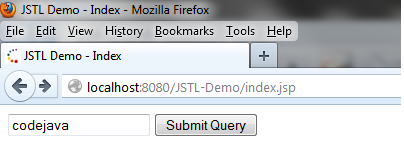
- Once the JSTL-Demo is successfully deployed to Tomcat, we can access the index.jsp as shown below. Enter any name in the text field and click on ‘Submit Query’ button.
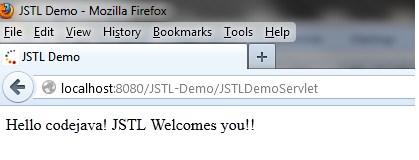
- We can see the JSTL enabled greeting message.
Adding Tomcat as Server Runtime
During development, it is convenient to administer the server from within IDE like Eclipse rather than to start/stop the server externally in DOS window. The following brief screen captures help you to add installed Tomcat as a server to your Eclipse IDE.
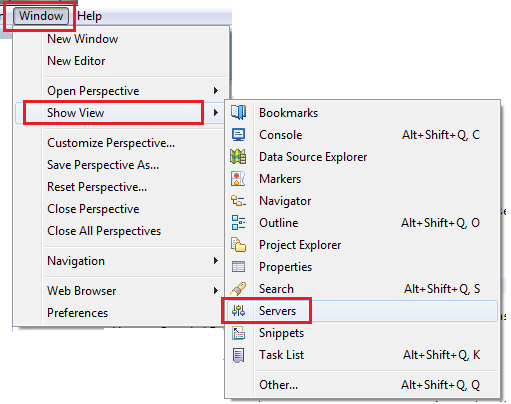
In case if you cannot find ‘Servers’ tab in your Eclipse, you can get ‘Servers’ tab by choosing Windows menu item then choosing Show View and then selecting Servers from the list of options. The following screen depicts this.
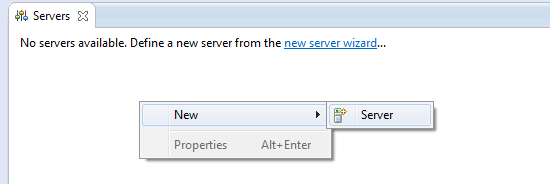
i). Right click on ‘Servers’ tab under Eclipse. Then select New and Server option. The ‘New Server’ dialogue appears.
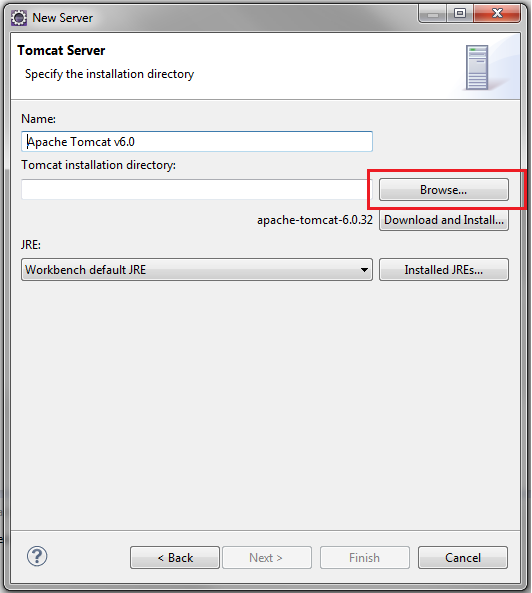
ii). In the ‘Add Server’ dialogue collapse Apache and then select the Tomcat version you wish to add. Then click on Next.

iii). In case Eclipse asks to select Tomcat installation directory, please select the Tomcat installation location by clicking on the Browse button and then selecting Tomcat installation directory. Normally, this step is necessary when you created a new workspace in the Eclipse.
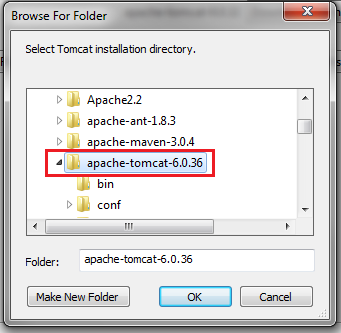
iv). Locate the Tomcat installation directory in the local file system. Click OK to continue.
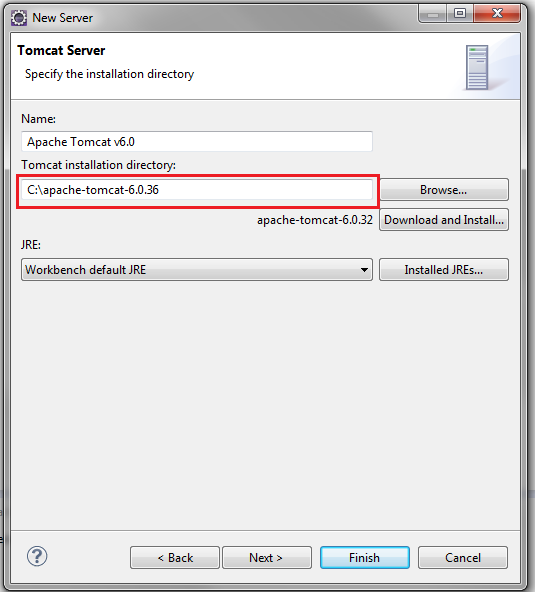
v). Tomcat installation directory path updated. Click Next button. Project add or remove dialogue appears.
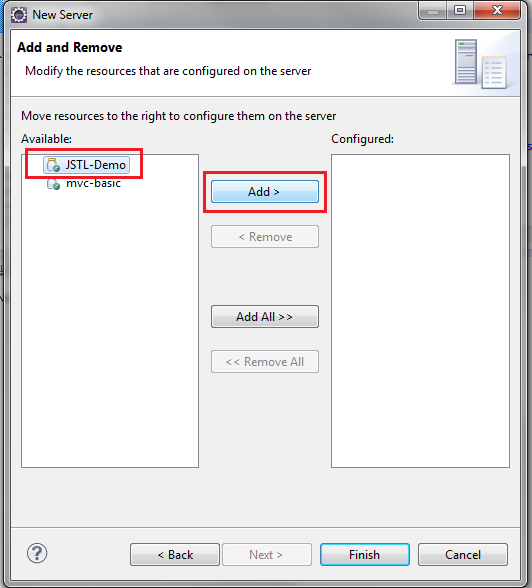
vi). Here you can choose a single or multiple projects you wish to target to the server being installed, in this case Tomcat 6.0. You can select our sample JSTL application JSTL-Demo. After selecting JSTL-Demo click Add > button to add our project to this server. Once you added the project click Finish.
Once we complete all of the above steps, every time we start Tomcat, our web applications will be deployed and available to access provided there were no deployment errors.
About the Author:
 Nam Ha Minh is certified Java programmer (SCJP and SCWCD). He began programming with Java back in the days of Java 1.4 and has been passionate about it ever since. You can connect with him on Facebook and watch his Java videos on YouTube.
| [The required JSTL JAR files (jstl.jar, standard.jar).] | 932 kB | |
| [You can simply use this project to import the JSTL-Demo web application into Eclipse and run it.] | 368 kB |