Download and Install OpenJDK 22 on Windows
- Details
- Written by Nam Ha Minh
- Last Updated on 17 June 2024 | Print Email
1. Download Binary Distribution of OpenJDK 22 for Windows
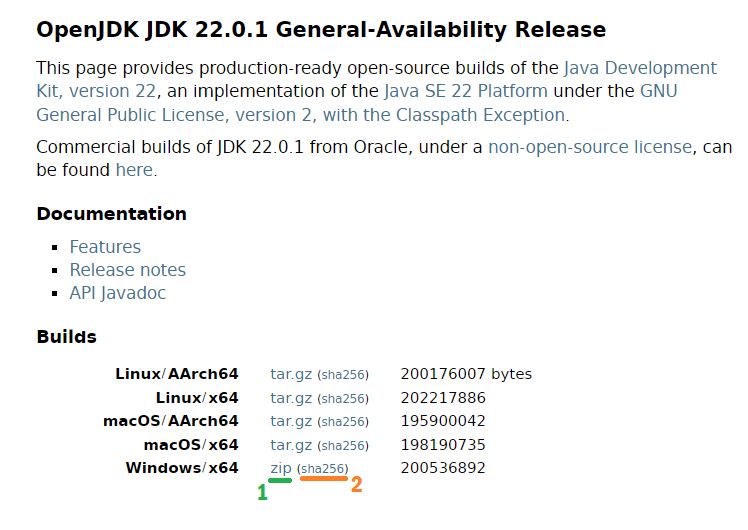
OpenJDK 22 is delivered as ZIP file only - no EXE or MSI installer for Windows. Visit OpenJDK 22 official download page in your web browser, the following page appears: To download, click the zip link next to Windows/x64 (marked as number 1 in the above screenshot). Save the file into a desired location on your computer. The file size is about 191 MB.
2. Verify Downloaded Zip File
Before installing OpenJDK 22, it’s strongly recommended to verity the integrity of the zip file to avoid harmful software enter your computer. So open a new Command Prompt window. Use the cd command to change the current directory to the location of the downloaded zip file.Then type the following command:certutil -hashfile openjdk-22.0.1_windows-x64_bin.zip sha256
This will print SHA256 checksum value of the specified file. Then compare it with the one publish on the official download page (click sha256 link marked as number 2 in the above screenshot). If they match, you can use the downloaded zip file at no risk. Else the file was corrupted or tampered with (in this case, you need to download again).
3. Install OpenJDK 22 on Windows
tar -xf openjdk-22.0.1_windows-x64_bin.zip -C D:\OpenJDK22
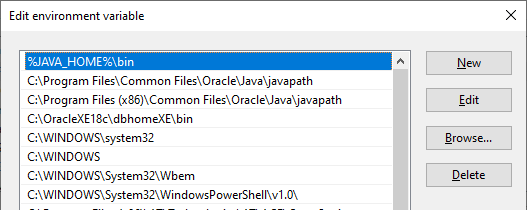
This command will extract the zip file into the specified directory OpenJDK22 on D: drive. Use dir command, you will see it put all extracted files under jdk-22.0.1 directory.Next, press Windows Start button and type environment variable into the search box. Then click the best match Edit the system environment variables. Then click Environment Variables… button in the System Properties dialog.Under System variables, click New button to create a new system environment variable called JAVA_HOME, as shown below: Then look for the Path environment variable in the list and click Edit. Then click New to add a new entry with value %JAVA_HOME%/bin. And use the Move Up button to make it the first one, as shown below:
 Click OK two times to save the changes. Close the command prompt window.Check this guide to see how to setup JAVA_HOME in greater detailed.
4. Verify OpenJDK 22 Installation on Windows
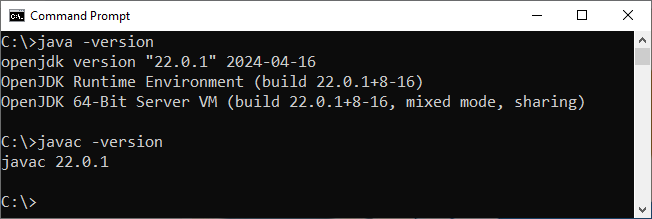
Now, open a new Command Prompt window to verify if OpenJDK 22 is installed properly or not. Type java -version and javac -version to check versions of Java virtual machine and Java compiler, respectively. You will the result like this: If you see this, that means you have installed JDK version 22 successfully on Windows OS with OpenJDK distribution. You can now start creating, developing, building and running Java applications on Windows. I hope you find this article helpful, whether you’re new to Java setup or want to upgrade to the latest Java version.You can watch the following video to see the setup in action:
 Related Articles:
- How to set JAVA_HOME in macOS and Linux permanently
- How to set JAVA_HOME environment variable on Windows 10
- What are JVM, JRE and JDK
- How to write, compile and run a hello world Java program for beginners
- Java Core Language Tutorials
About the Author:
 Nam Ha Minh is certified Java programmer (SCJP and SCWCD). He began programming with Java back in the days of Java 1.4 and has been passionate about it ever since. You can connect with him on Facebook and watch his Java videos on YouTube.
Comments