Download and Install OpenJDK 23 on macOS
- Details
- Written by Nam Ha Minh
- Last Updated on 01 November 2024 | Print Email
1. Download Binary Distribution of OpenJDK 23 for macOS
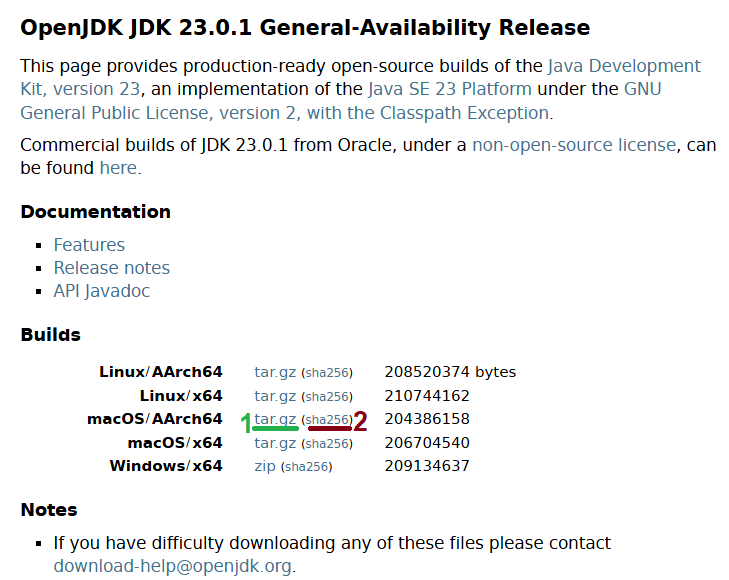
There is no installer for OpenJDK, so you need to download its binary distribution as a compressed archive file (tar.gz). Click this link to visit the official OpenJDK 23 download page, which appears as shown below: Oh, there are two different download links for macOS. Which one should you click?
- macOS/AArch64: this is for Mac computers that run on an Apple CPU.
- macOS/x64: this is for Mac computers powered by an Intel CPU.
2. Verify the Downloaded File
It’s recommended to verify the integrity of the downloaded .tar.gz file before extracting it for the installation of OpenJDK 23. To do this, open a new Terminal window and change the current directory to the location of the file:cd Downloads
And type the following command:shasum -a 256 openjdk-23.0.1_macos-aarch64_bin.tar.gz
3. Install OpenJDK 23 on macOS
The installation involves two tasks: extracting the archive file and configuring environment variables. In the Terminal window, type the following command to create a new folder that will store the extracted files: mkdir $HOME/OpenJDKThis creates the OpenJDK directory under your user home directory. Then, type the following command to extract the archive file:tar -xf openjdk-23.0.1_macos-aarch64_bin.tar.gz -C $HOME/OpenJDK
This extracts the binary files of OpenJDK 23 into the OpenJDK directory, making the installation directory $HOME/OpenJDK/jdk-23.0.1.jdk/Contents/Home.Next, you need to create a new environment variable named JAVA_HOME and update the PATH variable so that the JDK will be recognized by Java-based tools and applications. To do this, you need to create or update the shell resource file (.zshrc for Z-Shell or .bash_profile for Bash shell).In the terminal, change the current directory to your user home: cd $HOMEThen type the following command to create or update the Z-Shell resource file: cat >> .zshrcWhen prompted to enter the content, type the following:export JAVA_HOME=$HOME/OpenJDK/jdk-23.0.1.jdk/Contents/Home
export PATH=$JAVA_HOME/bin:$PATH
Here, the first export command creates the environment variable JAVA_HOME, pointing to the installation directory of OpenJDK 23. The second command inserts the path to the JDK’s bin directory as the first entry in the PATH environment variable. The bin directory contains programs and tools such as Java Virtual Machine (java) and Java compiler (javac).Hit Enter and press Ctrl + D to save the file. Note that if the terminal’s shell is Bash, you need to update the .bash_profile file.
4. Verify the OpenJDK 23 Setup on macOS
Finally, verify the installation by opening a new Terminal window (after completely quitting the current one), and typing java -version and javac -version to check the versions of the JVM and Java compiler, respectively. You should see the following output: This means you have successfully installed the JDK on macOS with OpenJDK version 23. Congratulations! You can now begin developing Java applications on your Mac. To see the setup in action, you can watch the following video:
 Related Articles:
- How to set JAVA_HOME in macOS and Linux permanently
- How to set JAVA_HOME environment variable on Windows 10
- What are JVM, JRE and JDK
- How to write, compile and run a hello world Java program for beginners
- Java Core Language Tutorials
About the Author:
 Nam Ha Minh is certified Java programmer (SCJP and SCWCD). He began programming with Java back in the days of Java 1.4 and has been passionate about it ever since. You can connect with him on Facebook and watch his Java videos on YouTube.
Comments