Download and Install OpenJDK 23 on Windows
- Details
- Written by Nam Ha Minh
- Last Updated on 28 October 2024 | Print Email
1. Download Binary Distribution of OpenJDK 23 for Windows
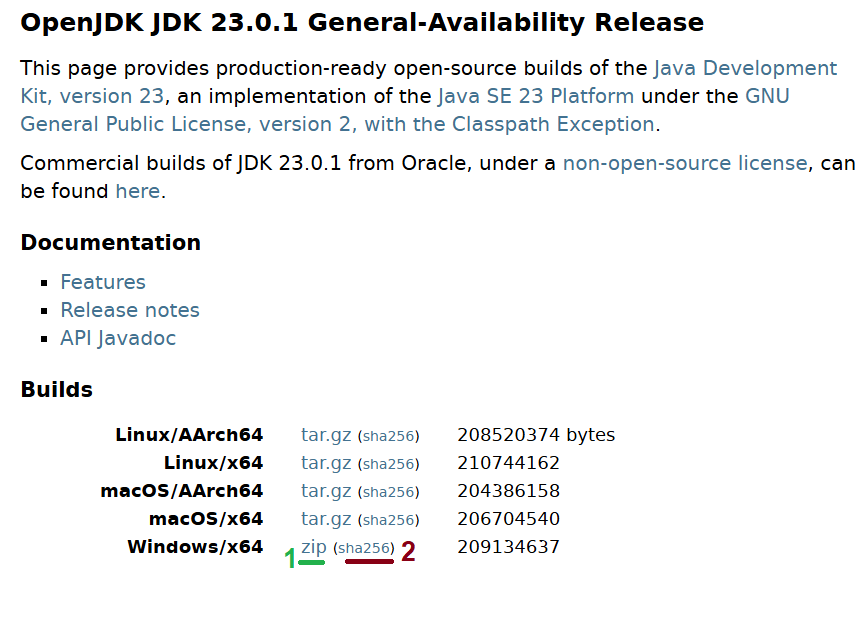
Click this link to visit the official OpenJDK 23 download page, which appears as follows: As you can see, there is no installer for OpenJDK for any operating system. It is distributed as compressed ZIP archive file for Windows. Click the link (1) to start downloading the binary distribution of OpenJDK 23. Save the file (openjdk-23.0.1_windows-x64_bin.zip) in the Downloads directory under your user home directory.
2. Verify the Downloaded Zip File
Before using the downloaded ZIP file, it’s strongly recommended to verify its integrity by comparing the SHA256 checksum value of the file with the one published on the download page. To verify, open a new Command Prompt window (press the Start button, type ‘cmd’, and click the best match), and use the cd command to set the current directory to the location of the downloaded file. For example:cd Downloads
Then type the following command:certutil -hashfile openjdk-23.0.1_windows-x64_bin.zip sha256
This prints the SHA256 checksum of the specified file. Compare it to the checksum shown in the link (2) in the download page screenshot above. If they match, you can extract the ZIP file to install the JDK.
3. Install OpenJDK 23 on Windows
tar -xf openjdk-23.0.1_windows-x64_bin.zip -C D:\OpenJDK
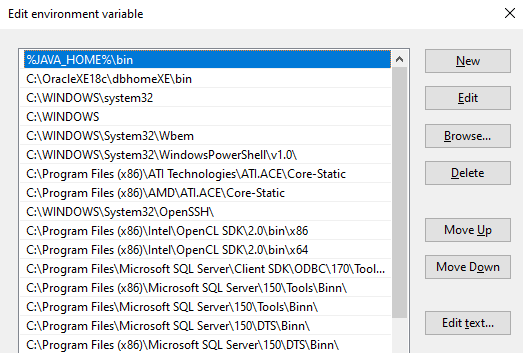
This command extracts the ZIP file into the OpenJDK directory on the D drive, so the JDK installation directory becomes D:\OpenJDK\jdk-23.0.1.Next, we need to configure a couple of system environment variables, such as JAVA_HOME and Path. To do this, click the Start button, type ‘environment variable’, and click the best match, Edit the system environment variables. In the System Properties dialog, click the Environment Variables button.In the Environment Variables dialog, click the New button under System variables list to create a new variable named JAVA_HOME, as shown below: Next, edit the Path environment variable and insert a new entry at the beginning of the list, as shown below:
 This configuration allows the JDK to be recognized by Java-based applications such as IDEs and servers. Click OK a few times to close the dialogs.For more details about setting environment variables for Java on Windows, check this guide.
4. Verify the OpenJDK 23 Setup on Windows
The final step is to perform some checks to ensure everything is configured properly. Open a new Command Prompt window and type java -version to check the version of the Java Virtual Machine (JVM). You should see the following output: This means you have successfully installed OpenJDK 23 on your Windows computer. If you don’t see this output, check the environment variables to ensure they point to the right path. You can also type javac -version to check the version of the Java compiler.Congratulations! You can now start your Java development journey.To see the setup of OpenJDK 23 on Windows in action, watch the following video:
 Related Articles:
- How to set JAVA_HOME in macOS and Linux permanently
- How to set JAVA_HOME environment variable on Windows 10
- What are JVM, JRE and JDK
- How to write, compile and run a hello world Java program for beginners
- Java Core Language Tutorials
About the Author:
 Nam Ha Minh is certified Java programmer (SCJP and SCWCD). He began programming with Java back in the days of Java 1.4 and has been passionate about it ever since. You can connect with him on Facebook and watch his Java videos on YouTube.
Comments