Download and Install Oracle JDK 23 on macOS
- Details
- Written by Nam Ha Minh
- Last Updated on 27 October 2024 | Print Email
1. Download Oracle JDK 23 Installer for macOS
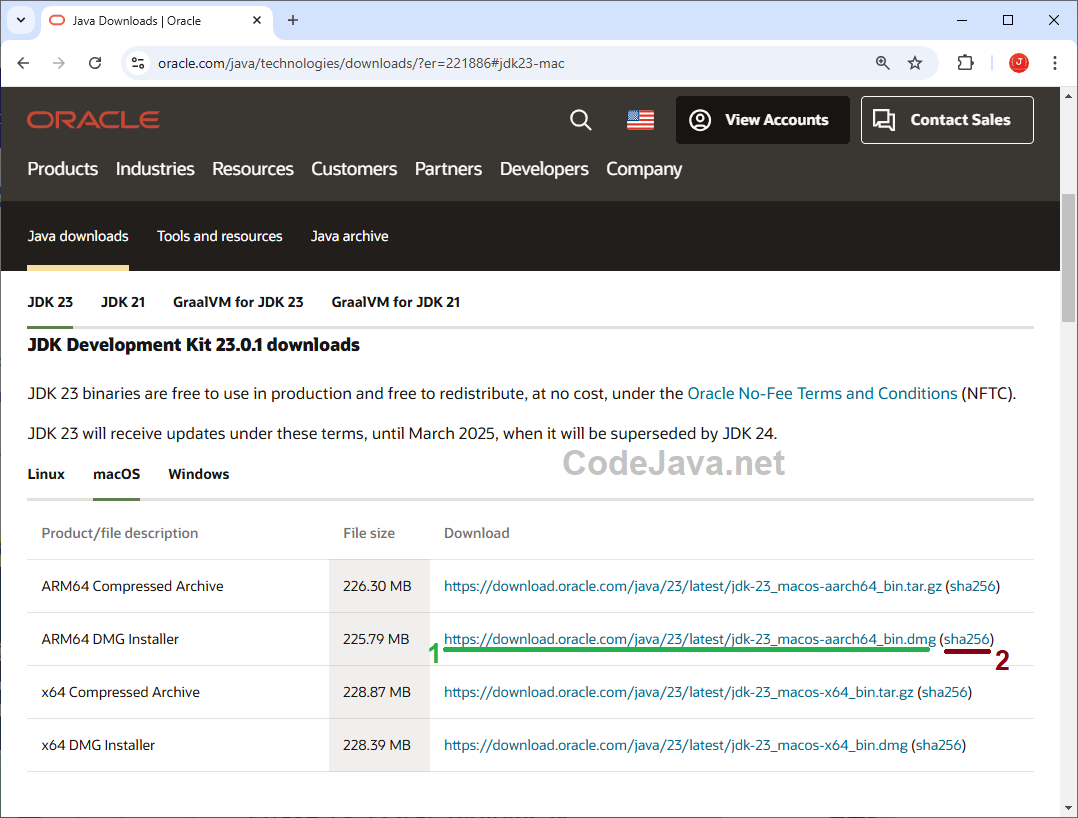
It is recommended to download the installer for Oracle JDK from a trusted source, such as Oracle’s official website. Click this link to visit the official Java Download pages, which will appear as follows: As you can see, Oracle JDK is distributed as both compressed archive files and DMG installers for macOS. For convenience, download the DMG installer, which can be one of the following:ARM64 DMG Installer: download this if your Mac runs on Apple CPU.x64 DMG installer: download this if your Mac is equipped with an Intel CPU.
2. Verify the Installer File
This step is optional but recommended to ensure that the downloaded file is original and has not been tampered with. As you know, it’s risky if the file has been modified for fraudulent purposes.To verify the installer file, you need to get its SHA256 checksum value. Open a new Terminal window, use the cdcommand to change the current directory to where the installer file is saved, such as the Downloads directory. For example:cd Downloads
Then type the following command:shasum -a 256 jdk-23_macos-aarch64_bin.dmg
This will print the SHA256 checksum of the file. Compare it to the one published on the Java Downloads page by clicking the link (2) in the above screenshot. If they match, you can run the installer safely. If not, check the Download page and download the file again.
3. Install Oracle JDK 23 on macOS
Double-click the DMG installer file to start the installation. It will extract to a package named JDK 23.pkg. Then, double-click this file to launch the setup program for Oracle JDK 23. The JDK 23 installer appears as follows on macOS: Click Continue twice to install JDK 23 with default settings. The default installation directory is /Library/Java/JavaVirtualMachines/jdk-23.0.1.jdk. You may need to enter your admin password to proceed. The installation is straightforward.
4. Verify the Oracle JDK 23 Installation on macOS
Thanks to the DMG installer, which automatically updates the environment variables, you don’t need to configure them manually. To verify the installation of Oracle JDK 23 on your Mac, open a new Terminal window and type the java -version command as below: If you see it prints java version “23”, congratulations! You have successfully installed JDK on your Mac computer with the Oracle distribution for Java version 23. You can now start creating, developing, building and running Java applications on macOS.NOTE: you can also type javac -version to check version of the Java compiler.Watch the following video to see the setup in action:
 Related Articles:
- How to set JAVA_HOME in macOS and Linux permanently
- How to set JAVA_HOME environment variable on Windows 10
- What are JVM, JRE and JDK
- How to write, compile and run a hello world Java program for beginners
- Java Core Language Tutorials
About the Author:
 Nam Ha Minh is certified Java programmer (SCJP and SCWCD). He began programming with Java back in the days of Java 1.4 and has been passionate about it ever since. You can connect with him on Facebook and watch his Java videos on YouTube.
Comments