Java Hibernate JPA Annotations Tutorial for Beginners
- Details
- Written by Nam Ha Minh
- Last Updated on 05 November 2023 | Print Email
- Java Development Kit (JDK 1.8 or above)
- MySQL, includes MySQL database server, MySQL Command Line Client, and MySQL Workbench tool (MySQL 5.5 or above)
- Eclipse IDE (Neon or later)
Here are the steps you will follow in this tutorial:1. Overview of JPA and Hibernate
3. Setup Java Maven Project in Eclipse
5. Create JPA Configuration File (persistence.xml)
6. Understand EntityManager and EntityManagerFactory
1. Overview of JPA and Hibernate
Let’s understand some fundamentals about JPA and Hibernate before writing code.Java Persistence API (JPA):
JPA is a Java API specification for relational data management in applications using Java SE and Java EE. JPA defines a standard way for simplifying database programming for developers, reduce development time and increase productivity.When using JPA, you have to import interfaces and classes from the package javax.persistence.Hibernate Framework:
Hibernate is a popular Object Relational Mapping (ORM) framework that aims at simplifying database programming for developers.Hibernate was developed before JPA. And after JPA becomes a standard, Hibernate restructures itself to become an implementation of JPA.The Hibernate framework consists of several components: Hibernate ORM, Hibernate Search, Hibernate Validator, Hibernate CGM and Hibernate Tools.In this tutorial, we use Hibernate ORM which is the core component of the Hibernate framework, for mapping Java model classes to tables in a relational database.2. Create MySQL Database
Use the following statement to create a database named usersdbusing MySQL Workbench or MySQL Command Line Client:create database usersdb;Then create a table name users with 4 columns: user_id, fullname, email and password, using the following script:
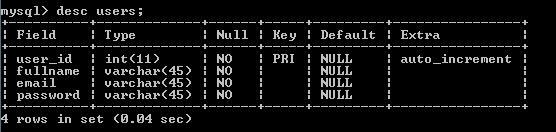
CREATE TABLE `users` (
  `user_id` int(11) NOT NULL AUTO_INCREMENT,
  `fullname` varchar(45) NOT NULL,
   `email` varchar(45) NOT NULL,
  `password` varchar(45) NOT NULL,
  PRIMARY KEY (`user_id`)
) ENGINE=InnoDB DEFAULT CHARSET=latin1
Using desc users command in MySQL Command Line Client, the structure of the table looks like this:
3. Setup Java Maven Project in Eclipse
In Eclipse IDE, click File > New > Project… and select Maven > Maven Project in the New Project dialog. Then click Next.In the next screen, check the option ‘Create a simple project (skip archetype selection)’, and then click Next.In the New Maven Project screen, enter the project’s information as follows:- Group Id: net.codejava.hibernate
- Artifact Id: HibernateJPABeginner
Leave other things as they are and click Finish. In the Project Explorer view, you see the project gets created with the following structure: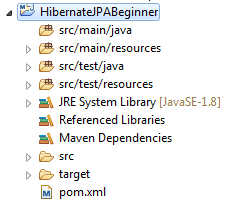
Configure Maven Dependencies:
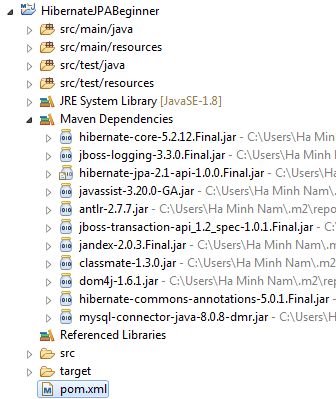
Next, we need to add dependencies in Maven’s Project Object Model (pom.xml) for Hibernate, JPA and MySQL Connector Java. Open the pom.xml file in XML mode and insert the following XML just before the </project> tag:<dependencies> <dependency> <groupId>org.hibernate</groupId> <artifactId>hibernate-core</artifactId> <version>5.2.12.Final</version> </dependency> <dependency> <groupId>mysql</groupId> <artifactId>mysql-connector-java</artifactId> <version>8.0.8-dmr</version> </dependency> </dependencies>You see, here we add two dependencies for the project: hibernate-core and mysql-connector-java. Maven automatically downloads the required JAR files which are shown under the Maven Dependencies node in the project:
4. Code Model Class
Next, let’s create a domain model class named User. Then we will use JPA annotations to map this table to the corresponding table in the database.Here’s the initial code of the User class:package net.codejava.hibernate;
/**
* User.java
* Copyright by CodeJava.net
*/
public class User {
private Integer id;
private String fullname;
private String email;
private String password;
public Integer getId() {
return id;
}
public void setId(Integer id) {
this.id = id;
}
public String getFullname() {
return fullname;
}
public void setFullname(String fullname) {
this.fullname = fullname;
}
public String getEmail() {
return email;
}
public void setEmail(String email) {
this.email = email;
}
public String getPassword() {
return password;
}
public void setPassword(String password) {
this.password = password;
}
}You see, this is just a POJO (Plain Old Java Object) class with some instance fields and its getter and setter methods. Now, let’s use some annotations provided by JPA to map this model class to the users table in the database. @EntityThis annotation indicates that the class is mapped to a database table. By default, the ORM framework understands that the class name is as same as the table name. The @Entity annotation must be placed before the class definition:@Entity
public class User {
…
} @TableThis annotation is used if the class name is different than the database table name, and it is must placed before the class definition. Since the class name is User and the table name is Users, we have to use this annotation:@Entity
@Table(name = "USERS")
public class User { @ColumnThis annotation is used to map an instance field of the class to a column in the database table, and it is must placed before the getter method of the field. By default, Hibernate can implicitly infer the mapping based on field name and field type of the class. But if the field name and the corresponding column name are different, we have to use this annotation explicitly. ThisIn our model class, the field name id is different than the column user_id, so we have to use the @Column annotation as follows:@Column(name = "USER_ID")
public Integer getId() {
return id;
}The other fields (fullname, email and password) have identical names as the corresponding columns in the table so we don’t have to annotate those fields. @IdThis annotation specifies that a field is mapped to a primary key column in the table. Since the column user_id is a primary key, we have to use this annotation as follows:@Column(name = "USER_ID")
@Id
public Integer getId() {
return id;
} @GeneratedValueIf the values of the primary column are auto-increment, we need to use this annotation to tell Hibernate knows, along with one of the following strategy types: AUTO, IDENTITY, SEQUENCE, and TABLE. In our case, we use the strategy IDENTITY which specifies that the generated values are unique at table level, whereas the strategy AUTO implies that the generated values are unique at database level.Therefore, the getter method of the field id is annotated as follows:@Column(name = "USER_ID")
@Id
@GeneratedValue(strategy = GenerationType.IDENTITY)
public Integer getId() {
return id;
} Finally, we have the model class User is annotated as follows:package net.codejava.hibernate;
import javax.persistence.*;
@Entity
@Table(name = "USERS")
public class User {
private Integer id;
private String fullname;
private String email;
private String password;
@Column(name = "USER_ID")
@Id
@GeneratedValue(strategy = GenerationType.IDENTITY)
public Integer getId() {
	return id;
}
// other setters and getters are not shown for brevity
} 
Java Servlet, JSP and Hibernate: Build eCommerce Website
Code Functional Bookshop Website with Java Servlet and Hibernate framework. Full-stack Development. Job-ready Skills.
5. Create JPA Configuration File (persistence.xml)
Next, we need to create an XML configuration file for JPA called persistence.xml, in order to tell Hibernate how to connect to the database. This file must be present in the classpath, under the META-INF folder.Under the src/main/resources folder, create a new folder named META-INF (Right-click, select New > Other… > Folder).Right click on the newly created folder META-INF, select New > Other… > XML > XML File. Enter the file name as persistence.xml. And paste the following XML code:<?xml version="1.0" encoding="UTF-8"?> <persistence version="2.1" xmlns="http://xmlns.jcp.org/xml/ns/persistence" xmlns:xsi="http://www.w3.org/2001/XMLSchema-instance" xsi:schemaLocation="http://xmlns.jcp.org/xml/ns/persistence http://xmlns.jcp.org/xml/ns/persistence/persistence_2_1.xsd"> <persistence-unit name="UsersDB"> <properties> <property name="javax.persistence.jdbc.url" value="jdbc:mysql://localhost:3306/usersdb" /> <property name="javax.persistence.jdbc.user" value="root" /> <property name="javax.persistence.jdbc.password" value="P@ssw0rd" /> <property name="javax.persistence.jdbc.driver" value="com.mysql.jdbc.Driver" /> <property name="hibernate.show_sql" value="true" /> <property name="hibernate.format_sql" value="true" /> </properties> </persistence-unit> </persistence>The root element <persistence> specifies the version of JPA to be used, and as you can see, we use JPA version 2.1.The element <persistence-unit> specifies a unit of persistence with a name. The name (UsersDB) will be looked up by Java code.Then we specify several properties for database connection information:
- javax.persistence.jdbc.url: specifies the JDBC URL points to the database.
- javax.persistence.jdbc.user: specifies the username of the account having privilege to access to the database.
- javax.persistence.jdbc.password: specifies the password of the user.
- javax.persistence.jdbc.driver: specifies the class name of the JDBC driver to be used. Here we use MySQL Connector Java so the name is com.mysql.jdbc.Driver.
- hibernate.show_sql: tells Hibernate to show SQL statements in standard output.
- hibernate.format_sql: tells Hibernate to format the SQL statements.
So you may need to change the values for url, user, and password accordingly.6. Understand EntityManager and EntityManagerFactory
Finally, we need to code a test program to check if everything we’ve done so far is correct or not. But let’s understand a couple of key interfaces in JPA first.EntityManager:
An EntityManager instance is associated with a persistence context, and it is used to interact with the database.A persistence context is a set of entity instances, which are actually the objects or instances of the model classes.So we use the EntityManager to manage entity instances and their life cycle, such as create entities, update entities, remove entities, find and query entities.EntityManagerFactory:
An EntityManagerFactory is used to create an EntityManager. And EntityManagerFactory is associated with a persistence unit. In Java SE environments, an EntityManagerFactory can be obtained from the Persistence class.And here are the typical steps to manage entity instances via JPA:- Create an EntityManagerFactory from a persistence unit
- Create an EntityManager from the EntityManagerFactory
- Begin a transaction
- Manage entity instances (create, update, remove, find, query, etc)
- Commit the transaction
- Close the EntityManager and EntityManagerFactory
Let’s see the code details below.7. Code a Test Program
Now, let’s write some code to create, update, find, query and remove User entity instances using JPA. Create a new Java class under src/main/java folder called UserDAOTest.java, with the main() method.Persist an entity instance:
In the main() method, add the following code to create an EntityManager and begin the transaction:EntityManagerFactory factory = Persistence.createEntityManagerFactory("UsersDB");
EntityManager entityManager = factory.createEntityManager();
entityManager.getTransaction().begin();And write the following code to saves a new User object to the database:User newUser = new User();
newUser.setEmail("billjoy@gmail.com");
newUser.setFullname("bill Joy");
newUser.setPassword("billi");
entityManager.persist(newUser);As you can see, we call the persist(Object) method of the EntityManager class to save the User object to the underlying database.And finally commit the transaction and close the EntityManager and EntityManagerFactory:entityManager.getTransaction().commit(); entityManager.close(); factory.close();So the complete program should look like this:
package net.codejava.hibernate;
import javax.persistence.EntityManager;
import javax.persistence.EntityManagerFactory;
import javax.persistence.Persistence;
/**
* UserDAOTest.java
* Copyright by CodeJava.net
*/
public class UserDAOTest {
public static void main(String[] args) {
EntityManagerFactory factory = Persistence.createEntityManagerFactory("UsersDB");
EntityManager entityManager = factory.createEntityManager();

entityManager.getTransaction().begin();
User newUser = new User();
newUser.setEmail("billjoy@gmail.com");
newUser.setFullname("bill Joy");
newUser.setPassword("billi");

entityManager.persist(newUser);
entityManager.getTransaction().commit();
entityManager.close();
factory.close();
}
}Run this program, and you should see the following output in the Console view: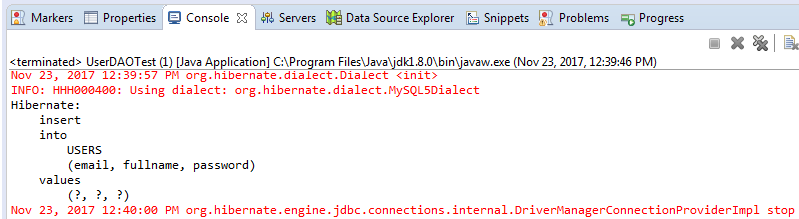 You see, Hibernate prints the SQL statement which is nicely formatted. That means the program has been executed successfully. You can check the result by typing the command “select * from users” in MySQL Command Line Client tool:
 You see, a new row created and you don’t have to write any SQL statement, right? That’s the power of using Hibernate/JPA for database programming.Let’s see how to perform other operations.
 Update an entity instance:
The following code snippet updates an entity instance which is already persisted in the database:User existingUser = new User();
existingUser.setId(1);
existingUser.setEmail("bill.joy@gmail.com");
existingUser.setFullname("Bill Joy");
existingUser.setPassword("billionaire");
entityManager.merge(existingUser);As you can see, we need to specify the ID of the object and use the merge(Object) method of the EntityManager class. Find an entity instance:
To find an entity from the database, we use the method find(Class<T> entityClass, Object primaryKey) of the EntityManager class. For example:Integer primaryKey = 1; User user = entityManager.find(User.class, primaryKey); System.out.println(user.getEmail()); System.out.println(user.getFullname()); System.out.println(user.getPassword());This code finds the user with ID = 1 in the database.
Execute a query:
The following code snippet shows you how to execute a query (JPQL):String sql = "SELECT u from User u where u.email = 'bill.joy@gmail.com'"; Query query = entityManager.createQuery(sql); User user = (User) query.getSingleResult(); System.out.println(user.getEmail()); System.out.println(user.getFullname()); System.out.println(user.getPassword());Note that the query looks similar to traditional SQL syntax but it is not. The difference is JPQL operates against entity instances (Java objects) rather than tables in database.
Remove an entity instance:
And the following code demonstrates how to delete an entity instance:Integer primaryKey = 1; User reference = entityManager.getReference(User.class, primaryKey); entityManager.remove(reference);As you can see, this code removes the User object with ID = 1 from the database, first by looking up a reference based on the class type (User.class) and primary key value (1), then remove the reference.That’s how to get started with Hibernate/JPA with Eclipse and MySQL. We hope this tutorial is helpful for you. Happy coding!I recommend you take this course to Learn Java Servlet, JSP, Hibernate framework to build an eCommerce Website (with PayPal and credit card payment).
References:
You can watch the video version of this tutorial here:Other Hibernate Tutorials:
- Hibernate Hello World Tutorial for Beginners with Eclipse and MySQL
- Hibernate One-to-One Association on Primary Key Annotations Example
- Hibernate One-to-Many Using Join Table XML Mapping Example
- Hibernate Many-to-Many Association with Extra Columns in Join Table Example
- Hibernate Enum Type Mapping Example
- Hibernate Binary Data and BLOB Mapping Example
- Java Hibernate Reverse Engineering Tutorial with Eclipse and MySQL
- Hibernate Basics - 3 ways to delete an entity from the datastore
- Hibernate Query Language (HQL) Example
About the Author:
 Nam Ha Minh is certified Java programmer (SCJP and SCWCD). He began programming with Java back in the days of Java 1.4 and has been passionate about it ever since. You can connect with him on Facebook and watch his Java videos on YouTube.
Comments
About this turorial, I changed some configuration:
1) the mysql-connector-java 8.0.30
2) hibernate core 5.6.5
3) User.class --> @Table(name = "users")
In the guide this is USERS, but the table is created with lower case.
entity can not be resolved to a type
I also tried and imported
import javax.persistence.Entity;
import javax.persistence.EntityManager;
but still error is same