How to Create Multi-Module Spring Boot Maven Project
- Details
- Written by Nam Ha Minh
- Last Updated on 19 September 2021 | Print Email
In this Spring Boot tutorial, you’ll learn how to develop a Spring Boot project that consists of multiple sub projects with Maven build. In other words, how to create a multi-module Maven project for developing a modularized Spring Boot application.
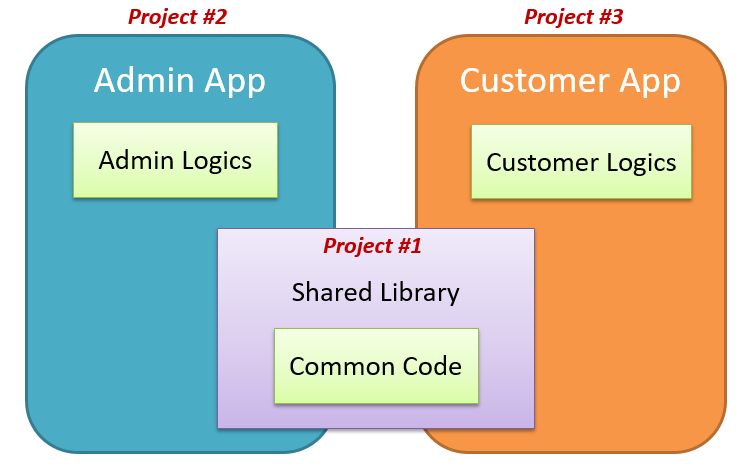
A typical scenario of a multi-module Spring Boot project is described in the following picture:

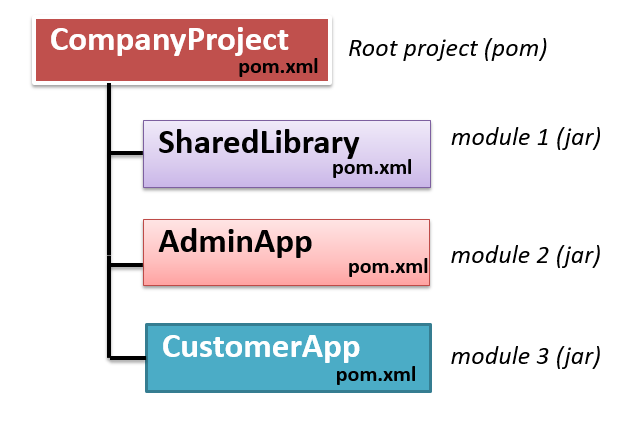
As you can see, there are two applications: Admin App (back end) and Customer App (front end) which are using some common code (shared library). So there would be 3 projects that correspond to 3 modules, as illustrated in the follow picture:

Here, CompanyProject is the root Maven project that contains modules. SharedLibrary project is the first module; AdminApp project is the second module; and CustomerApp is the third module.
Now, let’s see how to create this kind of project. You can use any IDE of your choice.
1. Create Root Maven Project
Create a simple Maven project named MyCompany with the pom.xml file looks like follows:
<project...>
  <modelVersion>4.0.0</modelVersion>
  <groupId>net.codejava</groupId>
  <artifactId>MyCompany</artifactId>
  <version>0.0.1-SNAPSHOT</version>

  <packaging>pom</packaging>

  <name>My Company</name>
  <description>Root Maven project</description>

  <modules>
  	<module>SharedLibrary</module>
  	<module>AdminApp</module>
  	<module>CustomerApp</module>
  </modules>
</project>
Note that the packaging type of the root project must be pom so it can contain modules. And you see, it declares to have 3 modules SharedLibrary, AdminApp and CustomerApp which correspond to 3 directories under the root project’s directory.
2. Create 1st Module for Shared Library Project
Next, create the first Maven module which is for the SharedLibrary project. The project directory must be SharedLibrary which is under MyCompany directory. And its pom.xml file would look like this:
<project ...>
	<modelVersion>4.0.0</modelVersion>

	<parent>
		<groupId>net.codejava</groupId>
		<artifactId>MyCompany</artifactId>
		<version>0.0.1-SNAPSHOT</version>
	</parent>

	<groupId>net.codejava.lib</groupId>
	<artifactId>SharedLibrary</artifactId>
	<name>Shared Library</name>
	<description>common code library</description>
	<packaging>jar</packaging>

</project>
You see, this project specifies its parent is the root Maven project:
<parent>
	<groupId>net.codejava</groupId>
	<artifactId>MyCompany</artifactId>
	<version>0.0.1-SNAPSHOT</version>
</parent>
This is a Java library project so its packaging type is jar. And code a simple Java class with the following code:
package net.codejava.lib;

public class CommonUtil {
	public static String getAppName() {
		return "My Company App version 1.0.1";
	}
}
This class will be used by both the Admin app and Customer app. If the SharedLibrary project must be a Spring Boot project (e.g. for common entity classes based on Spring Data JPA), you can change the parent of the project in the pom.xml file as follows:
<project ...>
	<modelVersion>4.0.0</modelVersion>

	<parent>
		<groupId>org.springframework.boot</groupId>
		<artifactId>spring-boot-starter-parent</artifactId>
		<version>2.4.3</version>
		<relativePath /> <!-- lookup parent from repository -->
	</parent>

	<groupId>net.codejava.lib</groupId>
	<artifactId>SharedLibrary</artifactId>
	<name>Shared Library</name>
	<description>common code library</description>
	<packaging>jar</packaging>

	<dependencies>
		<dependency>
			<groupId>org.springframework.boot</groupId>
			<artifactId>spring-boot-starter-data-jpa</artifactId>
		</dependency>
	</dependencies>

</project>
You know, it is not required for a Maven module to declare its Maven parent project, as long as it is under the right directory under the root project.
3. Create 2nd Module for Admin App Project
Next, create a new Maven project as the 2nd module in the MyCompany project. This module is for the Admin App project. It is a Spring Boot web application with Thymeleaf template engine, hence its pom.xml would look like this:
<project ...>
	<modelVersion>4.0.0</modelVersion>
	<parent>
		<groupId>org.springframework.boot</groupId>
		<artifactId>spring-boot-starter-parent</artifactId>
		<version>2.4.3</version>
		<relativePath /> <!-- lookup parent from repository -->
	</parent>

	<groupId>net.codejava.admin</groupId>
	<artifactId>AdminApp</artifactId>
	<version>0.0.1-SNAPSHOT</version>
	<name>AdminApp</name>
	<description>Admin application</description>

	<properties>
		<java.version>1.8</java.version>
	</properties>

	<dependencies>
		<dependency>
			<groupId>org.springframework.boot</groupId>
			<artifactId>spring-boot-starter-thymeleaf</artifactId>
		</dependency>
		<dependency>
			<groupId>org.springframework.boot</groupId>
			<artifactId>spring-boot-starter-web</artifactId>
		</dependency>
		<dependency>
			<groupId>net.codejava.lib</groupId>
			<artifactId>SharedLibrary</artifactId>
			<version>0.0.1-SNAPSHOT</version>
		</dependency>

	</dependencies>

	<build>
		<plugins>
			<plugin>
				<groupId>org.springframework.boot</groupId>
				<artifactId>spring-boot-maven-plugin</artifactId>
			</plugin>
		</plugins>
	</build>

</project>
You see, this project declares its parent is spring-boot-starter-parent and it is also a module of the MyCompany project. It requires the SharedLibrary project, hence this dependency declaration:
<dependency>
	<groupId>net.codejava.lib</groupId>
	<artifactId>SharedLibrary</artifactId>
	<version>0.0.1-SNAPSHOT</version>
</dependency>
It is a simple Spring MVC web application, so code a controller class as follows:
package net.codejava.admin;

import org.springframework.stereotype.Controller;
import org.springframework.ui.Model;
import org.springframework.web.bind.annotation.GetMapping;

import net.codejava.lib.CommonUtil;

@Controller
public class MainController {

	@GetMapping("")
	public String viewHomePage(Model model) {
		String appName = CommonUtil.getAppName();

		model.addAttribute("appName", appName);

		return "index";
	}
}
You see, the handler method viewHomePage() uses the CommonUtil class from the SharedLibrary project. And code of the index.html file is as simple as follows:
<!DOCTYPE html>
<html>
<head>
<meta charset="ISO-8859-1">
<title>Admin Home Page</title>
</head>
<body>
	<h1>[[${appName}]]</h1>
</body>
</html>
This page displays the value of model attribute appName which is set in the controller, just for demo purpose.
4. Create 3rd Module for Customer App Project
Similarly, create the third Maven module for the Customer App project, which is also a web application based on Spring Boot. Its pom.xml file is as follows:
<project ...>
	<modelVersion>4.0.0</modelVersion>

	<parent>
		<groupId>org.springframework.boot</groupId>
		<artifactId>spring-boot-starter-parent</artifactId>
		<version>2.4.3</version>
		<relativePath /> <!-- lookup parent from repository -->
	</parent>

	<groupId>net.codejava.customer</groupId>
	<artifactId>CustomerApp</artifactId>
	<version>0.0.1-SNAPSHOT</version>
	<name>CustomerApp</name>
	<description>Customer application</description>

	<properties>
		<java.version>1.8</java.version>
	</properties>

	<dependencies>
		<dependency>
			<groupId>org.springframework.boot</groupId>
			<artifactId>spring-boot-starter-thymeleaf</artifactId>
		</dependency>
		<dependency>
			<groupId>org.springframework.boot</groupId>
			<artifactId>spring-boot-starter-web</artifactId>
		</dependency>

		<dependency>
			<groupId>net.codejava.lib</groupId>
			<artifactId>SharedLibrary</artifactId>
			<version>0.0.1-SNAPSHOT</version>
		</dependency>
	</dependencies>

	<build>
		<plugins>
			<plugin>
				<groupId>org.springframework.boot</groupId>
				<artifactId>spring-boot-maven-plugin</artifactId>
			</plugin>
		</plugins>
	</build>

</project>
Code of the main controller class:
package net.codejava.customer;

import org.springframework.stereotype.Controller;
import org.springframework.ui.Model;
import org.springframework.web.bind.annotation.GetMapping;

import net.codejava.lib.CommonUtil;

@Controller
public class MainController {

	@GetMapping("")
	public String viewHomePage(Model model) {
		String appName = CommonUtil.getAppName();

		model.addAttribute("appName", appName);

		return "index";
	}
}
Code of the index.html file:
<!DOCTYPE html>
<html>
<head>
<meta charset="ISO-8859-1">
<title>Customer Home Page</title>
</head>
<body>
	<h1>Customer Application</h1>
	<h1>[[${appName}]]</h1>
</body>
</html>
This is also a simple Spring-based web application for demo purpose about multi-module Spring Boot project with Maven.
5. Build the Whole Multi-Module Spring Boot Maven Project
To build the whole multi-module Spring Boot Maven project, run mvn install from the root project, and you should see the Reactor Summary like this:

You should see 3 JAR files generated for the SharedLibrary, AdminApp and CustomerApp projects, under the target directory of each module.
That’s how to create and build a Maven project that consists of multiple modules, which each module can be a Spring Boot project.
To see the coding in action, kindly watch the following video:
Related Tutorials:
- Create Multi-Module Maven Project in Eclipse IDE
- Create Multi-Module Maven Project in Apache NetBeans IDE
- How to Create a Multi-Module Maven Project in IntelliJ IDEA
Other Spring Boot Tutorials:
- How to create a Spring Boot Web Application (Spring MVC with JSP/ThymeLeaf)
- Spring Boot CRUD Example with Spring MVC – Spring Data JPA – ThymeLeaf - Hibernate - MySQL
- Spring Boot Registration and Login with MySQL Database Tutorial
- Spring Boot Hello World RESTful Web Services Tutorial
- Spring Boot Thymeleaf Form Handling Tutorial
- Spring Data JPA Paging and Sorting Examples
- Spring Boot Error Handling Guide
- Spring Boot Logging Basics
- Complete Spring Security Tutorials
- Complete Spring Boot Tutorials
About the Author:
 Nam Ha Minh is certified Java programmer (SCJP and SCWCD). He began programming with Java back in the days of Java 1.4 and has been passionate about it ever since. You can connect with him on Facebook and watch his Java videos on YouTube.
Comments