How to create Java web project with Maven in Eclipse
- Details
- Written by Nam Ha Minh
- Last Updated on 07 August 2019 | Print Email
 I tested all of those archetypes but none can generate a properly configured basic Java web project. So here’s the proper way to create a Java web project in Eclipse with Maven support:First, you create a new project as usual, click File > New > Dynamic Web Project:
 Then follow the wizards to create a Java dynamic web project normally. The newly created project would look like this:
 Now, right click on the project name and click Configure > Convert to Maven Project:
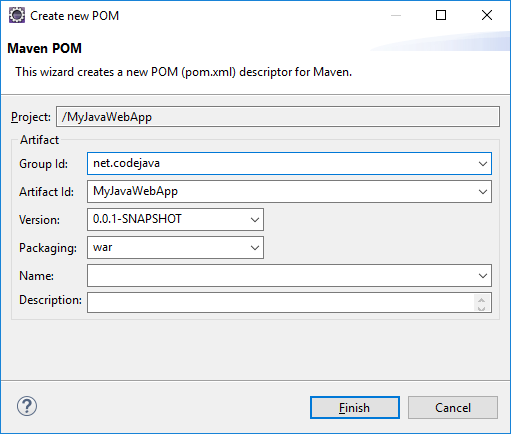
 Then in the Create new POM dialog, enter essential information for a Maven project like Group Id, artifact Id, version, name and description:
 Note that the Packaging type is war by default because this is a Java web project which will be packaged into a WAR file to deploy.Then click Finish. You will the project’s icon is updated with “M” letter – indicating it is a Maven project:
 You also see the pom.xml file is generated in the project’s root directory. It is the Project Object Model configuration file used by Maven.Now edit the pom.xml file to specify the dependency for Java Servlet API:
<dependencies>
		<dependency>
			<groupId>javax.servlet</groupId>
			<artifactId>javax.servlet-api</artifactId>
			<version>3.0.1</version>
			<scope>provided</scope>
		</dependency>
</dependencies>
This dependency is needed to write code that uses Servlet API, e.g. servlet classes. The whole content of the pom.xml file would look like this:
<project xmlns="http://maven.apache.org/POM/4.0.0"
	xmlns:xsi="http://www.w3.org/2001/XMLSchema-instance"
	xsi:schemaLocation="http://maven.apache.org/POM/4.0.0
		http://maven.apache.org/xsd/maven-4.0.0.xsd">
	<modelVersion>4.0.0</modelVersion>
	<groupId>net.codejava</groupId>
	<artifactId>MyJavaWebApp</artifactId>
	<version>0.0.1-SNAPSHOT</version>
	<packaging>war</packaging>
	<build>
		<sourceDirectory>src</sourceDirectory>
		<plugins>
			<plugin>
				<artifactId>maven-compiler-plugin</artifactId>
				<version>3.8.0</version>
				<configuration>
					<source>1.8</source>
					<target>1.8</target>
				</configuration>
			</plugin>
			<plugin>
				<artifactId>maven-war-plugin</artifactId>
				<version>3.2.1</version>
				<configuration>
					<warSourceDirectory>WebContent</warSourceDirectory>
				</configuration>
			</plugin>
		</plugins>
	</build>
	<dependencies>
		<dependency>
			<groupId>javax.servlet</groupId>
			<artifactId>javax.servlet-api</artifactId>
			<version>3.0.1</version>
			<scope>provided</scope>
		</dependency>
	</dependencies>
</project>
Now you have a Java dynamic web project with Maven support. Happy coding!You can watch the video:
Other Eclipse Tutorials:
- How to use Eclipse IDE for Java EE Developers
- How to import existing projects into Eclipse workspace
- How to create, build and run a Java Hello World program with Eclipse
- How to create, deploy and run Java Servlet in Eclipse
- How to generate JAR file in Eclipse
- How to create WAR file for Java web application in Eclipse
- How to create Ant build file for existing Java project in Eclipse
- How to generate Javadoc in Eclipse
- How to create Java web project with Maven in Eclipse
- 25 Eclipse Shortcut Keys for Code Editing
- How to Add Copyright License Header for Java Source Files in Eclipse
- How to monitor HTTP requests and responses using TCP/IP Monitor in Eclipse
About the Author:
 Nam Ha Minh is certified Java programmer (SCJP and SCWCD). He began programming with Java back in the days of Java 1.4 and has been passionate about it ever since. You can connect with him on Facebook and watch his Java videos on YouTube.
Comments