How to handle HTML form data with Java Servlet
- Details
- Written by Nam Ha Minh
- Last Updated on 30 November 2023 | Print Email
In this Java servlet tutorial, I will guide you how to read values of common input fields from HTML form on the server side with Java Servlet.
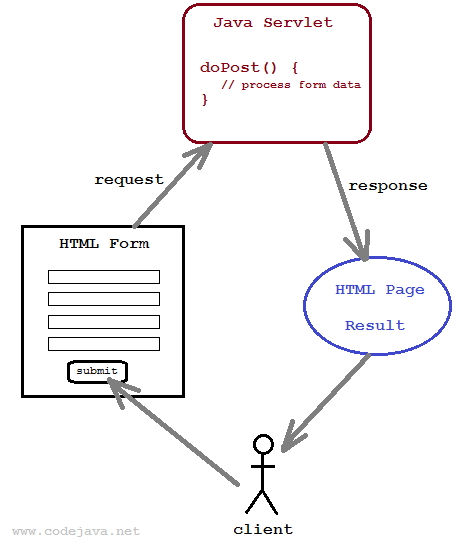
You know, handling form data represented in HTML page is a very common task in web development. A typical scenario is the user fills in fields of a form and submits it. The server will process the request based on the submitted data, and send response back to the client. The following picture depicts that workflow with Java servlet on the server side:

To create a form in HTML we need to use the following tags:
- <form>: to create a form to add fields in its body.
- <input>, <select>, <textarea>…: to create form fields like text boxes, dropdown list, text area, check boxes, radio buttons,… and submit button.
To make the form works with Java servlet, we need to specify the following attributes for the <form> tag:
- method=”post”: to send the form data as an HTTP POST request to the server. Generally, form submission should be done in HTTP POST method.
- action=”URL of the servlet”: specifies relative URL of the servlet which is responsible for handling data posted from this form.
For example, following is HTML code of a login form:
<form name="loginForm" method="post" action="loginServlet">
	Username: <input type="text" name="username"/> <br/>
	Password: <input type="password" name="password"/> <br/>
	<input type="submit" value="Login" />
</form>
This form would look like this in browser:

On the server side, we need to create a Java servlet which is mapped to the URL: loginServlet, as specified in the form’s action attribute. Following is code of the servlet:
@WebServlet("/loginServlet")
public class LoginServlet extends HttpServlet {

	protected void doPost(HttpServletRequest request,
			HttpServletResponse response) throws ServletException, IOException {

		// code to process the form...

	}

}
Notice that the servlet’s URL is specified by the @WebServlet annotation before the servlet class. When the user submits the login form above, the servlet’s doPost() method will be invoked by the servlet container. Typically we will do the following tasks inside doPost() method:
- Read values of the fields posted from the form via the request object (implementation of javax.servlet.http.HttpServletRequest interface).
- Do some processing, e.g. connecting to database to validate the username and password.
- Return response back to the user via the respone object (implementation of javax.servlet.http.HttpServletResponse interface).
To read values of form’s fields, the HttpServletRequest interface provides the following methods:
- String getParameter(String name): gets value of a field which is specified by the given name, as a String. The method returns null if there is no form field exists with the given name.
- String[] getParameterValues(String name): gets values of a group of fields which have same name, in an array of String objects. The method returns null if there is no field exists with the given name.
Note that the above methods can also deal with parameters in URL’s query string, hence the name getParameter.
For example, we can write the following code in the doPost() method to read values of form’s fields:
String username = request.getParameter("username");
String password = request.getParameter("password");
To send response back to the client, we need to obtain a writer from the response object by calling the method getWriter() of the HttpServletResponse interface:
PrintWriter writer = response.getWriter();
Then use the print() or println() method to deliver the response (in form of HTML code). For example:
String htmlRespone = "<html>";
htmlRespone += "<h2>Your username is: " + username + "</h2>";
htmlRespone += "</html>";

writer.println(htmlRespone);
Here’s complete code of the servlet class to process the login form:
package net.codejava.servlet;

import java.io.IOException;
import java.io.PrintWriter;

import javax.servlet.ServletException;
import javax.servlet.annotation.WebServlet;
import javax.servlet.http.HttpServlet;
import javax.servlet.http.HttpServletRequest;
import javax.servlet.http.HttpServletResponse;

@WebServlet("/loginServlet")
public class LoginServlet extends HttpServlet {

	protected void doPost(HttpServletRequest request,
			HttpServletResponse response) throws ServletException, IOException {

		// read form fields
		String username = request.getParameter("username");
		String password = request.getParameter("password");

		System.out.println("username: " + username);
		System.out.println("password: " + password);

		// do some processing here...

		// get response writer
		PrintWriter writer = response.getWriter();

		// build HTML code
		String htmlRespone = "<html>";
		htmlRespone += "<h2>Your username is: " + username + "<br/>";
		htmlRespone += "Your password is: " + password + "</h2>";
		htmlRespone += "</html>";

		// return response
		writer.println(htmlRespone);

	}

}
Here’s an example output when submitting the above login form in browser:

So far you have got the ins and outs when handling HTML form data with Java servlet. For your reference, we provide a list of examples for handling common HTML form fields as below. Note that we use the System.out.println() statement in servlet to demo the output.
1. Read values of text field and password field
- HTML code:
Username: <input type="text" name="username"/>
Password: <input type="password" name="password"/>
- Field image:

- Java code in servlet:
String username = request.getParameter("username"); String password = request.getParameter("password"); System.out.println("username is: " + username); System.out.println("password is: " + password); - Output:
username is: admin
password is: nimda
2. Read value of checkbox field
- HTML code:
Speaking language:
<input type="checkbox" name="language" value="english" />English
<input type="checkbox" name="language" value="french" />French
- Field image:

- Java code in servlet:
String languages[] = request.getParameterValues("language"); if (languages != null) { System.out.println("Languages are: "); for (String lang : languages) { System.out.println("\t" + lang); } } - Output:
Languages are:
	english
	french
Java Servlet, JSP and Hibernate: Build eCommerce Website
Code Functional Bookshop Website with Java Servlet and Hibernate framework. Full-stack Development. Job-ready Skills.
3. Read value of radio button field
- HTML code:
Gender:
<input type="radio" name="gender" value="male" />Male
<input type="radio" name="gender" value="female" />Female
- Field image:

- Java code in servlet:
String gender = request.getParameter("gender"); System.out.println("Gender is: " + gender); - Output:
Gender is: male
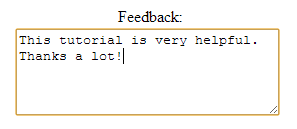
4. Read value of text area field
- HTML code:
Feedback:<br/>
<textarea rows="5" cols="30" name="feedback"></textarea>
- Field image:

- Java code in servlet:
String feedback = request.getParameter("feedback"); System.out.println("Feed back is: " + feedback); - Output:
Feed back is: This tutorial is very helpful. Thanks a lot!
5. Read value of dropdown list (combobox) field
- HTML code:
Job Category:
<select name="jobCat">
	<option value="tech">Technology</option>
	<option value="admin">Administration</option>
	<option value="biology">Biology</option>
	<option value="science">Science</option>
</select>
- Field image:

- Java code in servlet:
String jobCategory = request.getParameter("jobCat"); System.out.println("Job category is: " + jobCategory); - Output:
Job category is: science
6. Read data of file upload field
To create a form to upload file, we need to specify the enctypeattribute for the <form> tag as follow:
<form method="post" action="uploadServlet" enctype="multipart/form-data">

		Select file to upload: <input type="file" name="uploadFile" />

		<input type="submit" value="Upload" />
</form>
For handling file upload on the server side with Java servlet, we recommend these tutorials:
For the examples in this tutorial, you can download Eclipse-based project as well as deployable WAR file under the attachments section.
Other Java Servlet Tutorials:
- Java Servlet Quick Start for beginners (XML)
- How to Create and Run Java Servlet for Beginners (Annotation)
- Java Servlet and JSP Hello World Tutorial with Eclipse, Maven and Apache Tomcat
- Java File Download Servlet Example
- Upload file to servlet without using HTML form
- How to use Cookies in Java web application
- How to use Session in Java web application
About the Author:
 Nam Ha Minh is certified Java programmer (SCJP and SCWCD). He began programming with Java back in the days of Java 1.4 and has been passionate about it ever since. You can connect with him on Facebook and watch his Java videos on YouTube.