Spring Boot OAuth2 Login with Google Example
- Details
- Written by Nam Ha Minh
- Last Updated on 30 November 2022 | Print Email
Through this Spring Boot tutorial, you will learn how to implement single sign on functionality with Google accounts for an existing Spring Boot web application, using Spring OAuth2 Client library – allowing the end users to login using their own Google accounts instead of application-managed credentials.
Suppose that you have an existing Spring Boot project with authentication functionality already implemented using Spring Security and the user information is stored in MySQL database (If not, download the sample project in this tutorial).
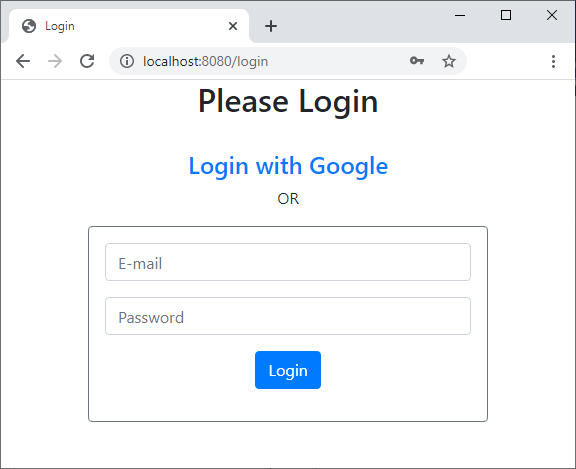
Then we will update the login page that lets the users login using their own Google accounts like this:

1. Create Google OAuth Credentials
Firstly, follow this video to create Google OAuth Client ID in order to get the access keys of Google single sign on API (Client ID and Client Secret). Note that you need to add an authorized redirect URI like this:
http://localhost:8080/login/oauth2/code/google
In case your application is hosted with its own context path, e.g. /Shopme - then specify the redirect URI like this:
http://localhost:8080/Shopme/login/oauth2/code/google
2. Declare Dependency for Spring Boot OAuth2 Client
Besides Spring Security dependency, you need to add a new dependency into the Maven project file in order to use Spring Boot OAuth2 Client API that greatly simplifies single sign on integration for Spring Boot applications.
So declare the following dependency:
<dependency>
	<groupId>org.springframework.boot</groupId>
	<artifactId>spring-boot-starter-oauth2-client</artifactId>
</dependency>
3. Configure Spring OAuth2 Properties for Google
Next, open the Spring Boot configuration file (application.yml), and specify the properties for OAuth2 Client registration for the provider named google, as follows:
spring:
  security:
    oauth2:
      client:
        registration:
         google:
          clientId: YOUR_GOOGLE_CLIENT_ID
          clientSecret: YOUR_GOOGLE_CLIENT_SECRET
          scope:
           - email
           - profile
Remember to specify the values for clientId and clientSecret which you got in the previous step (create Google OAuth Client ID).
4. Update User Entity Class and Users table
When a user logins using his own Google account, the application will store the user’s information (email and authentication provider) in the database – so we need to update the User entity class – adding a new field along with getter and setter as follows:
package net.codejava;

import javax.persistence.EnumType;
import javax.persistence.Enumerated;

@Entity
@Table(name = "users")
public class User {

	...

	@Enumerated(EnumType.STRING)
	private Provider provider;

	public Provider getProvider() {
		return provider;
	}

	public void setProvider(Provider provider) {
		this.provider = provider;
	}

	...
}
Provider is an enum type, which is as simple as follows:
package net.codejava;

public enum Provider {
	LOCAL, GOOGLE
}
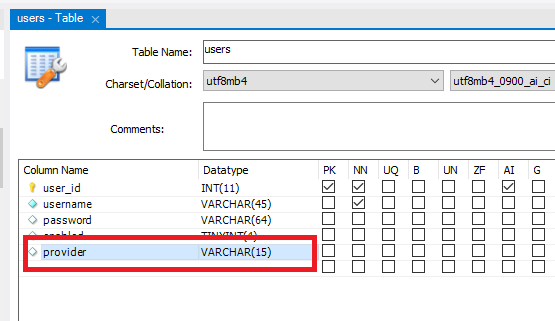
Then in the database, we have a new column provider with datatype is varchar like this:

The possible values for this column are LOCAL and GOOGLE (enum constants).
5. Update Login Page
Next, add the Login with Google hyperlink to your custom login page with the following URL:
<a th:href="/@{/oauth2/authorization/google}">Login with Google</a>Then the login page looks like this:

For your reference, below is code of the login page:
<div>
	<h2>Please Login</h2>
	<br/>
</div>
<div>
	<h4><a th:href="/@{/oauth2/authorization/google}">Login with Google</a></h4>
</div>
<div><p>OR</p></div>

<form th:action="@{/login}" method="post" style="max-width: 400px; margin: 0 auto;">
<div class="border border-secondary rounded p-3">
	<div th:if="${param.error}">
		<p class="text-danger">Invalid username or password.</p>
	</div>
	<div th:if="${param.logout}">
		<p class="text-warning">You have been logged out.</p>
	</div>
	<div>
		<p><input type="email" name="email" required class="form-control" placeholder="E-mail" /></p>
	</div>
	<div>
		<p><input type="password" name="pass" required class="form-control" placeholder="Password" /></p>
	</div>
	<div>
		<p><input type="submit" value="Login" class="btn btn-primary" /></p>
	</div>
</div>
</form>
6. Code Custom OAuth User and OAuth User Service Classes
Next, we need to code a class that implements the OAuth2User interface defined by Spring OAuth2, as follows:
package net.codejava;

import java.util.Collection;
import java.util.Map;

import org.springframework.security.core.GrantedAuthority;
import org.springframework.security.oauth2.core.user.OAuth2User;

public class CustomOAuth2User implements OAuth2User {

	private OAuth2User oauth2User;

	public CustomOAuth2User(OAuth2User oauth2User) {
		this.oauth2User = oauth2User;
	}

	@Override
	public Map<String, Object> getAttributes() {
		return oauth2User.getAttributes();
	}

	@Override
	public Collection<? extends GrantedAuthority> getAuthorities() {
		return oauth2User.getAuthorities();
	}

	@Override
	public String getName() {
		return oauth2User.getAttribute("name");
	}

	public String getEmail() {
		return oauth2User.<String>getAttribute("email");
	}
}
Here, this class wraps an instance of OAuth2User class, which will be passed by Spring OAuth upon successful OAuth authentication. And note that we override the getName() and code the getEmail() methods to return username and email, respectively.
And create a subclass of DefaultOAuth2UserService as follows:
package net.codejava;

import org.springframework.security.oauth2.client.userinfo.DefaultOAuth2UserService;
import org.springframework.security.oauth2.client.userinfo.OAuth2UserRequest;
import org.springframework.security.oauth2.core.OAuth2AuthenticationException;
import org.springframework.security.oauth2.core.user.OAuth2User;
import org.springframework.stereotype.Service;

@Service
public class CustomOAuth2UserService extends DefaultOAuth2UserService  {

	@Override
	public OAuth2User loadUser(OAuth2UserRequest userRequest) throws OAuth2AuthenticationException {
		OAuth2User user =  super.loadUser(userRequest);
		return new CustomOAuth2User(user);
	}

}
Here, we override the loadUser() method which will be called by Spring OAuth2 upon successful authentication, and it returns a new CustomOAuth2User object.
7. Configure Spring Security for OAuth2 Authentication
Next, we need to update our Spring Security configuration class for enabling OAuth authentication in conjunction with normal form login. So update the configure(HttpSecurity) method as follows:
package net.codejava;

@Configuration
@EnableWebSecurity
public class WebSecurityConfig extends WebSecurityConfigurerAdapter {

	...

	@Override
	protected void configure(HttpSecurity http) throws Exception {
		http.authorizeRequests()
			.antMatchers("/", "/login", "/oauth/**").permitAll()
			.anyRequest().authenticated()
			.and()
			.formLogin().permitAll()
			.and()
			.oauth2Login()
				.loginPage("/login")
				.userInfoEndpoint()
					.userService(oauthUserService);
	}

	@Autowired
	private CustomOAuth2UserService oauthUserService;


}
Note that it is required to allow public access to /oauth/** URL so it will be accessible to Google API upon redirection:
.antMatchers("/oauth/**").permitAll()That’s enough for the basic OAuth2 configuration with Spring Boot. You can now test login using Google, but let’s go further – read the sections below.
8. Implement Authentication Success Handler
Because we need to process some logics after successful login using Google, e.g. updating user information in the database – so add the following code to configure an authentication success handler:
http.oauth2Login()
	.loginPage("/login")
	.userInfoEndpoint()
		.userService(oauthUserService)
	.and()
	.successHandler(new AuthenticationSuccessHandler() {

		@Override
		public void onAuthenticationSuccess(HttpServletRequest request, HttpServletResponse response,
				Authentication authentication) throws IOException, ServletException {

			CustomOAuth2User oauthUser = (CustomOAuth2User) authentication.getPrincipal();

			userService.processOAuthPostLogin(oauthUser.getEmail());

			response.sendRedirect("/list");
		}
	})
The onAuthenticationSuccess() method will be called by Spring OAuth2 upon successful login using Google, so here we can perform our custom logics – by using the UserService class – which is described in the next section.
9. Register New User Upon Successful OAuth Authentication
We implement the processOAuthPostLogin() method in the UserService class as follows:
package net.codejava;

import org.springframework.beans.factory.annotation.Autowired;
import org.springframework.stereotype.Service;

@Service
public class UserService {

	@Autowired
	private UserRepository repo;

	public void processOAuthPostLogin(String username) {
		User existUser = repo.getUserByUsername(username);

		if (existUser == null) {
			User newUser = new User();
			newUser.setUsername(username);
			newUser.setProvider(Provider.GOOGLE);
			newUser.setEnabled(true);

			repo.save(newUser);
		}

	}

}
Here, we check if no users found in the database with the given email (which is retrieved after successful login with Google), then we persist a new User object with the provider name is GOOGLE. You can also write additional code for updating user’s details in case the user exists in the database.
For your reference, below is code of the UserRepository class:
package net.codejava;

import org.springframework.data.jpa.repository.Query;
import org.springframework.data.repository.CrudRepository;
import org.springframework.data.repository.query.Param;

public interface UserRepository extends CrudRepository<User, Long> {

	@Query("SELECT u FROM User u WHERE u.username = :username")
	public User getUserByUsername(@Param("username") String username);
}
10. Test Login using Google Account
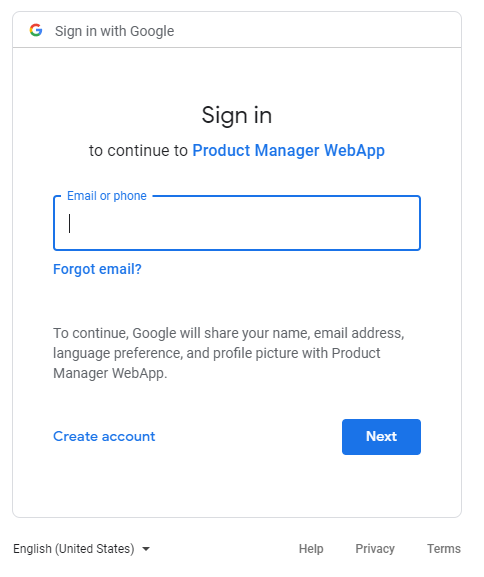
Download the sample project under the Attachments section below. Run the ProductManagerApplication and access the application at http://localhost:8080 URL. Click View all products and the login page appears. Click Login with Google, and you will be presented the Sign in with Google form, something like this:

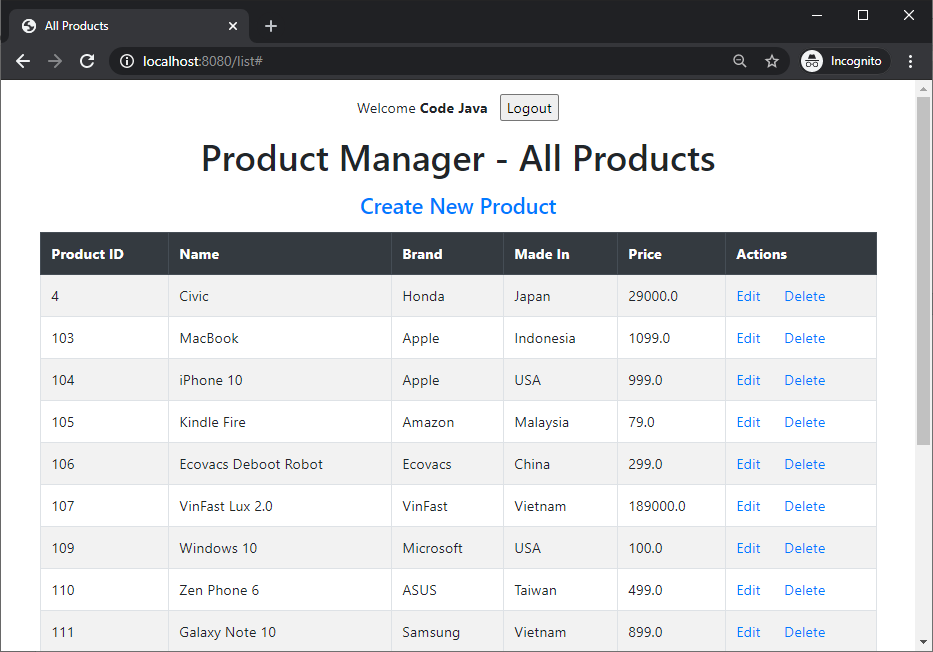
Enter email and password of your Google account, then you’ll be redirected to the product listing page:

If you see this page, congratulations! You have successfully implemented Google login in a Spring Boot application with Spring OAuth2 client API. Note that your Google account name is displayed in the welcome message, and check the users table to see a new row got inserted.
I also recommend you to watch the following video to see the steps in action:
GitHub Repo: https://github.com/codejava-official/spring-oauth2-google
Related Spring OAuth2 Tutorials:
- Spring Boot Social Login with Facebook Example
- Spring Boot OAuth2 Login with GitHub Example
- Spring Boot OAuth2 Social Login with Google and Facebook Examples
Related Spring Security Tutorials:
- Spring Security Forgot Password Tutorial
- Spring Security Limit Login Attempts Example
- Spring Security OTP Email Tutorial
- Spring Security Authentication with JPA, Hibernate and MySQL
- Spring Security Role-based Authorization Tutorial
- Spring Security Customize Login and Logout
- How to Get Logged-in User's Details with Spring Security
- Spring Security: Prevent User from Going Back to Login Page if Already logged in
- Spring Security Authentication Success Handler Examples
- Spring Security Authentication Failure Handler Examples
- Spring Security Logout Success Handler Example
- Spring Security Before Authentication Filter Examples
Other Spring Boot Tutorials:
- How to create a Spring Boot Web Application (Spring MVC with JSP/ThymeLeaf)
- Spring Boot CRUD Example with Spring MVC – Spring Data JPA – ThymeLeaf - Hibernate - MySQL
- Spring Boot Hello World RESTful Web Services Tutorial
- Spring Boot Thymeleaf Form Handling Tutorial
- Spring Data JPA Paging and Sorting Examples
- Spring Boot Error Handling Guide
- Spring Boot Logging Basics
About the Author:
 Nam Ha Minh is certified Java programmer (SCJP and SCWCD). He began programming with Java back in the days of Java 1.4 and has been passionate about it ever since. You can connect with him on Facebook and watch his Java videos on YouTube.
Comments
просто читайте перед тем как созавать
extends WebSecurityConfigurerAdapter