How to run Eclipse under different version of JDK or JRE
- Details
- Written by Nam Ha Minh
- Last Updated on 04 October 2019 | Print Email
In this article, I will guide you how to change JDK/JRE that runs Eclipse IDE, on Windows operating system. First, you need to know exactly which version of Java on which Eclipse is running.
1. Find the JDK / JRE that runs Eclipse
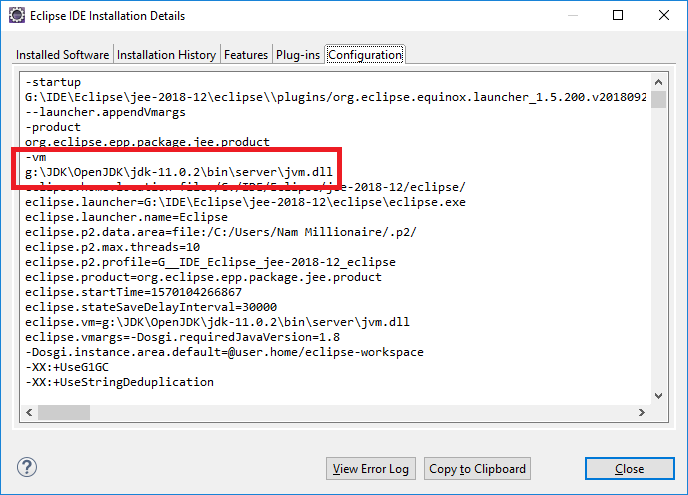
In Eclipse, click menu Help > About Eclipse IDE. Then in the About Eclipse IDE dialog, click the Installation Details button. Then in the next screen, click Configuration tab. Wait for a moment while Eclipse is retrieving configuration information, and you will see a screen as below:

Find the line that starts with –vm and the value in the next line shows the exact path of JDK/JRE on which Eclipse is running. In the above screenshot, you see Eclipse is running on OpenJDK 11.0.2.
2. How to Change JDK / JRE for Eclipse
You know, Eclipse IDE is written in Java so it needs a JDK/JRE installed to run. By default, the first instance of JDK/JRE found in the PATH environment variable is used to run Eclipse. Consider a typical value of the PATH environment variable like this:
path1;path2;path3;…;%JAVA_HOME%\bin;
In this case, the Java Virtual Machine found in the JAVA_HOME path will run Eclipse IDE. So changing the Java version that run Eclipse is just a matter of updating the value of the JAVA_HOME variable.
However, sometimes it doesn’t work like that. You changed JAVA_HOME points to a newer JDK/JRE, but Eclipse still runs under the old one. Why? What happens?
There are two reasons:
- An installation of Oracle Java putting its path before your JAVA_HOME, or
- Your Eclipse IDE is configured to stick with a JDK/JRE in its configuration file.
Let me show you how to change JDK/JRE for Eclipse in both cases.
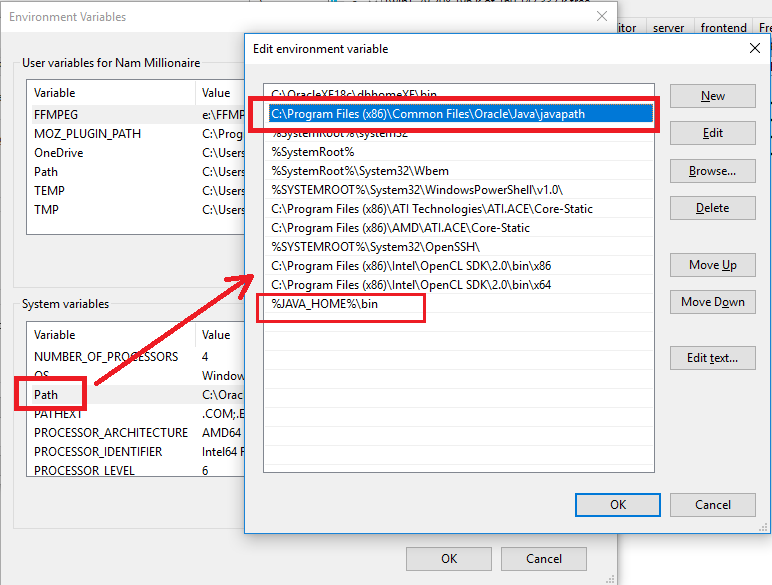
Edit the PATH environment variable on Windows, and you may see a screen as below:

Here, an installation of Oracle Java puts the following line before your JAVA_HOME:
C:\Program Files (x86)\Common Files\Oracle\Java\javapath
That means the JDK/JRE found in this path is always used to run Eclipse. Your JAVA_HOME is ignored. So to change, just move your JAVA_HOME before Oracle’s javapath using the Move Up and Move Down buttons; or delete that Oracle’s javapath. Then restart Eclipse and check configuration again to make sure Eclipse is actually running on the JDK/JRE you specified.
If that doesn’t work, it’s very likely that your Eclipse is somehow configured to stick with a specific version of Java Virtual Machine in its configuration file.
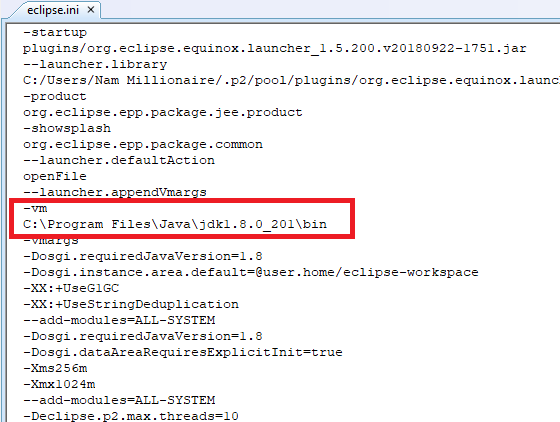
Open the eclipse.ini file in Eclipse’s installation directory in a text editor like Notepad. You may see something like this:

Now, you can change the path after the –vm line to point to a different path of JDK, or delete these two lines to use the Java version specified in the PATH system environment variable.
Phew! That’s how to change the version of Java virtual machine that powers your Eclipse IDE. I hope you found this article helpful.
You can also watch the video version below:
Other Eclipse Tutorials:
- How to use Eclipse IDE for Java EE Developers
- How to create, build and run a Java Hello World program with Eclipse
- How to generate Javadoc in Eclipse
- How to create WAR file for Java web application in Eclipse
- How to create JAR file in Eclipse
- How to pass arguments when running a Java program in Eclipse
- How to create Java web project with Maven in Eclipse
- 25 Eclipse Shortcut Keys for Code Editing
- How to add custom Ant build script to Eclipse project
- How to Add Copyright License Header for Java Source Files in Eclipse
About the Author:
 Nam Ha Minh is certified Java programmer (SCJP and SCWCD). He began programming with Java back in the days of Java 1.4 and has been passionate about it ever since. You can connect with him on Facebook and watch his Java videos on YouTube.
Comments