Download and Install Oracle JDK 23 on Windows
- Details
- Written by Nam Ha Minh
- Last Updated on 21 October 2024 | Print Email
JDK 23 is a regular update of the Java SE platform, released on September 17th 2024. Follow the steps below to set up the Java Development Kit (JDK) on your Windows operating system with Oracle JDK 23, a commercial distribution provided by Oracle corporation.
After completing this guide, you will have the Java runtime environment, as well as core Java development tools, installed - essentials to start your Java programming journey.
1. Download Oracle JDK 23 Installer for Windows
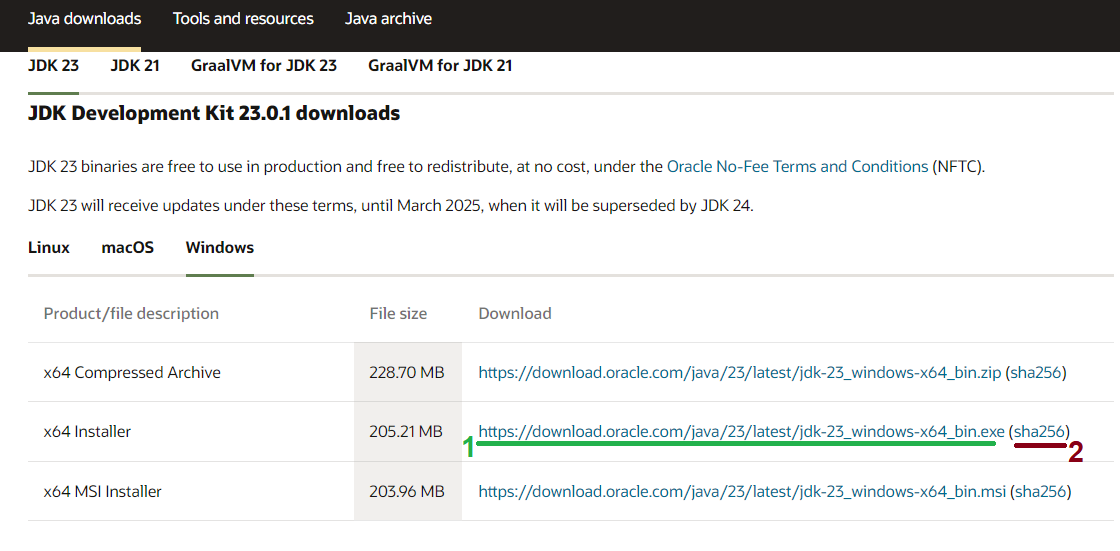
It’s strongly recommended to use an official installer or JDK 23. Visit the official Java downloads page, where you’ll find Oracle JDK 23 available as Zip file (x64 Compressed Archive), x64 Installer (EXE) and x64 MSI Installer:

For convenience (ease of setup), you can choose to download either the EXE or MSI installer. In this guide, I will choose the EXE installer, so click on the download link (1) next to x64 Installer. Save the file (jdk-23_windows-x64_bin.exe) to the Downloads folder in your user home directory.
2. Verify the Installer File
This step is option but recommended to ensure that the downloaded file is original and has not been tampered with. Open a new Command Prompt window and change the current directory to the Downloads folder using the following command:
cd Downloads
Then type the following command:
certutil -hashfile jdk-23_windows-x64_bin.exe sha256
This prints the SHA256 checksum value of the file. Go back to the Java downloads page and click on the sha256 link (2) next to the download link to view the SHA256 checksum of the original file. If both values match, it means the downloaded file is intact, and you can safely run it.
3. Install Oracle JDK 23 on Windows
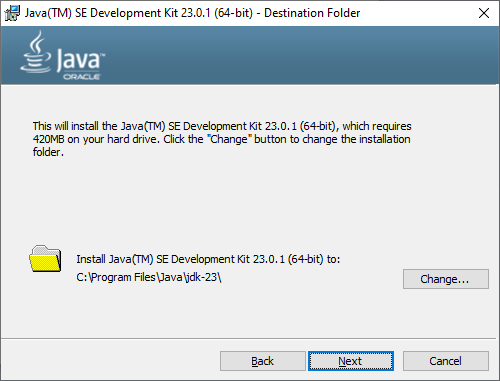
Double-click the .exe file to run the Windows installer for Oracle JDK 23. If you see the warning “the app you’re trying to install isn’t a Microsoft-verified app”, click Install anyway. This will launch the Setup program for Java(TM) SE Development Kit 23.0.1 (64-bit) as shown below:

If you want proceed the installation with default settings, click the Next button twice. The installation will be completed in just a few seconds, and JDK 23 will be installed in the C:\Program Files\Java\jdk-23 directory by default. There is no need to configure system environment variables.
4. Verify the Oracle JDK 23 Installation on Windows
Exit the Setup program. Then, open a new Command Prompt window, type in java -version to check version of the Java Virtual Machine (JVM). If you see a result similar to the following screenshot, it means JDK 23 has been installed successfully on your Windows computer:

You can also type javac -version to check version of the Java compiler, and it will display “javac 23.0.1”.
Congratulations! You’ve done the first and foremost step to begin creating, developing, building and running Java applications on the Windows operating system using the Oracle JDK distribution for Java 23.
To see the setup of Oracle JDK 23 in action, watch the following video:
Related Articles:
- How to set JAVA_HOME in macOS and Linux permanently
- How to set JAVA_HOME environment variable on Windows 10
- What are JVM, JRE and JDK
- How to write, compile and run a hello world Java program for beginners
- Java Core Language Tutorials
About the Author:
 Nam Ha Minh is certified Java programmer (SCJP and SCWCD). He began programming with Java back in the days of Java 1.4 and has been passionate about it ever since. You can connect with him on Facebook and watch his Java videos on YouTube.
Comments