Java Swing JTable Simple Example
- Details
- Written by Nam Ha Minh
- Last Updated on 04 July 2019 | Print Email
This article shows a simple example of JTable. The JTable component provided as part of the Swing API in Java is used to display/edit two-dimensional data. This is similar to a spreadsheet.
Let us consider some examples. Say that you want to display a list of employees belonging to an organization. This should display the various attributes of employees. For example, employee id, name, hourly rate, part-time status etc. The display will be more like a database table display of rows and columns. In this case, the id,name, hourly rate are the columns. The number of rows might differ based on the number of employees in the organization.
First Attempt:
Let us attempt to display such a data with JTable with minimum amount of code. The idea is to only display the details in the table. The user should not be allowed to edit any data. Also, text-based columns should be left-aligned and numerical values should be right-aligned.
The following code should help us do that:
package net.codejava.swing;
import javax.swing.JFrame;
import javax.swing.JScrollPane;
import javax.swing.JTable;
import javax.swing.SwingUtilities;
public class TableExample extends JFrame
{
    public TableExample()
    {
        //headers for the table
        String[] columns = new String[] {
            "Id", "Name", "Hourly Rate", "Part Time"
        };

        //actual data for the table in a 2d array
        Object[][] data = new Object[][] {
            {1, "John", 40.0, false },
            {2, "Rambo", 70.0, false },
            {3, "Zorro", 60.0, true },
        };
        //create table with data
        JTable table = new JTable(data, columns);

        //add the table to the frame
        this.add(new JScrollPane(table));

        this.setTitle("Table Example");
        this.setDefaultCloseOperation(JFrame.EXIT_ON_CLOSE);
        this.pack();
        this.setVisible(true);
    }

    public static void main(String[] args)
    {
        SwingUtilities.invokeLater(new Runnable() {
            @Override
            public void run() {
                new TableExample();
            }
        });
    }
}
This code attempts to build a table with minimum amount of effort. First of all, the column headers are identified and declared in a String array columns. Next, a 2d Object array named data is declared. Each inner array corresponds to a row of data. Within each array, the columns are separated by commas.
Note that the column values are declared based on their type. For example, the id holds int values, name holds string values, hourly rate holds double values and part-time status holds boolean values. This is important as it allows us to represent the actual values and not just as string values for all.
Coming back to the code, a JTable instance is then created by using the constructor that takes the data and column arrays. Rest of the code is about building the JFrame and adding the JTable instance to the JFrame (the JTable instance is wrapped in a JScrollPane instance to enable scrolling).
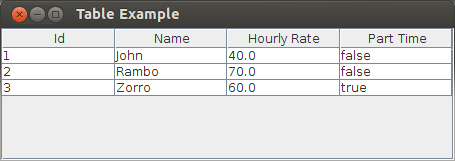
When the code is run, we get the following output:

Initial Display
Issues with this Program:
There are a few problems with this program. Firstly, the columns are not aligned properly. All the columns are left-aligned which is not we want. We want the numbers to be right-aligned. Secondly, when you run the program, you can see that the table allows the user to edit the fields. Our idea was to build a table that is for display-only.
Let us see how to correct these issues.
Customizing the Table Model:
Let us digress a bit to understand how JTable works. All components in the Swing API are built on the MVC pattern. Here, the JTable is the component which provides the view. The model is provided by an interface named TableModel. A default implementation is provided by the Swing API which is named as DefaultTableModel. This is internally used by JTable when we do not provide anything. This is exactly what happened in the above code.
To achieve our objectives, we can subclass this DefaultTableModel and customize it a little bit as the following code snippet shows:
final Class[] columnClass = new Class[] {
    Integer.class, String.class, Double.class, Boolean.class
};
//create table model with data
DefaultTableModel model = new DefaultTableModel(data, columns) {
    @Override
    public boolean isCellEditable(int row, int column)
    {
        return false;
    }
    @Override
    public Class<?> getColumnClass(int columnIndex)
    {
        return columnClass[columnIndex];
    }
};
JTable table = new JTable(model);
We are now using a model to populate the data. This code snippet first extends the DefaultTableModel class to create an anonymous instance. This is needed as we are overriding 2 methods:
One is the isCellEditable() method from which we return false. This simply indicates the table is not editable. This is a simple change.
The next method is the getColumnClass() method. The columnIndex is passed to this method. We need to indicate to the table which class the data is represented by. As we know, the String values are represented by the java.lang.String class. Therefore, we just indicate the types via the class.
This information is held in an array variable named columnClass. The class types are declared corresponding to the data values that they are supposed to display. For example, the first value is Integer.class. This is becuase the first column is 'id' which is supposed to display integer values. The same way, the third column 'hourly rate' would display decimal values and so the type is declared as Double.
Finally, the JTable is created using the constructor that takes an instance of the TableModel. In this case, we pass the model variable which we created as an anonymous instance.
Output:
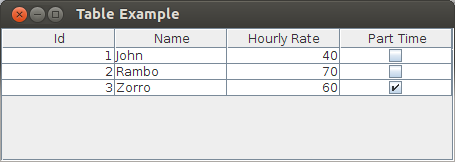
When we run the program with this change, we get the following output:

Output
Let us examine the output. The id and hourly rate values are displayed as right-aligned. The name continues to be displayed as left-aligned. This is exactly what we wanted. Also, when you run the program, you can see that we are not able to edit the values in the table.
Default Rendering:
But wait. There's more. The last column 'Part Time' displays a check-box!
And the box is checked for the third row as the corresponding data for that row is true.
So, how did this happen? Since we declared the last column type to be of Boolean, JTable automatically displays the boolean values as a check box. This is called rendering. In this case, the JTable provides this out-of-the-box which is really handy.
Source Code:
Let us provide the full source-code here:
package net.codejava.swing;
import javax.swing.JFrame;
import javax.swing.JScrollPane;
import javax.swing.JTable;
import javax.swing.SwingUtilities;
import javax.swing.table.DefaultTableModel;
public class TableExample extends JFrame
{
    public TableExample()
    {
        //headers for the table
        String[] columns = new String[] {
            "Id", "Name", "Hourly Rate", "Part Time"
        };

        //actual data for the table in a 2d array
        Object[][] data = new Object[][] {
            {1, "John", 40.0, false },
            {2, "Rambo", 70.0, false },
            {3, "Zorro", 60.0, true },
        };

        final Class[] columnClass = new Class[] {
            Integer.class, String.class, Double.class, Boolean.class
        };
        //create table model with data
        DefaultTableModel model = new DefaultTableModel(data, columns) {
            @Override
            public boolean isCellEditable(int row, int column)
            {
                return false;
            }
            @Override
            public Class<?> getColumnClass(int columnIndex)
            {
                return columnClass[columnIndex];
            }
        };

        JTable table = new JTable(model);

        //add the table to the frame
        this.add(new JScrollPane(table));

        this.setTitle("Table Example");
        this.setDefaultCloseOperation(JFrame.EXIT_ON_CLOSE);
        this.pack();
        this.setVisible(true);
    }

    public static void main(String[] args)
    {
        SwingUtilities.invokeLater(new Runnable() {
            @Override
            public void run() {
                new TableExample();
            }
        });
    }
}
Related JTable Tutorials:
- Editable JTable Example
- JTable Simple Renderer Example
- JTable column header custom renderer examples
- 6 Techniques for Sorting JTable You Should Know
- How to scroll JTable row to visible area programmatically
- JTable popup menu example
- Setting column width and row height for JTable
- How to handle mouse clicking event on JTable column header
- How to create JComboBox cell editor for JTable
About the Author:
 Nam Ha Minh is certified Java programmer (SCJP and SCWCD). He began programming with Java back in the days of Java 1.4 and has been passionate about it ever since. You can connect with him on Facebook and watch his Java videos on YouTube.
Comments
could you send me the same code of table with checkbox like upper with database records please? Thanks in advance.
Thanks.