How to make Editable JTable in Java Swing
- Details
- Written by Nam Ha Minh
- Last Updated on 04 July 2019 | Print Email
This article explains how to write an editable JTable and proceeds to show an example.
Understanding the TableModel:
Let us consider an example. We want to display the employee details in a table and also allow the user to edit the values directly in the table. The employee details would include fields like id, name, hourly rate and part-time status.
Before we start looking at the code, we need to understand about the model of JTable. All the components in the Swing API follow the MVC paradigm and JTable is no exception. Let us try and understand why this is needed and how this helps us.
In simple terms, the Model-View-Controller paradigm dictates that the data be held in a Model. And the view should display the data by querying the model. In other words, the view should not hold the data. When there is a need to display the data, the view should invoke the methods of the model to get this information.
Let us see how the MVC model looks for a JTable:
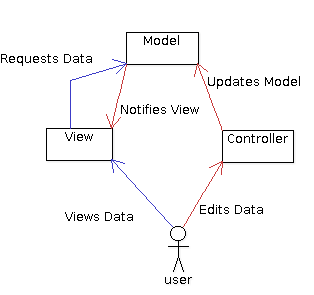
MVC Model
This means that, the model should expose various methods which return useful information for the view. For JTable, the model is named as TableModel which is an interface. Let us look at the class diagram of the TableModel to understand this better:
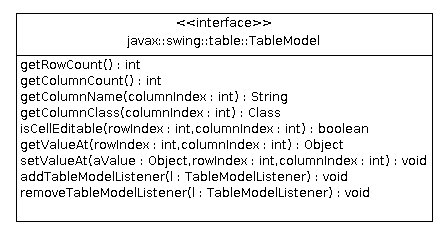
Class Diagram of TableModel
As we can see, there are several getXXX methods which return various data. Let us try and understand how the view (in this case, the JTable) can make use of this.
Let us consider a scenario. The JTable should display the details of the employees. So, it should in turn query the TableModel to get this data and display it.
Let us focus on the querying part by attempting to write a pseudocode for this. To display the data, the table needs several details like header values, number of rows, number of columns and the actual data. The pattern would be something like this:
get the header values
get the cell value of row number 1 and column number 1
get the cell value of row number 1 and column number 2
...
get the cell value of row number 1 and column number 4
get the cell value of row number 2 and column number 1
...
and so on till the end of the table.
So, when we attempt to convert this into actual working code, the repetitive part of getting the cell values one by one yields itself to a loop. Also, since we are dealing with a 2 dimensional data, this means we would need 2 loops – a loop within a loop i.e an inner loop. The outer loop will be for the rows and the inner loop will be for the columns. Thus, we will be able to traverse the entire table.
So, the model should be able to provide the table back with all this information. In other words, the model should provide methods which will return these values for us. If you look at the TableModel class diagram, you can find that it exactly does this. For example, the getRowCount() method returns the number of rows in the model. Similarly, the getColumnCount() method returns the number of columns in the model. And most importantly, the getValueAt() method takes the row number and the column number as parameters and returns the value of that particular cell.
So, the JTable internally would probably execute a code like this at runtime to display the values:
int rowCount = model.getRowCount();
int columnCount = model.getColumnCount();
for(int i=0; i<rowCount; i++) {
  for(int j=0; j<columnCount; j+) {
    Object cellValue = model.getValueAt(i,j);
    //now display this value graphically.
  }
}
Note that, the row numbers and column numbers begin indexing at 0 and hence we start from 0.
The actual code written by the Swing API developers would be much more complex. But, this should give an idea of what actually happens behind the scenes. And that in turn, helps us to understand how and what to write in a TableModel implementation.
Remember that TableModel is an interface and we have to provide or implementation. Fortunately, Swing provides a class named AbstractTableModel which provides a default implementation for many methods in this interface. So, we can simply extend this class and implement those methods which we need to.
Before doing that, let us first define our POJO model. This class is simply a value bean which represents the actual entity:
package net.codejava.model;

public class Employee
{
    private int id;
    private String name;
    private double hourlyRate;
    private boolean partTime;

    public Employee(int id, String name, double hourlyRate, boolean partTime)
    {
        this.id = id;
        this.name = name;
        this.hourlyRate = hourlyRate;
        this.partTime = partTime;
    }

    public int getId()
    {
        return id;
    }

    public void setId(int id)
    {
        this.id = id;
    }

    public String getName()
    {
        return name;
    }

    public void setName(String name)
    {
        this.name = name;
    }

    public double getHourlyRate()
    {
        return hourlyRate;
    }

    public void setHourlyRate(double hourlyRate)
    {
        this.hourlyRate = hourlyRate;
    }

    public boolean isPartTime()
    {
        return partTime;
    }

    public void setPartTime(boolean partTime)
    {
        this.partTime = partTime;
    }

}
This class is self-explanatory. We declare a value bean named Employee and its attributes like id,name. And, we provide corresponding getter and setter methods.
Table Model Implementation:
Let us now extend the AbstractTableModel and override the methods that we need to:
package net.codejava.swing;

import java.util.List;
import javax.swing.table.AbstractTableModel;

import net.codejava.model.Employee;

public class EmployeeTableModel extends AbstractTableModel
{
    private final List<Employee> employeeList;

    private final String[] columnNames = new String[] {
            "Id", "Name", "Hourly Rate", "Part Time"
    };
    private final Class[] columnClass = new Class[] {
        Integer.class, String.class, Double.class, Boolean.class
    };

    public EmployeeTableModel(List<Employee> employeeList)
    {
        this.employeeList = employeeList;
    }

    @Override
    public String getColumnName(int column)
    {
        return columnNames[column];
    }

    @Override
    public Class<?> getColumnClass(int columnIndex)
    {
        return columnClass[columnIndex];
    }

    @Override
    public int getColumnCount()
    {
        return columnNames.length;
    }

    @Override
    public int getRowCount()
    {
        return employeeList.size();
    }

    @Override
    public Object getValueAt(int rowIndex, int columnIndex)
    {
        Employee row = employeeList.get(rowIndex);
        if(0 == columnIndex) {
            return row.getId();
        }
        else if(1 == columnIndex) {
            return row.getName();
        }
        else if(2 == columnIndex) {
            return row.getHourlyRate();
        }
        else if(3 == columnIndex) {
            return row.isPartTime();
        }
        return null;
    }
}
This code shows a simple extension of the AbstractTableModel class. The model should hold data, so, we declare an instance variable which holds a list of employees. And we provide a constructor which takes a list as an argument. The no-args constructor is not provided here. This is because, we want to enforce the fact that the model is useless without any data.
We also declare a String array columnNames to hold the names of the headers. This is then used by the getColumnName() method to return the corresponding column header. Another array columnClass tells us which column is of which type. This variable is then used in the getColumnClass() method to return the corresponding type. The getColumnCount() method is supposed to return the number of columns to be displayed in the table. Instead of hardcoding the number as 4 (as we have 4 columns in our case), we have just used the columnName.length to return the value. This is very useful, as, later on, if we decide to increase the number of columns, we simply need to add more values to the array. The method as such can be left untouched.
The next method to be looked at it is the getRowCount(). This method should simply return the number of rows present in the table. And since we have a List variable, we can simply call the size() method on that and return the value. The number of rows is simply the number of employees in the organization which translates to number of employee instances in the list.
The final method to be looked at is getValueAt(). This method is slightly complex than the other methods. Like we discussed earlier, this method takes a row number and column number as parameters and should simply return the value that is to be displayed in that cell. In our case, the values come from the Employee value bean. So, we first get the Employee instance which corresponds to this row. We get this instance from the employee list by passing in the row number. Next, we check for the column number and make corresponding method call on the Employee instance to get the value and return it.
Using the Table Model:
Let us now attempt to use this model and build the table and display it:
package net.codejava.swing;

import java.util.ArrayList;
import java.util.List;
import javax.swing.JFrame;
import javax.swing.JScrollPane;
import javax.swing.JTable;
import javax.swing.SwingUtilities;
import net.codejava.model.Employee;

public class EditableTableExample extends JFrame
{
    public EditableTableExample()
    {
        Employee row1 = new Employee(1, "John", 40.0, false);
        Employee row2 = new Employee(2, "Rambo", 70.0, false);
        Employee row3 = new Employee(3, "Zorro", 60.0, true);

        //build the list
        List<Employee> employeeList = new ArrayList<Employee>();
        employeeList.add(row1);
        employeeList.add(row2);
        employeeList.add(row3);

        //create the model
        EmployeeTableModel model = new EmployeeTableModel(employeeList);
        //create the table
        JTable table = new JTable(model);

        //add the table to the frame
        this.add(new JScrollPane(table));

        this.setTitle("Editable Table Example");
        this.setDefaultCloseOperation(JFrame.EXIT_ON_CLOSE);
        this.pack();
        this.setVisible(true);
    }

    public static void main(String[] args)
    {
        SwingUtilities.invokeLater(new Runnable() {
            @Override
            public void run() {
                new EditableTableExample();
            }
        });
    }
}
We are now making use of the model that we wrote and building the display. We first create the data that is to be passed to the table for display. So, 3 instances of Employee class are created and and these are added to an ArrayList.
Then, we create the instance of the EmployeeTableModel by passing in the list. This instance is then passed to the JTable constructor. The JTable is then added to the JFrame and displayed.
Output:
When we run the program, we get the following output:
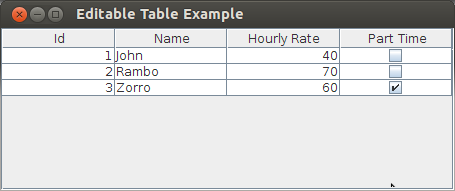
Output
When we examine the output, we see that the headers are displayed correctly. Then, the numbers are displayed right-aligned and the name is displayed left-aligned. This is really useful. And the boolean value is displayed as a check-box with the box checked if the value is true. This is really handy and something that we get out-of-the-box.
And when you run it, you can see that the table doesn't allow editing.
Editing Data:
Let us now proceed to allow editing on this table. Similar to what happens when the data is displayed, when editing happens, the table simply delegates saving of the data to the model. So, we need to first provide methods on the model that can facilitate this. If you look at the TableModel class diagram, it provides a method setValueAt(). The last 2 parameters are similar to getValueAt(). We need the column index and the row index to identify the cell to which the value is to be set. The 1st parameter is the actual value that is provided by the user.
So, what do we do with data? Similar to getValueAt(), we first identify the row and get the instance. Then, we can invoke setter methods on the Employee row instance to persist the data to the instance. Thus, our setValueAt() implementation looks like:
 @Override
    public void setValueAt(Object aValue, int rowIndex, int columnIndex)
    {
        Employee row = employeeList.get(rowIndex);
        if(0 == columnIndex) {
            row.setId((Integer) aValue);
        }
        else if(1 == columnIndex) {
            row.setName((String) aValue);
        }
        else if(2 == columnIndex) {
            row.setHourlyRate((Double) aValue);
        }
        else if(3 == columnIndex) {
            row.setPartTime((Boolean) aValue);
        }
    }
As explained above, we get the row instance and then based on the columnIndex call the corresponding setter. For example, for column 1, we call setName() on the Employee instance.
Wait a minute. When we ran the program last time, it actually didn't allow us to edit any values. So, is this enough? The answer is no. We also need to override the isCellEditable() method as follows:
    @Override
    public boolean isCellEditable(int rowIndex, int columnIndex)
    {
        return true;
    }
Overriding this method tells the table to allow editing by the user. So, apart from holding data, the table model also provides information on whether the table can be edited. So, actually, it is the table model that controls the table!
Editable Table Output:
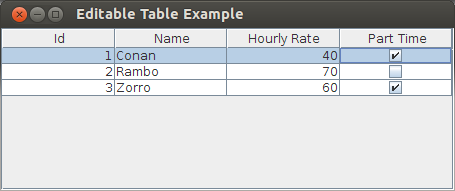
Editable Table
When you run the program, you can edit the values. This includes the check-box too!
Validating Input:
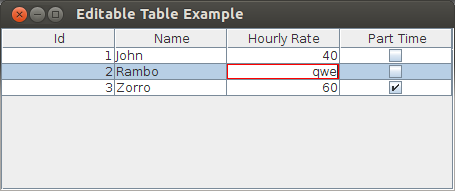
But, wait a minute. What if the user enters an invalid value? Let us now attempt to enter some alphabets in the 'Hourly Rate' column and see what happens:
Validating Input
When we try to enter an invalid value like 'qwe', the edit is not accepted! The cursor stays in the same cell. Also, the JTable displays a nice red border over the cell to indicate that we have entered an invalid value!
This feature is very useful and we get this out-of-the-box. Isn't that cool?
So, our full table model code now looks like this:
package net.codejava.swing;

import java.util.List;
import javax.swing.table.AbstractTableModel;

import net.codejava.model.Employee;

public class EmployeeTableModel extends AbstractTableModel
{
    private final List<Employee> employeeList;

    private final String[] columnNames = new String[] {
            "Id", "Name", "Hourly Rate", "Part Time"
    };
    private final Class[] columnClass = new Class[] {
        Integer.class, String.class, Double.class, Boolean.class
    };

    public EmployeeTableModel(List<Employee> employeeList)
    {
        this.employeeList = employeeList;
    }

    @Override
    public String getColumnName(int column)
    {
        return columnNames[column];
    }

    @Override
    public Class<?> getColumnClass(int columnIndex)
    {
        return columnClass[columnIndex];
    }

    @Override
    public int getColumnCount()
    {
        return columnNames.length;
    }

    @Override
    public int getRowCount()
    {
        return employeeList.size();
    }

    @Override
    public Object getValueAt(int rowIndex, int columnIndex)
    {
        Employee row = employeeList.get(rowIndex);
        if(0 == columnIndex) {
            return row.getId();
        }
        else if(1 == columnIndex) {
            return row.getName();
        }
        else if(2 == columnIndex) {
            return row.getHourlyRate();
        }
        else if(3 == columnIndex) {
            return row.isPartTime();
        }
        return null;
    }

    @Override
    public boolean isCellEditable(int rowIndex, int columnIndex)
    {
        return true;
    }

    @Override
    public void setValueAt(Object aValue, int rowIndex, int columnIndex)
    {
        Employee row = employeeList.get(rowIndex);
        if(0 == columnIndex) {
            row.setId((Integer) aValue);
        }
        else if(1 == columnIndex) {
            row.setName((String) aValue);
        }
        else if(2 == columnIndex) {
            row.setHourlyRate((Double) aValue);
        }
        else if(3 == columnIndex) {
            row.setPartTime((Boolean) aValue);
        }
    }

}
Note that we are not providing the EditableTableExample code again. Why? Simply because there is no change in that code. All the decisions are made in the table model and the JTable simply queries the model for everything and just does the display.
This is very clean. We are able to easily the separate the display and the model part. This also illustrates how the MVC paradigm is elegant.
Related JTable Tutorials:
- A Simple JTable Example for Display
- JTable Simple Renderer Example
- JTable column header custom renderer examples
- 6 Techniques for Sorting JTable You Should Know
- How to scroll JTable row to visible area programmatically
- JTable popup menu example
- Setting column width and row height for JTable
- How to handle mouse clicking event on JTable column header
- How to create JComboBox cell editor for JTable
About the Author:
 Nam Ha Minh is certified Java programmer (SCJP and SCWCD). He began programming with Java back in the days of Java 1.4 and has been passionate about it ever since. You can connect with him on Facebook and watch his Java videos on YouTube.
Comments