How to Embed Tomcat Server into Java Web Applications
- Details
- Written by Nam Ha Minh
- Last Updated on 06 August 2019 | Print Email
1. Why Using Embedded Tomcat? Maven Dependencies for Embedded Tomcat
2. Maven Dependencies for Embedded Tomcat
4. Embedding Tomcat server for a Programmatic Java Web Application
5. Using Embedded Tomcat server for a WAR File
6. Embedding Tomcat server for an Existing Java Web Application
1. Why Using Embedded Tomcat? Maven Dependencies for Embedded Tomcat
Basically, we want to use embedded Tomcat for the following purposes:- Rapid unit testing for web components like Java servlets: instead of starting/stopping Tomcat server and opening a web browser for manual unit testing, it is possible to use embedded Tomcat to automate unit testing.
- Delivering a Java web application as a standalone Java application: the end users now can run a JAR file which starts the embedded server which hosts the web application. No need to download and install Tomcat and deploy the web application manually.
- Programmatic control of the server: integrating an embedded server allows you to have more control of the server in programmatic ways, and automate manual steps.
- Whatever you can imagine.
2. Maven Dependencies for Embedded Tomcat
In order to use embedded Tomcat and pack its runtime with your Java web applications, add the following dependencies in Maven’s pom.xml file:<dependency>
<groupId>org.apache.tomcat.embed</groupId>
<artifactId>tomcat-embed-core</artifactId>
<version>${tomcat.version}</version>
</dependency>
<dependency>
<groupId>org.apache.tomcat.embed</groupId>
<artifactId>tomcat-embed-jasper</artifactId>
<version>${tomcat.version}</version>
</dependency>
<dependency>
<groupId>org.apache.tomcat.embed</groupId>
<artifactId>tomcat-embed-logging-juli</artifactId>
<version>${tomcat.version}</version>
</dependency>Where tomcat.version is a property that points to the actual version of Tomcat:<properties> <tomcat.version>8.0.48</tomcat.version> </properties>In case you don’t use Maven, download and add the following JAR files to your project’s classpath:
- ecj-3.12.3.jar
- tomcat-annotations-api-8.0.48.jar
- tomcat-embed-core-8.0.48.jar
- tomcat-embed-el-8.0.48.jar
- tomcat-embed-jasper-8.0.48.jar
- tomcat-embed-logging-juli-8.0.48.jar
3. The Tomcat Embed API
The central class is org.apache.catalina.startup.Tomcat that lets you control almost everything of an embedded server: create new instance, configure server, add web applications, add servlets, start and stop the server, etc.For example, the following code creates and starts an embedded Tomcat instance running on port number 8080:Tomcat tomcat = new Tomcat(); tomcat.setPort(8080); // configure the server // configure web applications tomcat.start();You can use following methods to configure the server:
- setBaseDir(String baseDir): sets the base directory for the server to work. This should be the first method called. By default, Tomcat attempts to use these system properties in this order: catalina.base , catalina.home, and user.dir.
- setHostname(String name): sets the hostname of the default host. Default is ‘localhost’.
- setPort(int port): sets the port number for the default connector.
// add context initialization parameters
context.addParameter("param1", "value1");
context.addParameter("param2", "value2");

context.addErrorPage(new ErrorPage());
context.setCookies(true);
context.setSessionTimeout(30);
To configure the server for an existing web application, use the following Tomcat’s method: addWebapp(String contextPath, String baseDir)Where contextPath is the web application name and baseDir is the base directory of the application. baseDir can refer to an external WAR file, or to a web application directory in the same project.To add an existing Java servlet to a web application, you can use the following method:addServlet(String contextPath, String servletName, Servlet servlet)
Or use the following static method:Tomcat.addServlet(Context context, String servletName, Servlet servlet)
To configure URL mapping for a servlet, you can use the following method of the Context class:addServletMappingDecoded(String urlPattern, String servletName)
To start, stop and destroy the server: tomcat.start() tomcat.stop() tomcat.destroy()And to cause the current thread to wait until the server is shutdown, use the following statement:tomcat.getServer().await();For complete reference, read the Javadocs of Tomcat and Context classes.
4. Embedding Tomcat server for a Programmatic Java Web Application
In this approach, you create a whole Java web application programmatically from scratch. There’s no existing web application, no existing servlet.For example, the following program SimpleWebApp creates an instance of embedded Tomcat, a web application under the root context path (“/”), a Java servlet named “Servlet1”, and maps this servlet to the URL pattern “/go”:package net.codejava;
import java.io.File;
import java.io.IOException;
import java.io.PrintWriter;
import javax.servlet.ServletException;
import javax.servlet.http.HttpServlet;
import javax.servlet.http.HttpServletRequest;
import javax.servlet.http.HttpServletResponse;
import org.apache.catalina.Context;
import org.apache.catalina.LifecycleException;
import org.apache.catalina.startup.Tomcat;
public class SimpleWebApp {
public static void main(String[] args) throws LifecycleException {
Tomcat tomcat = new Tomcat();
tomcat.setBaseDir("temp");
tomcat.setPort(8080);
String contextPath = "/";
String docBase = new File(".").getAbsolutePath();
Context context = tomcat.addContext(contextPath, docBase);
HttpServlet servlet = new HttpServlet() {
	@Override
	protected void doGet(HttpServletRequest req, HttpServletResponse resp)
			throws ServletException, IOException {
		PrintWriter writer = resp.getWriter();

		writer.println("<html><title>Welcome</title><body>");
		writer.println("<h1>Have a Great Day!</h1>");
		writer.println("</body></html>");
	}
};
String servletName = "Servlet1";
String urlPattern = "/go";
tomcat.addServlet(contextPath, servletName, servlet);
context.addServletMappingDecoded(urlPattern, servletName);
tomcat.start();
tomcat.getServer().await();
}
}As you can see, a Java servlet is created “on the fly”, which overrides the doGet() method:HttpServlet servlet = new HttpServlet() {
@Override
protected void doGet(HttpServletRequest req, HttpServletResponse resp)
throws ServletException, IOException {
PrintWriter writer = resp.getWriter();
writer.println("<html><title>Welcome</title><body>");
writer.println("<h1>Have a Great Day!</h1>");
writer.println("</body></html>");
}
};This servlet sends a simple HTML page to the client, with a heading “Have a Great Day!”.Run this program in Eclipse and you can see the server’s log in the Console view: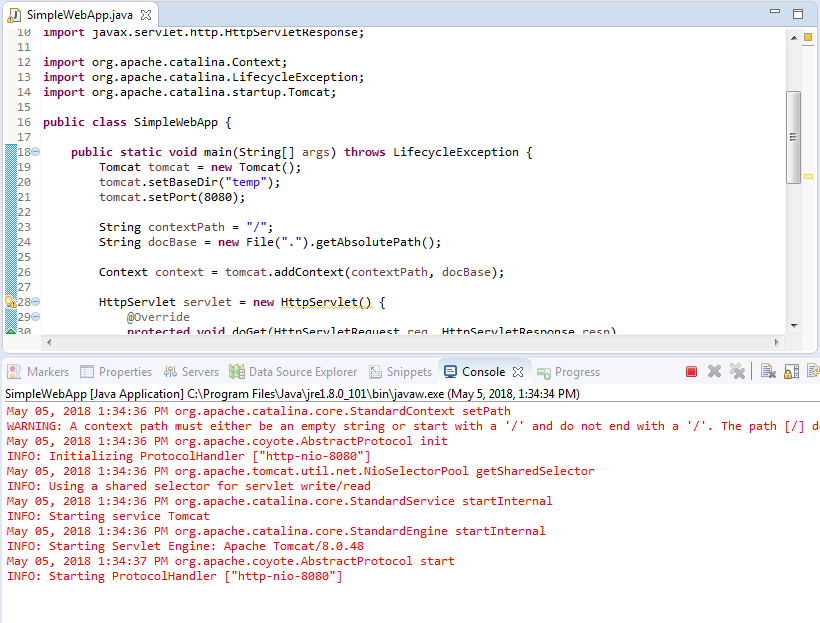 The server is listening on port 8080, so type the following URL in your web browser:
http://localhost:8080/go
And you can see the result looks like this: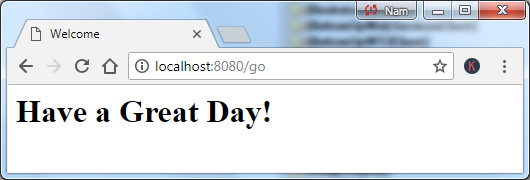 That means the server and web application are up and running.You can also write a Servlet in a separate class (AddServlet.java) like this:
package net.codejava;

import java.io.IOException;
import java.io.PrintWriter;

import javax.servlet.ServletException;
import javax.servlet.http.HttpServlet;
import javax.servlet.http.HttpServletRequest;
import javax.servlet.http.HttpServletResponse;

public class AddServlet extends HttpServlet {
	@Override
	protected void doGet(HttpServletRequest req, HttpServletResponse resp)
			throws ServletException, IOException {
		int a = Integer.parseInt(req.getParameter("a"));
		int b = Integer.parseInt(req.getParameter("b"));
		int sum = a + b;

		String result = String.format("%d + %d = %d", a, b, sum);

		PrintWriter writer = resp.getWriter();
		writer.println("<html><title>Addition</title><body>");
		writer.println("<h1>" + result + "</h1");
		writer.println("</body></html>");
	}
}
This servlet returns sum of two numbers passed from query parameters. And add this servlet to the web application like this:AddServlet addServlet = new AddServlet(); servletName = "AddServlet"; urlPattern = "/add"; tomcat.addServlet(contextPath, servletName, addServlet); context.addServletMappingDecoded(urlPattern, servletName);Call the servlet from the web browser:
http://localhost:8080/add?a=1234&b=5678
And result: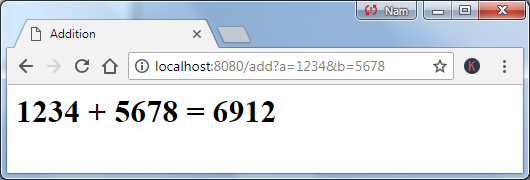 In this programmatic mode, there is no JSP support. This approach is suitable for creating a minimum, simple, lightweight web application with an embedded Tomcat server.To create an executable JAR file for this kind of application in Eclipse IDE, click File > Export… In the Export dialog, select Java > Runnable JAR file and click Next. In the Runnable JAR File Export screen, remember to choose the option “Copy required libraries into a sub-folder next to the generated JAR”, as shown in the following screenshot:
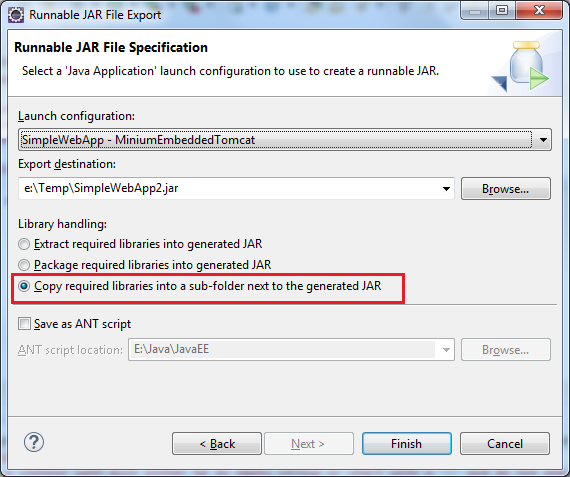 Click Finish, and eclipse generate the executable JAR file along with the required JAR files for embedded Tomcat in a directory next to the generated JAR. Then you can run the application using java command like this:
java -jar SimpleWebApp2.jarThen you can see the server is started and ready to accept client’s requests.
5. Using Embedded Tomcat server for a WAR File
An interesting feature of embedded Tomcat is that you can programmatically starts the server for running a Java web application which is packed in a Web Archive (WAR) file.Suppose you have a Java web application packed in Bookstore.war file, the following program creates a Tomcat instance and adds a web application from the WAR file:package net.codejava;
import javax.servlet.ServletException;
import org.apache.catalina.LifecycleException;
import org.apache.catalina.startup.Tomcat;
public class RunWarExample {
public static void main(String[] args) throws ServletException, LifecycleException {
Tomcat tomcat = new Tomcat();
tomcat.setBaseDir("temp");
tomcat.setPort(8080);
String contextPath = "/Bookstore";
String warFilePath = "D:\\Web\\Website\\Bookstore.war";
tomcat.getHost().setAppBase(".");
tomcat.addWebapp(contextPath, warFilePath);
tomcat.start();
tomcat.getServer().await();
}
}Run this program and you can see the content of the WAR file is extracted to the base directory, and you can access the web application using the specified context path.This approach is very convenient for testing existing web applications which are packed in WAR files, and you don’t have to touch their code.For this kind of application, generate the executable JAR file in the same way as described in the programmatic web application. 6. Embedding Tomcat server for an Existing Java Web Application
Perhaps this is the most frequently used feature of embedded Tomcat. This is the scenario: You’re developing a Java web application and now you want to embed Tomcat for the purpose of unit testing or deliver the web application as a standalone Java program. So how to make it?Suppose that your web application’s files are stored in a directory named WebContent that looks like this: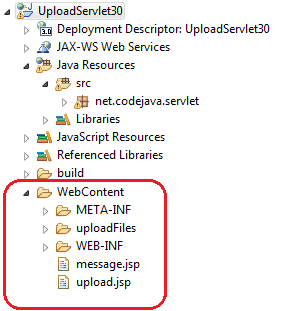 The following program starts an embedded Tomcat instance to run the web application:
package net.codejava.servlet;

import java.io.File;

import javax.servlet.ServletException;

import org.apache.catalina.LifecycleException;
import org.apache.catalina.startup.Tomcat;

public class EmbeddedTomcatTest {

	public static void main(String[] args) throws LifecycleException, ServletException {
		String contextPath = "/UploadApp";
		String webappDir = new File("WebContent").getAbsolutePath();

		Tomcat tomcat = new Tomcat();
		tomcat.setBaseDir("temp");
		tomcat.setPort(8080);

		tomcat.addWebapp(contextPath, webappDir);

		tomcat.start();
		tomcat.getServer().await();
	}
}
Now you can use your browser to access the web application using the specified port number and context path in the program above:http://localhost:8080/UploadApp/upload.jsp
To generate executable JAR file for this kind of application, you need to use Tomcat Maven plugin as described here.API References:
Other Tomcat Tutorials:
- How to deploy a Java web application on Tomcat
- How to Use Virtual Hosts in Tomcat
- How to set web application context path as server root in Tomcat
- How to configure JNDI DataSource for Database Connection Pooling in Tomcat
- How to configure session timeout in Tomcat
- How to change Tomcat port number
- How to add Tomcat server in Eclipse
- How to change server location and deploy path for Tomcat in Eclipse
About the Author:
 Nam Ha Minh is certified Java programmer (SCJP and SCWCD). He began programming with Java back in the days of Java 1.4 and has been passionate about it ever since. You can connect with him on Facebook and watch his Java videos on YouTube.