In this Java Tomcat tutorial, we'll guide you how to configure Apache Tomcat server to deploy and run multiple Java web applications under different hostnames, on a single server machine. For example, a project management application can be accessed via this URL:
http://projectx.com/
A payroll application is deployed to the following address:
http://payrollf.com/
And a bug tracking application can be accessed via this URL:
http://bugtrackingz.com/
And so on...Though the applications are deployed and accessed via diffrent hostnames, they are actually running on a single instance of Tomcat. You can set up this kind of deployment by configuring virtual hosts in Tomcat.Follow these steps:
1. Update Server Configuration File
Open the server.xmlfile under the conf folder in Tomcat installation directory. Scroll this file to the end, and you see a <Host> section that looks like this:
<Host name="localhost"  appBase="webapps"
      unpackWARs="true" autoDeploy="true">
<!-- SingleSignOn valve, share authentication between web applications
Documentation at: /docs/config/valve.html -->
<!--
<Valve className="org.apache.catalina.authenticator.SingleSignOn" />
-->
<!-- Access log processes all example.
Documentation at: /docs/config/valve.html
Note: The pattern used is equivalent to using pattern="common" -->
<Valve className="org.apache.catalina.valves.AccessLogValve" directory="logs"
prefix="localhost_access_log" suffix=".txt"
pattern="%h %l %u %t "%r" %s %b" />
</Host>
You see, this is the configuration for the default host - with hostname is locahostand the base directory is webapps:
Note that when you specify the hostname "projectx.com", you must also configure the operating system to resolve the hostname to IP address of the server. On Windows, you can do this by editing the hosts file under c:\Windows\System32\drivers\etc directory. Add the following line at the end of the file:
192.168.1.5 projectx.com
Of course you need to use the correct IP address of the server. Then save the hosts file.
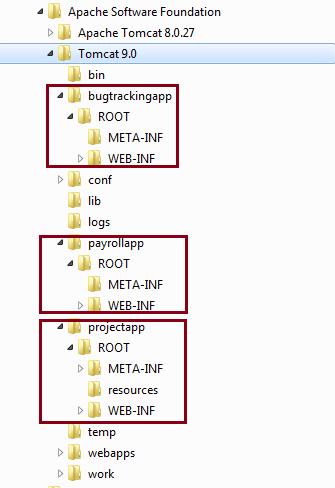
3. Create Base Directory for the Virtual Host
The property appBase points to a directory that contains the web application's files. So create a new directory named projectapp under Tomcat installation directory.
4. Deploy the Java Web Application
Copy the web application's WAR file to projectapp directory, and rename it to ROOT.war.Now, start the server. You will see Tomcat automatically unpacks the ROOT.war file to host the application. You now can access the application via this URL:
http://projectx.com
Note that in the <Host> element for the host "projectx.com", the <Vavle> element specifies the access log file:
Navigate to the logs folder under Tomcat installation directory, you will the the project_access_log.txt has been reated.That's how to add a virtual host in Tomcat. You can repeat the same steps for other applications.The XML code for virtual hosts configuration in server.xml would look like this:
Nam Ha Minh is certified Java programmer (SCJP and SCWCD). He began programming with Java back in the days of Java 1.4 and has been passionate about it ever since. You can connect with him on Facebook and watch his Java videos on YouTube.
Thanks for sharing. I've seen other approaches that involve creating different physical directories associated with the same tomcat. The nice approach here is the /bin/setenv.sh are specific to each application instance. Is there a way, or does Tomcat have a precedence for reading setenv.sh from different locations?
 Nam Ha Minh is certified Java programmer (SCJP and SCWCD). He began programming with Java back in the days of Java 1.4 and has been passionate about it ever since. You can connect with him on Facebook and watch his Java videos on YouTube.
Comments
Thanks for sharing. I've seen other approaches that involve creating different physical directories associated with the same tomcat. The nice approach here is the /bin/setenv.sh are specific to each application instance. Is there a way, or does Tomcat have a precedence for reading setenv.sh from different locations?
Like localhost:8181/ords/f?p=payroll as payroll.com on my intranet tomcat
Please guide me
If I only deploy projectx.com, how to restart tomcat by vhost?
Thank you.