How to initialize log4j for Java web application
- Details
- Written by Nam Ha Minh
- Last Updated on 01 July 2019 | Print Email
In this tutorial, I will guide you how to configure log4j for a Java web application.
Typically, for Java web application, we can put the log4j.properties file or log4j.xml file under the root of the classpath (WEB-INF\classes directory) to use log4j immediately in a servlet class as follows:
Logger logger = Logger.getLogger(MyServlet.class);
logger.debug("this is a debug log message");
However, what if we put log4j configuration file in another location rather than the root of the classpath? In this case, we need to initialize log4j explicitly like this:
String log4jConfigFile = "some/path/log4j.properties";
PropertyConfigurator.configure(log4jConfigFile);
But this initialization code should be executed only once when the application is being started. To do so, it’s recommended to declare an implementation of the ServletContextListener interface to listen to the contextInitialized() event which happens when the application is being started, before serving client’s requests. For example:
public class ContextListener implements ServletContextListener {

	@Override
	public void contextInitialized(ServletContextEvent event) {
		// code to initialize log4j here...
	}
}
Here are the steps to initialize and use log4j in a Java web application:
1. Creating log4j properties file
Create a log4j configuration file named log4j.properties with the following content:
# LOG4J configuration
log4j.rootLogger=DEBUG, Appender1,Appender2

log4j.appender.Appender1=org.apache.log4j.ConsoleAppender
log4j.appender.Appender1.layout=org.apache.log4j.PatternLayout
log4j.appender.Appender1.layout.ConversionPattern=%-7p %d [%t] %c %x - %m%n

log4j.appender.Appender2=org.apache.log4j.FileAppender
log4j.appender.Appender2.File=D:/Logs/Log4jWebDemo.log
log4j.appender.Appender2.layout=org.apache.log4j.PatternLayout
log4j.appender.Appender2.layout.ConversionPattern=%-7p %d [%t] %c %x - %m%n
This configuration basically creates two appenders: the first for console logging and the second for file logging (log file will be created under D:/Logs/Log4jWebDemo.log).
Put the log4j.properties file under the WEB-INF directory of your web application.
2. Configuring location of log4j properties file in web.xml
It’s also recommended to have the location of log4j.properties file configurable via web.xml file like this:
<?xml version="1.0" encoding="UTF-8"?>
<web-app xmlns:xsi="http://www.w3.org/2001/XMLSchema-instance"
	xmlns="http://java.sun.com/xml/ns/javaee"
	xmlns:web="http://java.sun.com/xml/ns/javaee/web-app_2_5.xsd"
	xsi:schemaLocation="http://java.sun.com/xml/ns/javaee
		http://java.sun.com/xml/ns/javaee/web-app_3_0.xsd"
	id="WebApp_ID" version="3.0">

	<display-name>Log4jWebDemo1</display-name>

	<context-param>
		<param-name>log4j-config-location</param-name>
		<param-value>WEB-INF/log4j.properties</param-value>
	</context-param>

</web-app>
Here we configure the log4j.properties file under WEB-INF directory.
3. Implementing the ServletContextListener interface
Create a ContextListener class that implements the ServletContextListener interface with the following code:
package net.codejava.servlet;

import java.io.File;

import javax.servlet.ServletContext;
import javax.servlet.ServletContextEvent;
import javax.servlet.ServletContextListener;
import javax.servlet.annotation.WebListener;

import org.apache.log4j.PropertyConfigurator;

@WebListener("application context listener")
public class ContextListener implements ServletContextListener {

	/**
	 * Initialize log4j when the application is being started
	 */
	@Override
	public void contextInitialized(ServletContextEvent event) {
		// initialize log4j here
		ServletContext context = event.getServletContext();
		String log4jConfigFile = context.getInitParameter("log4j-config-location");
		String fullPath = context.getRealPath("") + File.separator + log4jConfigFile;

		PropertyConfigurator.configure(fullPath);

	}

	@Override
	public void contextDestroyed(ServletContextEvent event) {
		// do nothing
	}
}
In the contextInitialized() method, we read location of the log4j properties file and construct a complete, absolute path of this file which is then passed to the static configure() method of the PropertyConfigurator class. That’s way log4j is initialized with the given properties file.
Note that the @WebListener annotation (Servlet 3.0) is placed before the class declaration to tell the servlet container to register this class as a listener. If you use Servlet 2.5, use the following equivalent XML in the web.xml file:
<listener>
	<listener-class>net.codejava.servlet.ContextListener</listener-class>
</listener>
4. Writing a test servlet
Now create a simple servlet to test log4j. Create a TestLog4jServlet.java class with the following content:
package net.codejava.servlet;

import java.io.IOException;
import javax.servlet.ServletException;
import javax.servlet.annotation.WebServlet;
import javax.servlet.http.HttpServlet;
import javax.servlet.http.HttpServletRequest;
import javax.servlet.http.HttpServletResponse;

import org.apache.log4j.Logger;

@WebServlet("/test")
public class TestLog4jServlet extends HttpServlet {

	static final Logger LOGGER = Logger.getLogger(TestLog4jServlet.class);

	protected void doGet(HttpServletRequest request,
			HttpServletResponse response) throws ServletException, IOException {

		LOGGER.info("This is a logging statement from log4j");

		String html = "<html><h2>Log4j has been initialized successfully!</h2></html>";
		response.getWriter().println(html);
	}

}
This servlet simply writes a log entry to the logger, and sends a short HTML text to the client.
Since we use the @WebServlet annotation (Servlet 3.0), there is no need to configure this servlet in the web.xml file. In case you use Servlet 2.5, add the following XML snippet into the web.xml file:
<servlet>
	<display-name>TestServlet</display-name>
	<servlet-name>TestServlet</servlet-name>
	<servlet-class>net.codejava.servlet.TestLog4jServlet</servlet-class>
</servlet>

<servlet-mapping>
	<servlet-name>TestServlet</servlet-name>
	<url-pattern>/test</url-pattern>
</servlet-mapping>
5. Testing the application
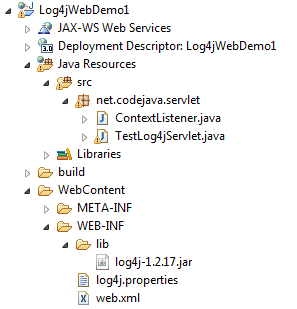
If you did the above steps in Eclipse IDE, you would have the following project structure:

Remember to add log4j’s library jar file under WEB-INF\lib directory (you can download log4j here) and create the directory D:/Logs where a log file will be created (as configured in the log4j.properties file).
Deploy the application on a servlet container such as Tomcat, type the following URL into browser’s address bar to test the servlet and log4j:
http://localhost:8080/Log4jWebDemo1/test
Output in the browser:

Look at the server’s console log we’ll see a log4j-style log entry like this:

And check for the Log4jWebDemo.log file would be created under D:/Logs directory (you should create this directory first).
Related Java log4j Tutorials:
- How to configure log4j as logging mechanism in Java
- Configure log4j for creating daily rolling log files
- Log4j common conversion patterns
- How to use log4j in Spring MVC
- How to use log4j in Struts2
Other Java Coding Tutorials:
- 10 Common Mistakes Every Beginner Java Programmer Makes
- 10 Java Core Best Practices Every Java Programmer Should Know
- How to become a good programmer? 13 tasks you should practice now
About the Author:
 Nam Ha Minh is certified Java programmer (SCJP and SCWCD). He began programming with Java back in the days of Java 1.4 and has been passionate about it ever since. You can connect with him on Facebook and watch his Java videos on YouTube.
Comments
Very simple and understandable explanation.