JSP Servlet JDBC MySQL Create Read Update Delete (CRUD) Example
- Details
- Written by Nam Ha Minh
- Last Updated on 05 November 2023 | Print Email
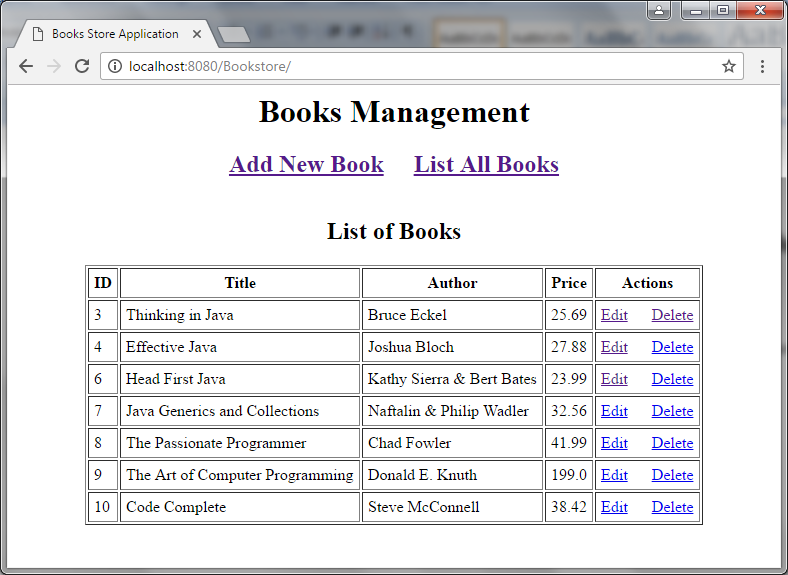 You will learn to how to build this application using the following technologies:
- Java Servlets and Java Server Pages (JSP)
- JSP Standard Tag Library (JSTL)
- Java Database Connectivity (JDBC)
- MySQL database
- Apache Tomcat Server
1. Creating MySQL Database
For simplicity, we have only one table. Execute the following MySQL script to create a database named Bookstore and a table named Book:CREATE DATABASE 'Bookstore'; USE Bookstore; CREATE TABLE `book` ( `book_id` int(11) NOT NULL AUTO_INCREMENT, `title` varchar(128) NOT NULL, `author` varchar(45) NOT NULL, `price` float NOT NULL, PRIMARY KEY (`book_id`), UNIQUE KEY `book_id_UNIQUE` (`book_id`), UNIQUE KEY `title_UNIQUE` (`title`) ) ENGINE=InnoDB AUTO_INCREMENT=11 DEFAULT CHARSET=latin1The table book has structure like this:
 You can use either MySQL Command Line Client or MySQL Workbench tool to create the database.
2. Creating Eclipse Project with Maven
In Eclipse IDE, click File > New > Dynamic Web Project to create a new Java dynamic web project. Name the project as Bookstore: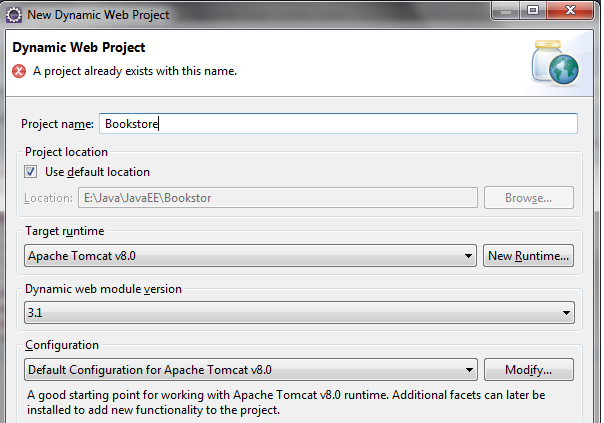 Remember to choose Target runtime as Apache Tomcat v8.0 and Dynamic web module version as 3.1 (this is the Java servlet version).Click Finish. Then convert this project to a Maven project by right click on the project, select Configure > Convert to Maven Project, as shown below:
 You need to enter information to create Maven POM file, such as group ID, artifact ID, etc. Then add the following dependencies to the pom.xml file:
<dependencies>
	<dependency>
		<groupId>javax.servlet</groupId>
		<artifactId>javax.servlet-api</artifactId>
		<version>3.1.0</version>
		<scope>provided</scope>
	</dependency>
	<dependency>
		<groupId>javax.servlet.jsp</groupId>
		<artifactId>javax.servlet.jsp-api</artifactId>
		<version>2.3.1</version>
		<scope>provided</scope>
	</dependency>
	<dependency>
		<groupId>jstl</groupId>
		<artifactId>jstl</artifactId>
		<version>1.2</version>
	</dependency>
	<dependency>
		<groupId>mysql</groupId>
		<artifactId>mysql-connector-java</artifactId>
		<version>5.1.30</version>
	</dependency>
</dependencies>
As you can see, the dependencies here are for Servlet, JSP, JSTL and MySQL connector Java (a JDBC driver for MySQL).And remember to create a Java package for the project, here we use the package name net.codejava.javaee.bookstore.
3. Writing Model Class
Next, create a Java class named Book.java to model a book entity in the database with the following code:package net.codejava.javaee.bookstore;
/**
* Book.java
* This is a model class represents a book entity
* @author www.codejava.net
*
*/
public class Book {
protected int id;
protected String title;
protected String author;
protected float price;
public Book() {
}
public Book(int id) {
this.id = id;
}
public Book(int id, String title, String author, float price) {
this(title, author, price);
this.id = id;
}
public Book(String title, String author, float price) {
this.title = title;
this.author = author;
this.price = price;
}
public int getId() {
return id;
}
public void setId(int id) {
this.id = id;
}
public String getTitle() {
return title;
}
public void setTitle(String title) {
this.title = title;
}
public String getAuthor() {
return author;
}
public void setAuthor(String author) {
this.author = author;
}
public float getPrice() {
return price;
}
public void setPrice(float price) {
this.price = price;
}
}As you can see, this class has 4 fields according to 4 columns in the table book in database: id, title, author and price. 
Java Servlet, JSP and Hibernate: Build eCommerce Website
Learn Java Servlet, JSP, Hibernate framework to build an eCommerce Website (with PayPal and credit card payment)
4. Coding DAO class
Next, we need to implement a Data Access Layer (DAO) class that provides CRUD (Create, Read, Update, Delete) operations for the table book in database. Here’s the full source code of the BookDAOclass:package net.codejava.javaee.bookstore;
import java.sql.Connection;
import java.sql.DriverManager;
import java.sql.PreparedStatement;
import java.sql.ResultSet;
import java.sql.SQLException;
import java.sql.Statement;
import java.util.ArrayList;
import java.util.List;
/**
* AbstractDAO.java
* This DAO class provides CRUD database operations for the table book
* in the database.
* @author www.codejava.net
*
*/
public class BookDAO {
private String jdbcURL;
private String jdbcUsername;
private String jdbcPassword;
private Connection jdbcConnection;
public BookDAO(String jdbcURL, String jdbcUsername, String jdbcPassword) {
this.jdbcURL = jdbcURL;
this.jdbcUsername = jdbcUsername;
this.jdbcPassword = jdbcPassword;
}
protected void connect() throws SQLException {
if (jdbcConnection == null || jdbcConnection.isClosed()) {
try {
Class.forName("com.mysql.jdbc.Driver");
} catch (ClassNotFoundException e) {
throw new SQLException(e);
}
jdbcConnection = DriverManager.getConnection(
jdbcURL, jdbcUsername, jdbcPassword);
}
}
protected void disconnect() throws SQLException {
if (jdbcConnection != null && !jdbcConnection.isClosed()) {
jdbcConnection.close();
}
}
public boolean insertBook(Book book) throws SQLException {
String sql = "INSERT INTO book (title, author, price) VALUES (?, ?, ?)";
connect();
PreparedStatement statement = jdbcConnection.prepareStatement(sql);
statement.setString(1, book.getTitle());
statement.setString(2, book.getAuthor());
statement.setFloat(3, book.getPrice());
boolean rowInserted = statement.executeUpdate() > 0;
statement.close();
disconnect();
return rowInserted;
}
public List<Book> listAllBooks() throws SQLException {
List<Book> listBook = new ArrayList<>();
String sql = "SELECT * FROM book";
connect();
Statement statement = jdbcConnection.createStatement();
ResultSet resultSet = statement.executeQuery(sql);
while (resultSet.next()) {
int id = resultSet.getInt("book_id");
String title = resultSet.getString("title");
String author = resultSet.getString("author");
float price = resultSet.getFloat("price");
Book book = new Book(id, title, author, price);
listBook.add(book);
}
resultSet.close();
statement.close();
disconnect();
return listBook;
}
public boolean deleteBook(Book book) throws SQLException {
String sql = "DELETE FROM book where book_id = ?";
connect();
PreparedStatement statement = jdbcConnection.prepareStatement(sql);
statement.setInt(1, book.getId());
boolean rowDeleted = statement.executeUpdate() > 0;
statement.close();
disconnect();
return rowDeleted;
}
public boolean updateBook(Book book) throws SQLException {
String sql = "UPDATE book SET title = ?, author = ?, price = ?";
sql += " WHERE book_id = ?";
connect();
PreparedStatement statement = jdbcConnection.prepareStatement(sql);
statement.setString(1, book.getTitle());
statement.setString(2, book.getAuthor());
statement.setFloat(3, book.getPrice());
statement.setInt(4, book.getId());
boolean rowUpdated = statement.executeUpdate() > 0;
statement.close();
disconnect();
return rowUpdated;
}
public Book getBook(int id) throws SQLException {
Book book = null;
String sql = "SELECT * FROM book WHERE book_id = ?";
connect();
PreparedStatement statement = jdbcConnection.prepareStatement(sql);
statement.setInt(1, id);
ResultSet resultSet = statement.executeQuery();
if (resultSet.next()) {
String title = resultSet.getString("title");
String author = resultSet.getString("author");
float price = resultSet.getFloat("price");
book = new Book(id, title, author, price);
}
resultSet.close();
statement.close();
return book;
}
}As you can see, the JDBC connection information is injected to this class via its constructor. And the following methods are for CRUD operations:- Create: insertBook(Book)- this inserts a new row into the table book.
- Read: listAllBooks() - this retrieves all rows; and getBook(id)- returns a specific row based on the primary key value (ID).
- Update: updateBook(Book)- this updates an existing row in the database.
- Delete: deleteBook(Book) - this removes an existing row in the database based on the primary key value (ID).
5. Writing Book Listing JSP Page
Next, create a JSP page for displaying all books from the database. The following is code of the BookList.jsppage under the WebContentdirectory in the project:<%@ page language="java" contentType="text/html; charset=UTF-8"
pageEncoding="UTF-8"%>
<%@ taglib uri="http://java.sun.com/jsp/jstl/core" prefix="c" %>
<html>
<head>
<title>Books Store Application</title>
</head>
<body>
<center>
<h1>Books Management</h1>
<h2>
<a href="/new">Add New Book</a>
<a href="/list">List All Books</a>
</h2>
</center>
<div align="center">
<table border="1" cellpadding="5">
<caption><h2>List of Books</h2></caption>
<tr>
<th>ID</th>
<th>Title</th>
<th>Author</th>
<th>Price</th>
<th>Actions</th>
</tr>
<c:forEach var="book" items="${listBook}">
<tr>
<td><c:out value="${book.id}" /></td>
<td><c:out value="${book.title}" /></td>
<td><c:out value="${book.author}" /></td>
<td><c:out value="${book.price}" /></td>
<td>
<a href="/edit?id=<c:out value='${book.id}' />">Edit</a>
<a href="/delete?id=<c:out value='${book.id}' />">Delete</a>
</td>
</tr>
</c:forEach>
</table>
</div>
</body>
</html>In this JSP page, we use JSTL to display records of the table book from database. The listBook object will be passed from a servlet which we will create later.On running, this page looks something like this: As you can see, on this page we have two hyperlinks at the top menu for creating a new book (Add New Book) and showing all books (List All Books). In addition, for each individual book there are two links for editing (Edit) and deleting (Delete).
 6. Writing Book Form JSP Page
Next, we create a JSP page for creating a new book called BookForm.jsp. Here’s its full source code:<%@ page language="java" contentType="text/html; charset=UTF-8"
pageEncoding="UTF-8"%>
<%@ taglib uri="http://java.sun.com/jsp/jstl/core" prefix="c" %>
<html>
<head>
<title>Books Store Application</title>
</head>
<body>
<center>
<h1>Books Management</h1>
<h2>
<a href="/new">Add New Book</a>
<a href="/list">List All Books</a>
</h2>
</center>
<div align="center">
<c:if test="${book != null}">
<form action="update" method="post">
</c:if>
<c:if test="${book == null}">
<form action="insert" method="post">
</c:if>
<table border="1" cellpadding="5">
<caption>
<h2>
<c:if test="${book != null}">
Edit Book
</c:if>
<c:if test="${book == null}">
Add New Book
</c:if>
</h2>
</caption>
<c:if test="${book != null}">
<input type="hidden" name="id" value="<c:out value='${book.id}' />" />
</c:if>
<tr>
<th>Title: </th>
<td>
<input type="text" name="title" size="45"
value="<c:out value='${book.title}' />"
/>
</td>
</tr>
<tr>
<th>Author: </th>
<td>
<input type="text" name="author" size="45"
value="<c:out value='${book.author}' />"
/>
</td>
</tr>
<tr>
<th>Price: </th>
<td>
<input type="text" name="price" size="5"
value="<c:out value='${book.price}' />"
/>
</td>
</tr>
<tr>
<td colspan="2" align="center">
<input type="submit" value="Save" />
</td>
</tr>
</table>
</form>
</div>
</body>
</html>This page will be served for both creating a new and editing an existing book. In editing mode, the servlet will pass a Book object to the request and we use the JSTL’s <c:if> tag to determine whether this object is available or not. If available (not null) the form is in editing mode, otherwise it is in creating mode.On running, this page shows new form like this: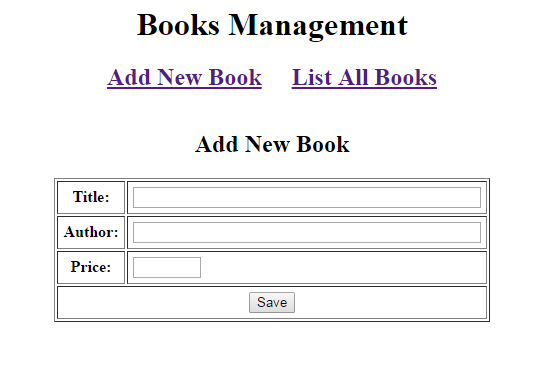 And on editing mode:
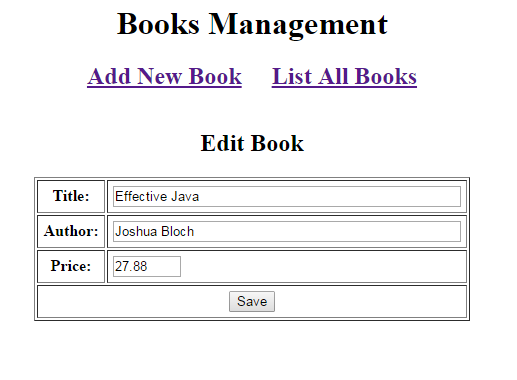 We’ll see how to connect the DAO class with the JSP pages based on user’s requests in the next section: creating the servlet class.
 7. Coding Controller Servlet Class
Now, the most difficult but interesting part is implement a Java Servlet that acts as a page controller to handle all requests from the client. Let’s look at the code first:package net.codejava.javaee.bookstore;
import java.io.IOException;
import java.sql.SQLException;
import java.util.List;
import javax.servlet.RequestDispatcher;
import javax.servlet.ServletException;
import javax.servlet.http.HttpServlet;
import javax.servlet.http.HttpServletRequest;
import javax.servlet.http.HttpServletResponse;
/**
* ControllerServlet.java
* This servlet acts as a page controller for the application, handling all
* requests from the user.
* @author www.codejava.net
*/
public class ControllerServlet extends HttpServlet {
private static final long serialVersionUID = 1L;
private BookDAO bookDAO;
public void init() {
	String jdbcURL = getServletContext().getInitParameter("jdbcURL");
	String jdbcUsername = getServletContext().getInitParameter("jdbcUsername");
	String jdbcPassword = getServletContext().getInitParameter("jdbcPassword");

	bookDAO = new BookDAO(jdbcURL, jdbcUsername, jdbcPassword);

}
protected void doPost(HttpServletRequest request, HttpServletResponse response)
throws ServletException, IOException {
doGet(request, response);
}
protected void doGet(HttpServletRequest request, HttpServletResponse response)
		throws ServletException, IOException {
	String action = request.getServletPath();

	try {
		switch (action) {
		case "/new":
			showNewForm(request, response);
			break;
		case "/insert":
			insertBook(request, response);
			break;
		case "/delete":
			deleteBook(request, response);
			break;
		case "/edit":
			showEditForm(request, response);
			break;
		case "/update":
			updateBook(request, response);
			break;
		default:
			listBook(request, response);
			break;
		}
	} catch (SQLException ex) {
		throw new ServletException(ex);
	}
}
private void listBook(HttpServletRequest request, HttpServletResponse response)
		throws SQLException, IOException, ServletException {
	List<Book> listBook = bookDAO.listAllBooks();
	request.setAttribute("listBook", listBook);
	RequestDispatcher dispatcher = request.getRequestDispatcher("BookList.jsp");
	dispatcher.forward(request, response);
}
private void showNewForm(HttpServletRequest request, HttpServletResponse response)
throws ServletException, IOException {
RequestDispatcher dispatcher = request.getRequestDispatcher("BookForm.jsp");
dispatcher.forward(request, response);
}
private void showEditForm(HttpServletRequest request, HttpServletResponse response)
throws SQLException, ServletException, IOException {
int id = Integer.parseInt(request.getParameter("id"));
Book existingBook = bookDAO.getBook(id);
RequestDispatcher dispatcher = request.getRequestDispatcher("BookForm.jsp");
request.setAttribute("book", existingBook);
dispatcher.forward(request, response);
}
private void insertBook(HttpServletRequest request, HttpServletResponse response)
throws SQLException, IOException {
String title = request.getParameter("title");
String author = request.getParameter("author");
float price = Float.parseFloat(request.getParameter("price"));
Book newBook = new Book(title, author, price);
bookDAO.insertBook(newBook);
response.sendRedirect("list");
}
private void updateBook(HttpServletRequest request, HttpServletResponse response)
throws SQLException, IOException {
int id = Integer.parseInt(request.getParameter("id"));
String title = request.getParameter("title");
String author = request.getParameter("author");
float price = Float.parseFloat(request.getParameter("price"));
Book book = new Book(id, title, author, price);
bookDAO.updateBook(book);
response.sendRedirect("list");
}
private void deleteBook(HttpServletRequest request, HttpServletResponse response)
throws SQLException, IOException {
int id = Integer.parseInt(request.getParameter("id"));
Book book = new Book(id);
bookDAO.deleteBook(book);
response.sendRedirect("list");
}
}First, look at the init() method which instantiates an instance of the BookDAOclass when the servlet is instantiated for the first time. The JDBC connection information will be read from Servlet’s context parameters. This method is invoked only one time during life cycle of the servlet so it’s reasonable to put the DAO instantiation code here:public void init() {
String jdbcURL = getServletContext().getInitParameter("jdbcURL");
String jdbcUsername = getServletContext().getInitParameter("jdbcUsername");
String jdbcPassword = getServletContext().getInitParameter("jdbcPassword");
bookDAO = new BookDAO(jdbcURL, jdbcUsername, jdbcPassword);
}Next, we can see this servlet handles both GET and POST requests as the doPost()method invokes the doGet()which handles all the request:protected void doGet(HttpServletRequest request, HttpServletResponse response)
throws ServletException, IOException {
String action = request.getServletPath();
try {
switch (action) {
case "/new":
showNewForm(request, response);
break;
case "/insert":
insertBook(request, response);
break;
case "/delete":
deleteBook(request, response);
break;
case "/edit":
showEditForm(request, response);
break;
case "/update":
updateBook(request, response);
break;
default:
listBook(request, response);
break;
}
} catch (SQLException ex) {
throw new ServletException(ex);
}
}Based on the request URL (starts with /edit, /list, /new, etc) the servlet calls the corresponding methods. Here we examine one method for example:private void listBook(HttpServletRequest request, HttpServletResponse response)
throws SQLException, IOException, ServletException {
List<Book> listBook = bookDAO.listAllBooks();
request.setAttribute("listBook", listBook);
RequestDispatcher dispatcher = request.getRequestDispatcher("BookList.jsp");
dispatcher.forward(request, response);
}This method uses the DAO class to retrieve all books from the database, and then forward to the BookList.jsp page for displaying the result. Similar logic is implemented for the rest methods.I recommend you to read this famous Servlet and JSP book to master Java servlet and JSP. 8. Configuring Web.xml
To make the ControllerServlet intercepts all requests, we have to configure its mapping in the web deployment descriptor web.xml file. Open the web.xml file under WebContent\WEB-INF directory and update it with the following code:<?xml version="1.0" encoding="UTF-8"?> <web-app xmlns:xsi="http://www.w3.org/2001/XMLSchema-instance" xmlns="http://xmlns.jcp.org/xml/ns/javaee" xsi:schemaLocation="http://xmlns.jcp.org/xml/ns/javaee http://xmlns.jcp.org/xml/ns/javaee/web-app_3_1.xsd" id="WebApp_ID" version="3.1"> <display-name>Books Management Web Application</display-name> <context-param> <param-name>jdbcURL</param-name> <param-value>jdbc:mysql://localhost:3306/bookstore</param-value> </context-param> <context-param> <param-name>jdbcUsername</param-name> <param-value>root</param-value> </context-param> <context-param> <param-name>jdbcPassword</param-name> <param-value>P@ssw0rd</param-value> </context-param> <servlet> <servlet-name>ControllerServlet</servlet-name> <servlet-class>net.codejava.javaee.bookstore.ControllerServlet</servlet-class> </servlet> <servlet-mapping> <servlet-name>ControllerServlet</servlet-name> <url-pattern>/</url-pattern> </servlet-mapping> <error-page> <exception-type>java.lang.Exception</exception-type> <location>/Error.jsp</location> </error-page> </web-app>As you can see, the <context-param> elements specify JDBC connection information (URL, username and password) for the DAO class.The <servlet> and <servlet-mapping> elements declare and specify URL mapping for the ControllerServletclass. The URL pattern /means this is the default servlet to handle all requests.The <error> page elements specify error handling page for all kind of exceptions (java.lang.Exception) which may occur during the life of the application.For details about error handling in Java web application, read this tutorial.
9. Writing Error JSP page
Here’s the code of the Error.jsppage which simply shows the exception message:<%@ page language="java" contentType="text/html; charset=UTF-8"
pageEncoding="UTF-8" isErrorPage="true" %>
<!DOCTYPE html PUBLIC "-//W3C//DTD HTML 4.01 Transitional//EN"
"http://www.w3.org/TR/html4/loose.dtd">
<html>
<head>
<title>Error</title>
</head>
<body>
<center>
<h1>Error</h1>
<h2><%=exception.getMessage() %><br/> </h2>
</center>
</body>
</html>It looks something like this when an error occurs: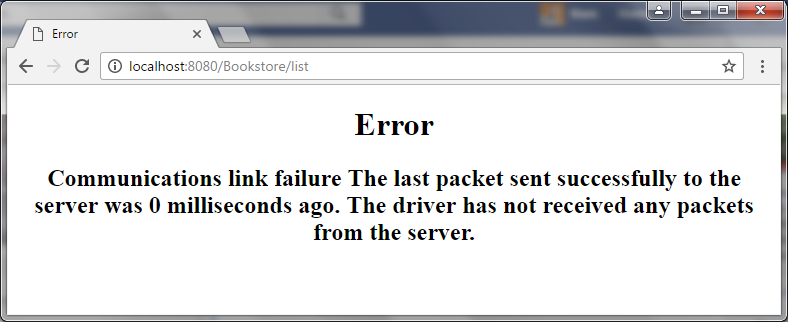
10. Deploying and Testing the Application
So far we have completed the code of the project. It’s time to deploy and test the application to see how it works. Follow this tutorial in case you don’t know how to add Apache Tomcat server in Eclipse.Type the following URL in your web browser to access the Bookstore application:http://localhost:8080/Bookstore
First time, the list is empty because there hasn’t any books yet: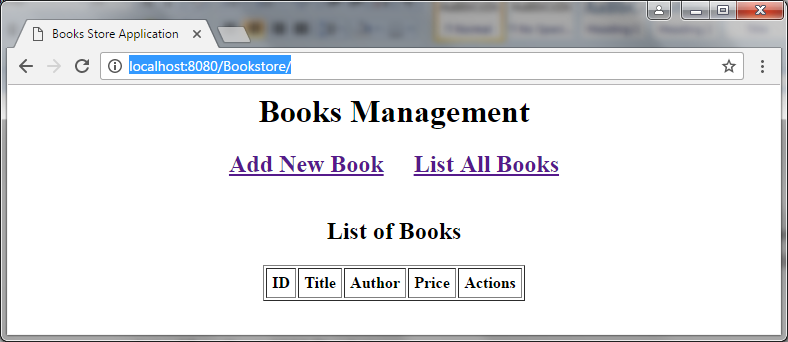 Click on the hyperlink Add New Book to begin adding a new book:
 Enter book information (title, author and price) and click Save. The application saves the book and shows the list, as shown below:
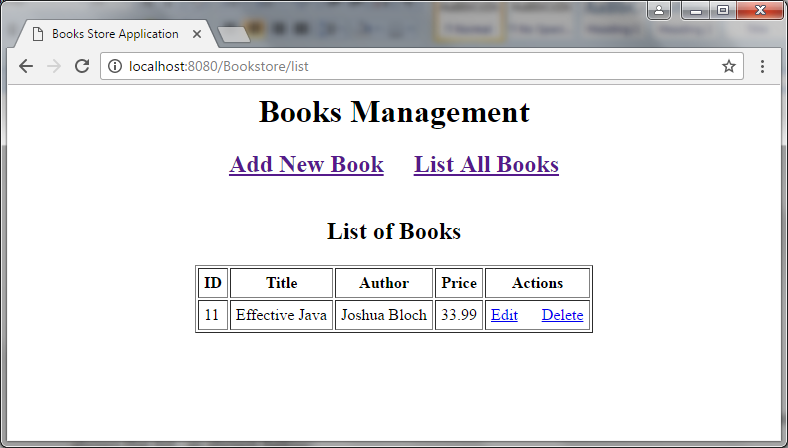 In this list, you can click on the Edit and Delete hyperlinks to edit and delete a specific book.That’s how a simple Java web application with Serlvet, JSP, JDBC and MySQL is built. We hope you find this tutorial helpful and you can download the whole project under the Attachments section below.If you want to have a full video training, I recommend you to take my course on Udemy Java Servlet, JSP and Hibernate: Build a Complete Website.
Related Tutorials:
- Java Servlet and JSP for beginners
- JDBC Create, Retrieve, Update and Delete (CRUD) Tutorial
- How to list database records in JSP
- Handling Error for Java web applications
Other Java Servlet Tutorials:
- Java Servlet Quick Start for beginners (XML)
- Java Servlet for beginners (annotations)
- Handling HTML form data with Java Servlet
- Java File Download Servlet Example
- Upload file to servlet without using HTML form
- How to use Cookies in Java web application
- How to use Session in Java web application
About the Author:
 Nam Ha Minh is certified Java programmer (SCJP and SCWCD). He began programming with Java back in the days of Java 1.4 and has been passionate about it ever since. You can connect with him on Facebook and watch his Java videos on YouTube.
Comments
Message /delete
Description The origin server did not find a current representation for the target resource or is not willing to disclose that one exists.