Hibernate One-to-Many XML Mapping Example
- Details
- Written by Nam Ha Minh
- Last Updated on 12 December 2023 | Print Email
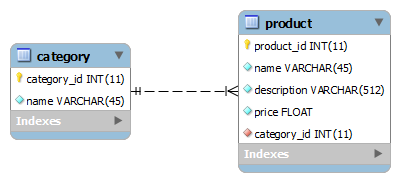
In this tutorial we are going to understand how to use XML to map a one-to-many association between Java objects and database tables using Hibernate framework. We will create a sample Hibernate-based application to manage the following entity relationship:

In this relationship, a category can contain one or many products.
The following pieces of software/library are used for this tutorial’s sample project (of course you can use newer versions):
You can click on a link to download the appropriate software/library.
Table of content:
1. Creating sample database and tables
Execute the following script in MySQL Workbench’s SQL Editor to create a database called stockdb with two tables named category and product:
create database stockdb;
use stockdb;

CREATE TABLE `category` (
  `category_id` int(11) NOT NULL AUTO_INCREMENT,
  `name` varchar(45) NOT NULL,
  PRIMARY KEY (`category_id`)
);

CREATE TABLE `product` (
  `product_id` int(11) NOT NULL AUTO_INCREMENT,
  `name` varchar(45) NOT NULL,
  `description` varchar(512) NOT NULL,
  `price` float NOT NULL,
  `category_id` int(11) NOT NULL,
  PRIMARY KEY (`product_id`),
  KEY `fk_category` (`category_id`),
  CONSTRAINT `fk_category` FOREIGN KEY (`category_id`) REFERENCES `category` (`category_id`)
);
Or type the following command in MySQL Command Line Client:
source Path\To\The\Script\File\MySQLscript.sql
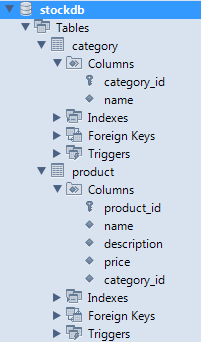
The MySQLscript.sql file can be located in the attached project or created from the above script. The newly created database would have the following structure:

2. Setting up a project in Eclipse
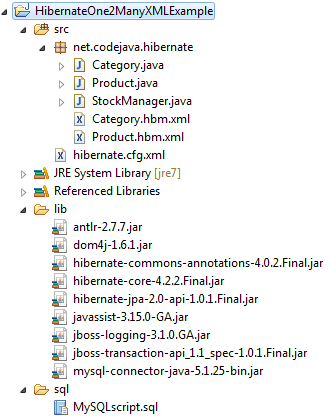
Use Eclipse IDE to create a project called HibernateOne2ManyXMLExample with the following structure:

This project consists of the following files:
- Model classes: Category.java and Product.java
- Hibernate XML mapping files: Category.hbm.xmland Product.hbm.xml
- Hibernate XML configuration file: hibernate.cfg.xml
- Test program: StockManager.java
- Hibernate required JAR libraries and MySQL Connector Java driver:
- hibernate-core-4.2.2.Final.jar
- hibernate-commons-annotations-4.0.2.Final.jar
- mysql-connector-java-5.1.25-bin.jar
- jboss-transaction-api_1.1_spec-1.0.1.Final.jar
- hibernate-jpa-2.0-api-1.0.1.Final.jar
- jboss-logging-3.1.0.GA.jar
- antlr-2.7.7.jar
- dom4j-1.6.1.jar
- javassist-3.15.0-GA.jar
- MySQL script file: MySQLscript.sql
The Hibernate jar files above can be found under hibernate-release-VERSION\lib\required directory from Hibernate distribution archive.
3. Coding Hibernate Model Classes
Create two JavaBean-style classes Category.java and Product.java to model the two tables category and product, respectively.
File net\codejava\hibernate\Category.java:
package net.codejava.hibernate;

import java.util.Set;

public class Category {

	private long id;
	private String name;

	private Set<Product> products;

	public Category() {
	}

	public Category(String name) {
		this.name = name;
	}

	// getters and setters...

}
File net\codejava\hibernate\Product.java:
package net.codejava.hibernate;

public class Product {
	private long id;
	private String name;
	private String description;
	private float price;
	private Category category;

	public Product() {
	}

	public Product(String name, String description, float price,
			Category category) {
		this.name = name;
		this.description = description;
		this.price = price;
		this.category = category;
	}


	// getters and setters...

}
NOTES: To model the one-to-many association, we put cross-references in both side:
- A Category contains a set of Products:
private Set<Product> products;
- A Product links back to its category:
private Category category;
4. Creating Hibernate Mapping Files
Create two XML files Category.hbm.xml and Product.hbm.xml to tell Hibernate how to map the JavaBean classes above with the database tables.
File net\codejava\hibernate\Category.hbm.xml:
<?xml version="1.0" encoding="UTF-8"?>
<!DOCTYPE hibernate-mapping PUBLIC
        "-//Hibernate/Hibernate Mapping DTD 3.0//EN"
        "http://www.hibernate.org/dtd/hibernate-mapping-3.0.dtd">
<hibernate-mapping package="net.codejava.hibernate">
	<class name="Category" table="CATEGORY">
		<id name="id" column="CATEGORY_ID">
			<generator class="native"/>
		</id>
		<property name="name" column="NAME" />

		<set name="products" inverse="true" cascade="all">
			<key column="CATEGORY_ID" not-null="true" />
			<one-to-many class="Product"/>
		</set>
	</class>
</hibernate-mapping>
File net\codejava\hibernate\Product.hbm.xml:
<?xml version="1.0" encoding="UTF-8"?>
<!DOCTYPE hibernate-mapping PUBLIC
        "-//Hibernate/Hibernate Mapping DTD 3.0//EN"
        "http://www.hibernate.org/dtd/hibernate-mapping-3.0.dtd">
<hibernate-mapping package="net.codejava.hibernate">
	<class name="Product" table="PRODUCT">
		<id name="id" column="PRODUCT_ID">
			<generator class="native"/>
		</id>
		<property name="name" column="NAME" />
		<property name="description" column="DESCRIPTION" />
		<property name="price" column="PRICE" type="float" />

		<many-to-one name="category" class="Category"
			column="CATEGORY_ID" not-null="true"/>
	</class>
</hibernate-mapping>
NOTES: Pay attention to the attribute inverse=”true” of the <set>element in the Category.hbm.xml file. That means this side (Category) is not the relationship owner. Instead, it is the reverse side (Product) is the relationship owner. Because the product table has a foreign key that refers to the category table, it is the owner of this one-to-many relationship. So keep in mind that using inverse=”true” is mandatory in this case.
5. Writing Hibernate Configuration File
Create the Hibernate configuration file (hibernate.cfg.xml) to specify database type, connection details and the mapping files:
<?xml version='1.0' encoding='utf-8'?>
<!DOCTYPE hibernate-configuration PUBLIC
        "-//Hibernate/Hibernate Configuration DTD 3.0//EN"
        "http://www.hibernate.org/dtd/hibernate-configuration-3.0.dtd">
<hibernate-configuration>
  <session-factory>
    <!-- Database connection settings -->
    <property name="connection.driver_class">com.mysql.jdbc.Driver</property>
    <property name="connection.url">jdbc:mysql://localhost:3306/stockdb</property>
    <property name="connection.username">root</property>
    <property name="connection.password">secret</property>
    <property name="dialect">org.hibernate.dialect.MySQLDialect</property>
    <property name="show_sql">true</property>

    <mapping resource="net/codejava/hibernate/Category.hbm.xml"/>
    <mapping resource="net/codejava/hibernate/Product.hbm.xml"/>

  </session-factory>
</hibernate-configuration>
NOTES: Update the database username and password corresponding to your database settings.
6. Coding a Test Program
Following is code of the test program that persists some sample data:
package net.codejava.hibernate;

import java.util.HashSet;
import java.util.Set;

import org.hibernate.Session;
import org.hibernate.SessionFactory;
import org.hibernate.cfg.Configuration;
import org.hibernate.service.ServiceRegistry;
import org.hibernate.service.ServiceRegistryBuilder;

/**
 *
 * This program demonstrates using Hibernate framework to manage a
 * bidirectional one-to-many association.
 * @author www.codejava.net
 *
 */
public class StockManager {

	public static void main(String[] args) {
		// loads configuration and mappings
		Configuration configuration = new Configuration().configure();
		ServiceRegistryBuilder registry = new ServiceRegistryBuilder();
		registry.applySettings(configuration.getProperties());
		ServiceRegistry serviceRegistry = registry.buildServiceRegistry();

		// builds a session factory from the service registry
		SessionFactory sessionFactory = configuration.buildSessionFactory(serviceRegistry);

		// obtains the session
		Session session = sessionFactory.openSession();
		session.beginTransaction();

		Category category = new Category("Computer");

		Product pc = new Product("DELL PC", "Quad-core PC", 1200, category);

		Product laptop = new Product("MacBook", "Apple High-end laptop", 2100, category);

		Product phone = new Product("iPhone 5", "Apple Best-selling smartphone", 499, category);

		Product tablet = new Product("iPad 3", "Apple Best-selling tablet", 1099, category);

		Set<Product> products = new HashSet<Product>();
		products.add(pc);
		products.add(laptop);
		products.add(phone);
		products.add(tablet);

		category.setProducts(products);

		session.save(category);

		session.getTransaction().commit();
		session.close();
	}
}
Output of the program:
Hibernate: insert into CATEGORY (NAME) values (?)
Hibernate: insert into PRODUCT (NAME, DESCRIPTION, PRICE, CATEGORY_ID) values (?, ?, ?, ?)
Hibernate: insert into PRODUCT (NAME, DESCRIPTION, PRICE, CATEGORY_ID) values (?, ?, ?, ?)
Hibernate: insert into PRODUCT (NAME, DESCRIPTION, PRICE, CATEGORY_ID) values (?, ?, ?, ?)
Hibernate: insert into PRODUCT (NAME, DESCRIPTION, PRICE, CATEGORY_ID) values (?, ?, ?, ?)
Result in the category table:

Result in the product table:

You can get the sample project code attached below, or check the code on GitHub.
Related Hibernate One-to-Many Tutorials:
- Hibernate One-to-Many Association Annotations Example
- Hibernate One-to-Many Association on Join Table Annotations Example
- Hibernate One-to-Many Using Join Table XML Mapping Example
Other Hibernate Tutorials:
- Java Hibernate JPA Annotations Tutorial for Beginners
- Hibernate Hello World Tutorial for Beginners with Eclipse and MySQL
- Hibernate One-to-One Association on Primary Key Annotations Example
- Hibernate Many-to-Many Association with Extra Columns in Join Table Example
- Hibernate Enum Type Mapping Example
- Hibernate Binary Data and BLOB Mapping Example
- Hibernate Query Language (HQL) Example
- Java Hibernate Reverse Engineering Tutorial with Eclipse and MySQL
- Hibernate Basics - 3 ways to delete an entity from the datastore
About the Author:
 Nam Ha Minh is certified Java programmer (SCJP and SCWCD). He began programming with Java back in the days of Java 1.4 and has been passionate about it ever since. You can connect with him on Facebook and watch his Java videos on YouTube.
Comments
actually in real life application we select category then add product. in your current example value is inserted on both table. means each time we insert value in product table a category table also updated with some value.
thanks
"Caused by: org.hibernate.boot.MappingException: Association [com.pos.storekeeper.storekeeper_module.hibernateFiles.dto.Category.products] references an unmapped entity [com.pos.storekeeper.storekeeper_module.hibernateFiles.dto.Category.products] : origin(hibernate_files/mapping/Category.hbm.xml"
This means that mapping is not done. in category class. But I did the same as you have done here. please help