Struts Beginner Tutorial (Eclipse + Tomcat + XML)
- Details
- Written by Nam Ha Minh
- Last Updated on 01 August 2019 | Print Email
1. Quick overview of Struts framework
Struts is a web framework for building Java web applications based on Model-View-Controller (MVC) architecture. It is open-sourced and actively developed and maintained by Apache Software Foundation.The following picture briefly explains how Struts work: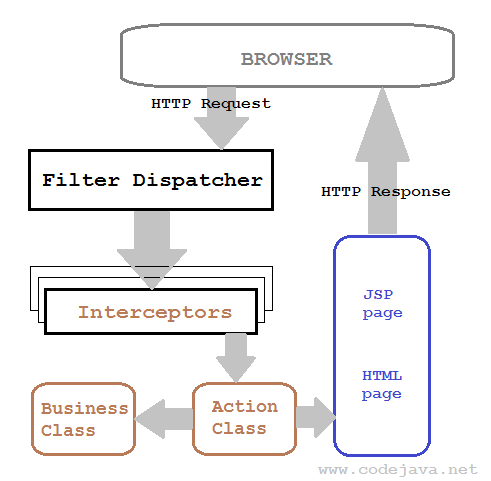 Here the business class presents the Model, the JSP/HTML represents the View, and the action class represents the Controller and often acts as the Model (with associated JavaBean-style setters/getters). We can configure interceptors to intercept the requests for specific purpose, and the filter dispatcher acts as the front controller between the framework and the clients. All these things can be configured in struts.xml configuration file.For detailed introduction about the framework, see the article: Introduction to Struts2 framework.
2. Workflow of the sample application
Following is workflow of the application we are going to develop with Struts: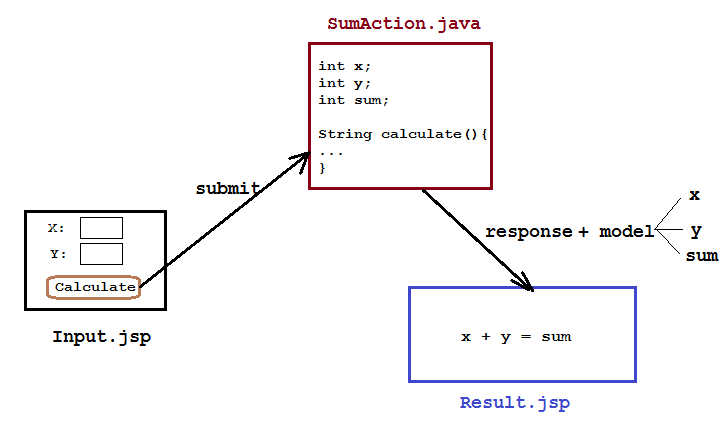
3. Downloading Struts distribution
Download the latest distribution of Struts here. You can download only the essential dependencies (struts-x.x.x-lib.zip) and extract the zip archive into a desired location. All the essential jar files are under struts-x.x.x\lib directory, but for this beginner tutorial, we will require just a few of them.4. Setting up the project in Eclipse
In Eclipse, make sure that Java EE is the currently active perspective, select File > New > Dynamic Web Project from main menu. In the New Dynamic Web Project dialog, type/select the following information:- Project name: Struts2Beginner
- Project location: use your own directory.
- Target runtime: Apache Tomcat v7.0
- Dynamic web module version: 3.0
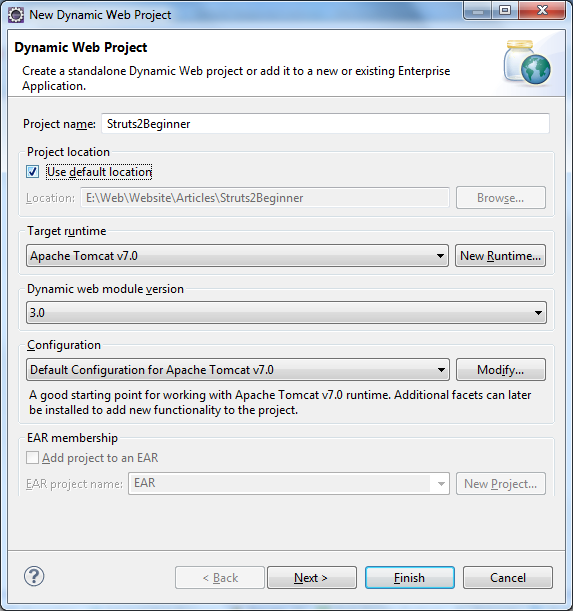 Click Next two times. In the last screen (Web Module), check the option: Generate web.xml deployment descriptor:
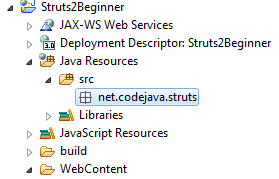
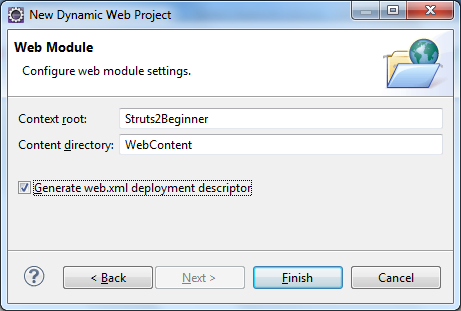 Click Finish, Eclipse will generate some basic stuffs for the project.Create a Java package called net.codejava.struts under JavaResources\src directory:
 Copy the following jar files from struts-2.3.8\lib directory to project’s WebContent\WEB-INF\lib directory:
- commons-fileupload-1.2.2.jar
- commons-io-2.0.1.jar
- commons-lang3-3.1.jar
- commons-logging-1.1.1.jar
- commons-logging-api-1.1.jar
- freemarker-2.3.19.jar
- javassist-3.11.0.GA.jar
- ognl-3.0.6.jar
- struts2-core-2.3.8.jar
- xwork-core-2.3.8.jar
5. Coding input page
Create Input.jsp file under project’s WebContent directory with the following code:<%@ taglib prefix="s" uri="/struts-tags" %>
<%@ page language="java" contentType="text/html; charset=ISO-8859-1"
pageEncoding="ISO-8859-1"%>
<!DOCTYPE html PUBLIC "-//W3C//DTD HTML 4.01 Transitional//EN"
"http://www.w3.org/TR/html4/loose.dtd">
<html>
<head>
<meta http-equiv="Content-Type" content="text/html; charset=ISO-8859-1">
<title>Struts2 beginner example application</title>
</head>
<body>
<center>
<h2>Calculate sum of two numbers</h2>
<s:form action="calculateSumAction" method="post">
<s:textfield name="x" size="10" label="Enter X" />
<s:textfield name="y" size="10" label="Enter Y" />
<s:submit value="Calculate" />
</s:form>
</center>
</body>
</html>In this JSP page, we use some Struts’ tags (starting with prefix s:) to build a form with two text fields and a submit button. The form would look like this: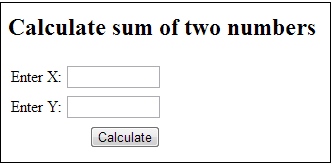 The Struts tags are imported by the following taglib directive:
<%@ taglib prefix="s" uri="/struts-tags" %>On submitting this form, the action calculateSumAction will be invoked. We will create the action class right now, and configure it in struts.xml file later.
6. Coding Struts action class
Under package net.codejava.struts, create a class called SumAction.java with the following code:package net.codejava.struts;
import com.opensymphony.xwork2.ActionSupport;
public class SumAction extends ActionSupport {
private int x;
private int y;
private int sum;
/**
* The action method
* @return name of view
*/
public String calculate() {
sum = x + y;
return SUCCESS;
}
// setters and getters for x, y, and sum:
public int getX() {
return x;
}
public void setX(int x) {
this.x = x;
}
public int getY() {
return y;
}
public void setY(int y) {
this.y = y;
}
public int getSum() {
return sum;
}
public void setSum(int sum) {
this.sum = sum;
}
}In this action class, we declare three private variables x, y, sum and its corresponding getters and setters. The framework will use the setters to fetch values from the input page, and use the getters to print values in result page.The method calculate() is the action method which will be invoked by the framework when the action is called. Which method to be invoked can be configured in struts.xml file. This method simply calculates sum of two numbers and returns a String which is logical name of a view. The framework will look for a matching view file and send it to the client. The method returns a String constant named SUCCESS which equals to the logical name “success”.Mapping logical view names to physical view files for action classes are configured in struts.xml file (We will configure the mapping later).Though not required, by extending the ActionSupport class we can reuse some predefined constants such as SUCCESS, INPUT, ERROR, etc. 7. Coding result page
Create Result.jsp file under project’s WebContent directory with the following code:<%@ taglib prefix="s" uri="/struts-tags" %>
<%@ page language="java" contentType="text/html; charset=ISO-8859-1"
pageEncoding="ISO-8859-1"%>
<!DOCTYPE html PUBLIC "-//W3C//DTD HTML 4.01 Transitional//EN"
"http://www.w3.org/TR/html4/loose.dtd">
<html>
<head>
<meta http-equiv="Content-Type" content="text/html; charset=ISO-8859-1">
<title>Sum Result</title>
</head>
<body>
Sum of <s:property value="x"/>
and <s:property value="y"/>
is:
<s:property value="sum"/>
</body>
</html>This JSP page displays values of the three variables in the action class: x, y and sum, by using Struts' <s:property> tag. 8. Wiring the pieces together in struts.xml
So far we have the input page, the action class and the result page, but they haven’t been connected yet. So we are going to connect these pieces together in struts.xml configuration file.<?xml version="1.0" encoding="UTF-8"?>
<!DOCTYPE struts PUBLIC
"-//Apache Software Foundation//DTD Struts Configuration 2.0//EN"
"http://struts.apache.org/dtds/struts-2.0.dtd">
<struts>
<package name="Struts2Beginner" extends="struts-default">
<action name="calculateSumAction" class="net.codejava.struts.SumAction"
method="calculate">
<result name="success">/Result.jsp</result>
<result name="input">/Input.jsp</result>
</action>
</package>
</struts>Create struts.xml file under JavaResources\src directory with the following content:- The <package> element defines a logical group of a Struts application. It extends the struts-default package which is built into Struts core to provide some defaults from which other packages can inherit.
- The <action>element wires an action class with its views. We specify some attributes:
- name: name of the action. This name must match value of the action’s attribute of <form> tag.
- class: fully-qualified name of the action class.
- method: name of a method in the action class (action method). The specified method will be executed by the framework when the action is called.
- The <result> elements specify mapping between logical view names (returned from the action method) to physical view files. The framework picks up a view based on the String returned from the action method, which should match with the name attribute of a <result>element. Here we defined two mappings:
- "success" maps to "/Result.jsp" file: The action method calculate() returns "success" so the Result.jsp file will be picked up and sent to the client.
- "input" maps to "/Input.jsp" file: When we specify "input" for the action, the framework will automatically fetch field values from the Input.jsp page to the action class’ properties (which are x, y and sum in this application).
NOTE: In Struts, action class and view mapping can be configured either by XML or annotation types. In this tutorial, we utilize the XML configuration.
9. Configuring Struts in web.xml
Configure dispatcher filter for Struts as follows:<?xml version="1.0" encoding="UTF-8"?> <web-app xmlns:xsi="http://www.w3.org/2001/XMLSchema-instance" xmlns="http://java.sun.com/xml/ns/javaee" xmlns:web="http://java.sun.com/xml/ns/javaee/web-app_2_5.xsd" xsi:schemaLocation="http://java.sun.com/xml/ns/javaee http://java.sun.com/xml/ns/javaee/web-app_3_0.xsd" id="WebApp_ID" version="3.0"> <display-name>Struts2Beginner</display-name> <filter> <filter-name>struts2</filter-name> <filter-class> org.apache.struts2.dispatcher.ng.filter.StrutsPrepareAndExecuteFilter </filter-class> </filter> <filter-mapping> <filter-name>struts2</filter-name> <url-pattern>/*</url-pattern> </filter-mapping> </web-app>In the <filter-mapping> element, we specify that all URLs (pattern: /*) will be handled by the Struts dispatcher filter.
10. Deploying and testing the Struts hello world application
Switch to the Servers view in Eclipse, right click on the server name (Tomcat v7.0 Server at localhost) and select Add and Remove…, then add the Struts2Beginner application to the server: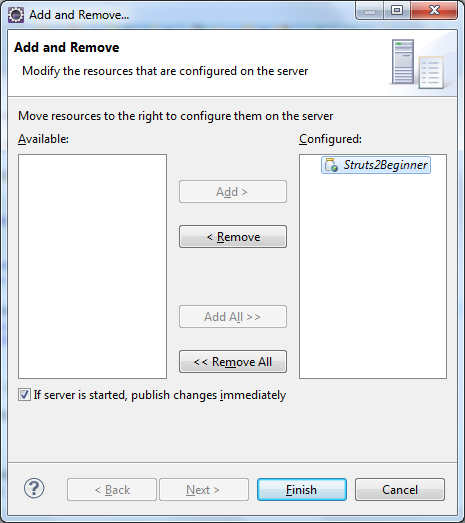 Click Finish and start the server. Open a web browser and type the following URL into its address bar:
http://localhost:8080/Struts2Beginner/Input.jsp
The input form gets displayed, type two numbers X, Y: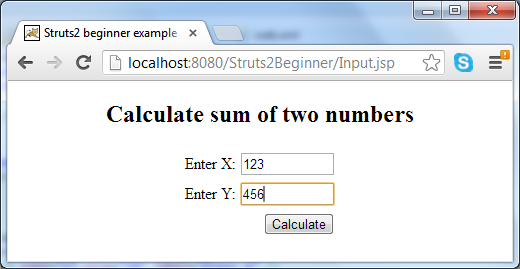 Hit Calculate button and we get the result:
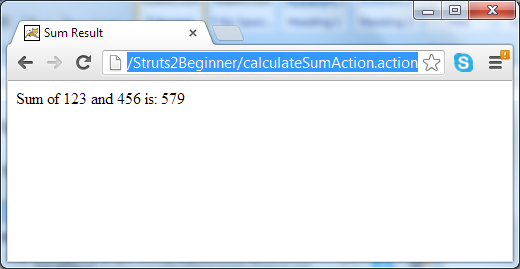 Notice the URL changed to the action in the address bar. Congratulations! We have successfully built, deployed and tested our first Struts application.
 11. What we have learnt so far
We have the final project structure in Eclipse as follows: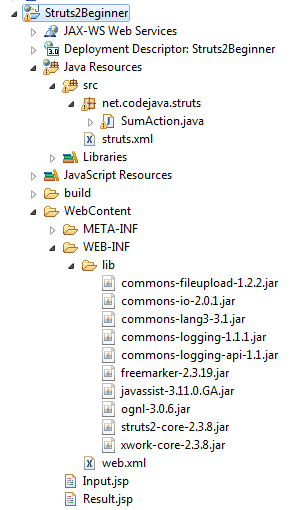
To summary, in this tutorial we have learnt:
- A brief of what Struts framework is and how it works.
- Setup a Struts-based application in Eclipse IDE.
- Using Struts tags to build input form and print value in result page.
- Understand how to implement a Struts action class.
- How to configure action class and view mapping in struts.xml file.
- How to enable Struts framework for the web application in web.xml file.
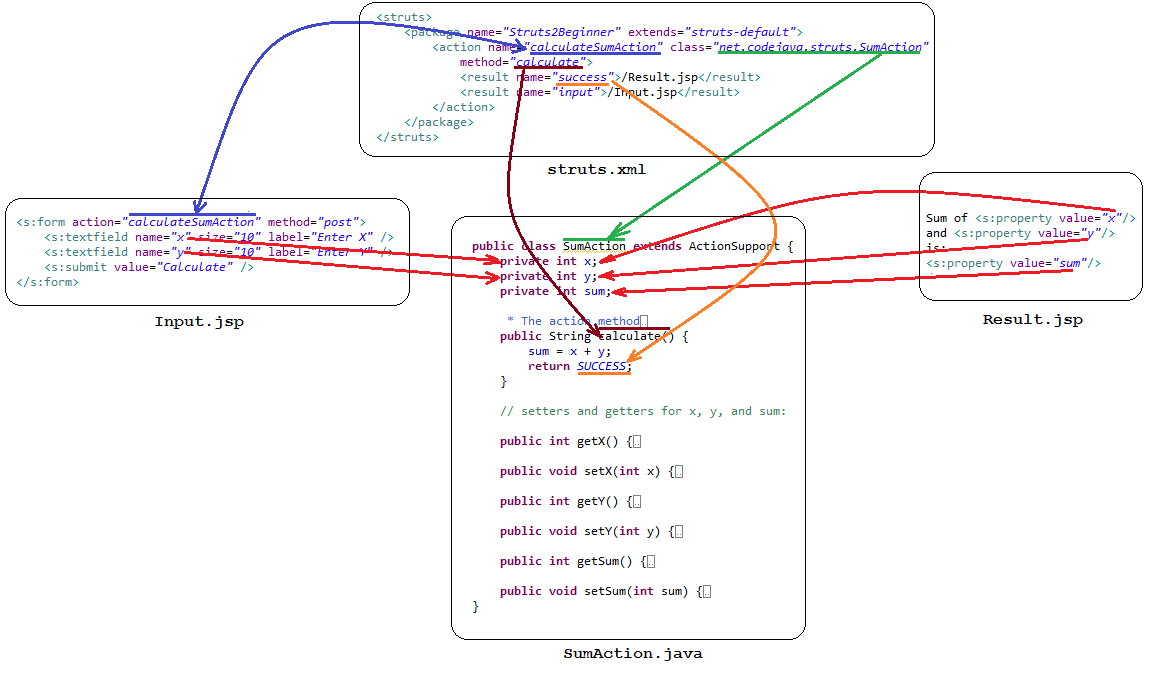
To help you memory things better, the following diagram shows the connections among components of the application:
 That's how to get started with Struts framework by developing a "hello world" application.
Related Struts Hello World Tutorials:
- Introduction to Struts framework
- Struts beginner tutorial with Convention Plugin (zero-configuration)
- Struts Beginner Tutorial with Annotations
Other Struts Tutorials:
- How to handle exceptions in Struts
- How to use log4j in Struts
- Send e-mail with attachments in Struts
- Struts File Download Tutorial
- Struts File Upload Tutorial
- Struts - Spring - Hibernate Integration Tutorial
About the Author:
 Nam Ha Minh is certified Java programmer (SCJP and SCWCD). He began programming with Java back in the days of Java 1.4 and has been passionate about it ever since. You can connect with him on Facebook and watch his Java videos on YouTube.
Comments
There is no Action mapped for namespace [/] and action name [] associated with context path [/Struts2Beginner]. - [unknown location]
create an index.html file under webContent/WEB-INF
and put the following code in it
------------------------------------
Loading ...
-------------------------------------
this will redirect it to input.jsp