Struts Form Validation Tutorial (XML)
- Details
- Written by Nam Ha Minh
- Last Updated on 01 August 2019 | Print Email
1. The Struts Validation Framework
By default, the validation framework is included in Struts default stack and is “turned on” already so we don’t have to do anything to use it, except creating validation rules in an XML file in a correct manner and putting it into right place. We specify validation rules per action class in an XML file that follows either of these naming conventions:- <actionClass>-validation.xml
- <actionClass>-<actionAlias>-validation.xml
- LoginAction-validation.xml
- LoginAction-doLogin-validation.xml
- Field Validators: are used to perform validation checks on a single field. The field is declared in the action class or in a JavaBean associated with the action class. A field validator is declared using <field-validator> element.
- Non-Field Validators (or Plain Validators): are used to perform validation checks on a set of fields or none field at all. A non-field validator is declared using <validator> element.
<field name="email">
	<field-validator type="email">
	    <message>You must enter a valid e-mail address</message>
	</field-validator>
</field>
And this is an example of a non-field validator which compares two numbers x and y:
<validator type="expression">
<param name="expression">x > y</param>
<message>x must be greater than y, x = ${x}, y = ${y}</message>
</validator> To see a complete list of built-in validators in Struts: Bundled Validators.Now let’s see how to build the sample application that applies the validation framework.2. Coding Input Form
Create LoginForm.jsp file with the following content:<%@ page language="java" contentType="text/html; charset=UTF-8"
pageEncoding="UTF-8"%>
<%@ taglib prefix="s" uri="/struts-tags" %>
<!DOCTYPE html PUBLIC "-//W3C//DTD HTML 4.01 Transitional//EN"
"http://www.w3.org/TR/html4/loose.dtd">
<html>
<head>
<meta http-equiv="Content-Type" content="text/html; charset=UTF-8">
<title>Login Form - Struts2 Validation Example</title>
</head>
<body>
<div align="center">
<h2>Login</h2>
<s:form action="doLogin" method="post" validate="true">
<s:textfield label="E-mail" name="email" />
<s:password label="Password" name="password" />
<s:submit value="Login" />
</s:form>
</div>
</body>
</html>This page will show a login form with two fields: email and password. We’ll configure Struts to validate these fields.Client-side validationThe attribute validate=”true” of the <s:form> tag specifies that the form validation will take place on the client side:<s:form action="doLogin" method="post" validate="true">Struts will generate appropriate Javascript code to perform the client-side validation. Server-side validationWithout specifying the attribute validate=”true”, Struts will perform validation checks on the server-side:
<s:form action="doLogin" method="post">No Javascript code will be generated. Instead, every submission will be sent to the server for validating.
3. Coding Struts Action Class
Create LoginAction.java file under package net.codejava.struts with the following code:package net.codejava.struts;
import com.opensymphony.xwork2.ActionSupport;
public class LoginAction extends ActionSupport {
private String email;
private String password;
public String execute() {
if (email != null && email.equals("admin@codejava.net")) {
return SUCCESS;
} else {
return INPUT;
}
}
// getters and setters
}This action class will redirect the client to SUCCESS page if the e-mail is admin@codejava.net, otherwise redirect back to the INPUT page. 4. Coding Success Page
Create LoginSuccess.jsp file with the following content:<%@ page language="java" contentType="text/html; charset=UTF-8"
pageEncoding="UTF-8"%>
<!DOCTYPE html PUBLIC "-//W3C//DTD HTML 4.01 Transitional//EN"
"http://www.w3.org/TR/html4/loose.dtd">
<html>
<head>
<meta http-equiv="Content-Type" content="text/html; charset=UTF-8">
<title>Login Success</title>
</head>
<body>
<div align="center">
<h2>Welcome, you have logged in successfully!</h2>
</div>
</body>
</html>This page will be picked up if the login form passes validation checks and the user enters the desired e-mail address. 5. Configuring Struts Validators using XML
To specify validation rules for the login form, create LoginAction-validation.xml file under package net.codejava.struts with the following content:<!DOCTYPE validators PUBLIC "-//Apache Struts//XWork Validator 1.0.3//EN"
"http://struts.apache.org/dtds/xwork-validator-1.0.3.dtd">
<validators>
<field name="email">
<field-validator type="requiredstring">
<message>You must enter an e-mail address</message>
</field-validator>
<field-validator type="email">
<message>You must enter a valid e-mail address</message>
</field-validator>
</field>
<field name="password">
<field-validator type="requiredstring">
<message>You must enter password</message>
</field-validator>
</field>
</validators>As we can see, we specify field validators for the two fields of the login form, email and password, with validator types of requiredstring and email, respectively. The text inside the <message> element will be shown to the user if he types in invalid data, e.g. wrong e-mail format or empty strings. 6. Configuring struts.xml file
Configure the LoginAction in the struts.xml file as follows:<?xml version="1.0" encoding="UTF-8"?>
<!DOCTYPE struts PUBLIC
"-//Apache Software Foundation//DTD Struts Configuration 2.0//EN"
"http://struts.apache.org/dtds/struts-2.0.dtd">
<struts>
<package name="Struts2Validation" extends="struts-default" namespace="/">
<action name="doLogin" class="net.codejava.struts.LoginAction">
<result name="success" type="redirect">/LoginSuccess.jsp</result>
<result name="input">/LoginForm.jsp</result>
</action>
</package>
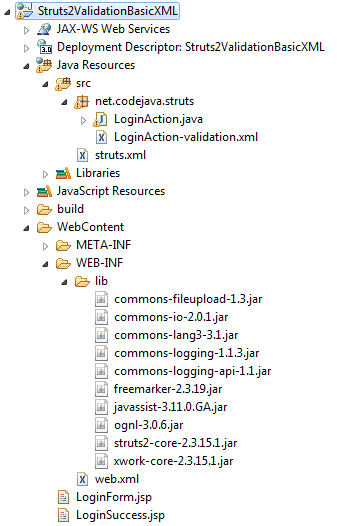
</struts>So far we have completed the sample application. Here’s how the project structure would look like in Eclipse IDE: We use the Struts distribution version 2.3.15.1. The required libraries are:
- commons-fileupload-1.3.jar
- commons-io-2.0.1.jar
- commons-lang3-3.1.jar
- commons-logging-1.1.3.jar
- commons-logging-api-1.1.jar
- freemarker-2.3.19.jar
- javassist-3.11.0.GA.jar
- ognl-3.0.6.jar
- struts2-core-2.3.15.1.jar
- xwork-core-2.3.15.1.jar
7. Testing the Struts Form Validator Example Application
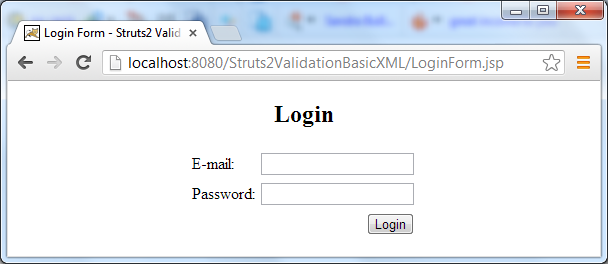
Enter the following URL in web browser:http://localhost:8080/Struts2ValidationBasicXML/LoginForm.jsp
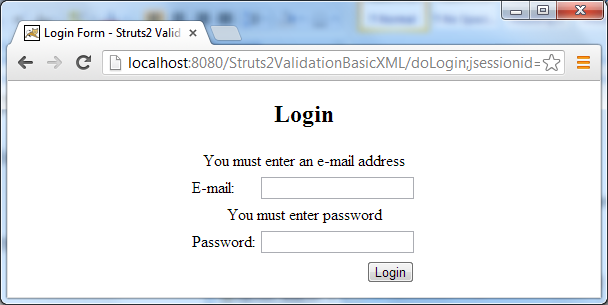
The login form appears as follows: Don’t type anything, just hit the Login button. Two validation error messages are displayed above the fields:
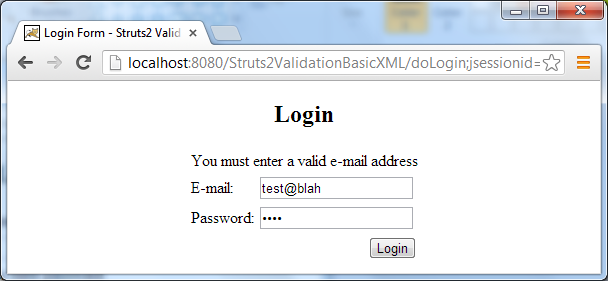
 Now try to enter an e-mail address (but in wrong format) and a password, then hit Login. We’ll see:
 Now enter the e-mail as admin@codejava.net and an arbitrary password and hit Login, we’ll be redirected to the success page:
 That works! You can download Eclipse project and deployable WAR file of this application under the Attachments section. Related Struts Form Validation Tutorials:
- Struts Form Handling Tutorial
- Struts Date Range Field Validator Example
- Struts String Length Field Validator Example
- Struts Required Field Validator Example
- Struts URL Validator Example
Other Struts Tutorials:
- Introduction to Struts 2 framework
- Struts beginner tutorial (Eclipse + Tomcat + XML)
- Struts Beginner Tutorial with Annotations
- Struts beginner tutorial with Convention Plugin (zero-configuration)
- How to handle exceptions in Struts
- Send e-mail with attachments in Struts
- Struts File Upload Tutorial
- Struts - Spring - Hibernate Integration Tutorial
About the Author:
 Nam Ha Minh is certified Java programmer (SCJP and SCWCD). He began programming with Java back in the days of Java 1.4 and has been passionate about it ever since. You can connect with him on Facebook and watch his Java videos on YouTube.
Comments
please help
nice post
thanks
very niceeee