How to Create Drop Down Button in Java Swing
- Details
- Written by Nam Ha Minh
- Last Updated on 04 July 2019 | Print Email
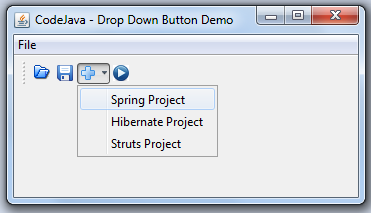
A drop down button is a button with small arrow on its right side, and when the arrow is clicked, a popup appears with a list of possible actions. The user can either click an action from the list or click the button to activate the default action. Here’s a screenshot of a Swing program that illustrates the drop down button:

This is a useful component, but there is no such built-in component in Swing. Fortunately, there are some solutions out there which can fill this gap. In this tutorial, we introduce a pretty nice solution which depends on some external libraries (from NetBeans IDE) so you can write minimal implementation code without worrying much about the details. Now, let’s walk through the steps for creating a drop down button in Swing.
1. Add Required Libraries from NetBeans IDE
You have to add three JAR files which can be found under NetBeans’ installation directory, e.g c:\Program Files\NetBeans 8.0\platform\lib on Windows. Add the following JARs to your project:
- org-openide-util.jar
- org-openide-awt.jar
- org-openide-util-lookup.jar
2. Create Popup Menu
Next, create a popup menu which is shown up when the drop down button is clicked. The code is pretty simple and straightforward:
JPopupMenu popupMenu = new JPopupMenu();

JMenuItem menuItemCreateSpringProject = new JMenuItem("Spring Project");
popupMenu.add(menuItemCreateSpringProject);

JMenuItem menuItemCreateHibernateProject = new JMenuItem("Hibernate Project");
popupMenu.add(menuItemCreateHibernateProject);

JMenuItem menuItemCreateStrutsProject = new JMenuItem("Struts Project");
popupMenu.add(menuItemCreateStrutsProject);
Here, we add three menu items to the popup menu to represent a list of actions, e.g. creating a Spring project, Hibernate project or a Struts project.
3. Create Drop Down Button
Now, we come to the important part which uses the NetBeans IDE’s API to make a drop down button:
JPopupMenu popupMenu = createDropDownMenu(); // created above

ImageIcon icon = new ImageIcon(getClass().getResource("/net/codejava/swing/images/new.gif"));

JButton dropDownButton = DropDownButtonFactory.createDropDownButton(icon, popupMenu);
The key point here is that we use the DropDownButtonFactory class which has a factory method that creates a JButton from an ImageIcon and a JPopupMenu:
JButton dropDownButton = DropDownButtonFactory.createDropDownButton(icon, popupMenu);
The createDropDownButton() returns a trivial JButton which then can be added to a toolbar or other part of the program. For example:
JToolBar toolbar = new JToolBar();

// code add some buttons to the toolbar...

// add the drop down button
toolbar.add(dropDownButton);
4. A Swing Demo Program
For your convenience and reference, we create a working demo program which looks like this:

You can download full source code (including the required libraries of NetBeans) of this program in the Attachments section.
Related Swing Button Tutorials:
- JButton basic tutorial and examples
- JRadioButton basic tutorial and examples
- Setting shortcut key and hotkey for menu item and button in Swing
Other Java Swing Tutorials:
- Java Swing Hello World Tutorial for Beginners Using Text Editor
- JFrame basic tutorial and examples
- JPanel basic tutorial and examples
- JLabel basic tutorial and examples
- JTextField basic tutorial and examples
- JComboBox basic tutorial and examples
About the Author:
 Nam Ha Minh is certified Java programmer (SCJP and SCWCD). He began programming with Java back in the days of Java 1.4 and has been passionate about it ever since. You can connect with him on Facebook and watch his Java videos on YouTube.
Comments
Maybe you forgot to add the org-openide-XXX.jar files.