JButton basic tutorial and examples
- Details
- Written by Nam Ha Minh
- Last Updated on 05 July 2019 | Print Email
1. Creating a JButton object
- Create a default button with a caption:
JButton button = new JButton("Edit");
Image:
- Create a button with only an icon in the file system:
JButton button = new JButton(new ImageIcon("images/start.gif"));Here the icon file start.gifis placed under images directory which is relative to the program.
Image:
- Create a button with only icon inside a jar file or in classpath:
String iconPath = "/net/codejava/swing/jbutton/stop.jpg";
Icon icon = new ImageIcon(getClass().getResource(iconPath));
JButton button = new JButton(icon);
Here the icon file stop.jpgis placed under a specific package in the classpath.
Image:
- Create a button with a caption and an icon:
JButton button = new JButton("Start", new ImageIcon("images/start.gif"));
Image:
- Create a default button with a caption:
2. Adding the button to a container
- A JButton is usually added to a JPanel, a JFrame, a JDialog or a JApplet:
frame.add(button);
dialog.add(button);
panel.add(button);
applet.getContentPane().add(button);
- Adding a JButton to a container with a specific layout manager:
frame.add(button, BorderLayout.CENTER);
panel.add(button, gridbagConstraints);
3. Adding event listener for JButton
- Adding an event listener using anonymous class (shortcut way):
button.addActionListener(new ActionListener() { @Override public void actionPerformed(ActionEvent evt) { // do everything here... } }); - Adding an event listener using anonymous class and an event handler method (recommended):
button.addActionListener(new ActionListener() {
	@Override
	public void actionPerformed(ActionEvent evt) {
		// delegate to event handler method
		buttonActionPerformed(evt);
	}
});
The event handler method is declared as follows:private void buttonActionPerformed(ActionEvent evt) { // do something here... } - Let the container listens to JButton’s click event (not recommended):
public class App extends JFrame implements ActionListener {
	public App() {
		// creates the button...

		// adds event listener:
		button.addActionListener(this);
	}

	@Override
	public void actionPerformed(ActionEvent evt) {
		// do something here...
	}
}
Here the container (JFrame) must implement the ActionListener interface and override the method actionPerformed().
4. Setting mnemonic and hotkey for JButton
- Set mnemonic key Alt + Efor the button whose caption is “Edit”:
button.setMnemonic(KeyEvent.VK_E);
The letter E is underlined: so user can invoke that button’s action by pressing Alt + Einstead of clicking mouse.
- Set F2 as the hot key to invoke the button’s action:
String mapKey = "KEY_F2";
InputMap inputMap = button.getInputMap(JComponent.WHEN_IN_FOCUSED_WINDOW);
inputMap.put(KeyStroke.getKeyStroke("F2"), mapKey);

button.getActionMap().put(mapKey, new AbstractAction() {
	public void actionPerformed(ActionEvent evt) {
		buttonActionPerformed(evt);
	}
});
5. Setting a JButton as the default button
A window can have a default button whose action will be invoked when the user hits Enter key. Here is the code to set the button as default button in the frame window:getRootPane().setDefaultButton(button);The default button is bold in the window like the 3rd button in this screenshot:
 6. Customizing JButton’s appearance
- Change font style, background color and foreground color of the button:
button.setFont(new java.awt.Font("Arial", Font.BOLD, 14));
button.setBackground(Color.YELLOW);
button.setForeground(Color.BLUE);
Image:
- Change font style using HTML code:
button.setText("<html><color=blue><b>Edit</b></font></html>"); 7. JButton demo program
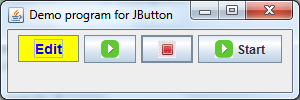
For reference, we created a demo program which incorporates all the practices mentioned above. The program looks like this: You can download source code of this program in the attachment section.
 Other Java Swing Tutorials:
- Java Swing Hello World Tutorial for Beginners Using Text Editor
- JFrame basic tutorial and examples
- JPanel basic tutorial and examples
- JLabel basic tutorial and examples
- JTextField basic tutorial and examples
- JComboBox basic tutorial and examples
- JList basic tutorial and examples
- JTree basic tutorial and examples
- A Simple JTable Example for Display
About the Author:
 Nam Ha Minh is certified Java programmer (SCJP and SCWCD). He began programming with Java back in the days of Java 1.4 and has been passionate about it ever since. You can connect with him on Facebook and watch his Java videos on YouTube.
Comments
I want to add to the button text using a variable. how do I get this to work? jpFormatPanel.add(new JButton("Format Citation: "
+ strTemplateName
+ strTemplateName
+ " - "
+ strTemplateCode),
BorderLayout.NORTH);