JTree basic tutorial and examples
- Details
- Written by Nam Ha Minh
- Last Updated on 06 July 2019 | Print Email
This article explains working with JTree and proceeds to show some examples.
We will write code to achieve a JTree output like:Output
Table of Contents:
1. Introduction to JTree:
JTree is a Swing component with which we can display hierarchical data. JTree is quite a complex component. A JTree has a 'root node' which is the top-most parent for all nodes in the tree. A node is an item in a tree. A node can have many children nodes. These children nodes themselves can have further children nodes. If a node doesn't have any children node, it is called a leaf node.The leaf node is displayed with a different visual indicator. The nodes with children are displayed with a different visual indicator along with a visual 'handle' which can be used to expand or collapse that node. Expanding a node displays the children and collapsing hides them.2. Developing a Simple JTree:
Let us now attempt to build a simple JTree. Let us say we want to display the list of vegetables and fruits hierarchically.The node is represented in Swing API as TreeNode which is an interface. The interface MutableTreeNode extends this interface which represents a mutable node. Swing API provides an implementation of this interface in the form of DefaultMutableTreeNode class.We will be using the DefaultMutableTreeNode class to represent our node. This class is provided in the Swing API and we can use it to represent our nodes. This class has a handy add() method which takes in an instance of MutableTreeNode.So, we will first create the root node. And then we can recursively add nodes to that root. Let us start with a simple root with just 2 nodes:package net.codejava.swing;
import javax.swing.JFrame;
import javax.swing.JTree;
import javax.swing.SwingUtilities;
import javax.swing.tree.DefaultMutableTreeNode;
public class TreeExample extends JFrame
{
private JTree tree;
public TreeExample()
{
//create the root node
DefaultMutableTreeNode root = new DefaultMutableTreeNode("Root");
//create the child nodes
DefaultMutableTreeNode vegetableNode = new DefaultMutableTreeNode("Vegetables");
DefaultMutableTreeNode fruitNode = new DefaultMutableTreeNode("Fruits");
//add the child nodes to the root node
root.add(vegetableNode);
root.add(fruitNode);
//create the tree by passing in the root node
tree = new JTree(root);
add(tree);
this.setDefaultCloseOperation(JFrame.EXIT_ON_CLOSE);
this.setTitle("JTree Example");
this.pack();
this.setVisible(true);
}
public static void main(String[] args)
{
SwingUtilities.invokeLater(new Runnable() {
@Override
public void run() {
new TreeExample();
}
});
}
}As explained earlier, we create a root node and add child nodes to it. Note that, when we create the JTree instance, we just pass the root node instance. This is because, the root node contains all the information including the children.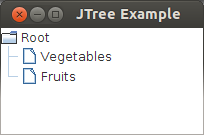
Initial Output with two Children
The output shows the root node and the two children. Note the difference in the icon that is displayed prior to the text. The nodes which have children are indicated with a folder icon and the leaf nodes are displayed with a different icon.
3. Adding More Children to JTree
Let us now add more children to the vegetable and fruits node. This is very simple. We just need to add DefaultMutableTreeNode instances to the vegetableNode and the fruitNode instance, like:
DefaultMutableTreeNode vegetableNode = new DefaultMutableTreeNode("Vegetables");
vegetableNode.add(new DefaultMutableTreeNode("Capsicum"));
vegetableNode.add(new DefaultMutableTreeNode("Carrot"));
vegetableNode.add(new DefaultMutableTreeNode("Tomato"));
vegetableNode.add(new DefaultMutableTreeNode("Potato"));
DefaultMutableTreeNode fruitNode = new DefaultMutableTreeNode("Fruits");
fruitNode.add(new DefaultMutableTreeNode("Banana"));
fruitNode.add(new DefaultMutableTreeNode("Mango"));
fruitNode.add(new DefaultMutableTreeNode("Apple"));
fruitNode.add(new DefaultMutableTreeNode("Grapes"));
fruitNode.add(new DefaultMutableTreeNode("Orange"));
When we run the program, we get the following output:
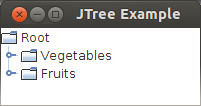
More Children Added
We can see that the icon displayed for the 'Vegetables' and 'Fruits' node has changed from a leaf icon to a folder icon. This indicates that these nodes have children themselves now. Also, note the handler icon (the one that looks like a key) that is displayed besides these nodes. These can be clicked on to expand the nodes.
Let us now run the program again and click on both these handles to expand them. We get the following output:
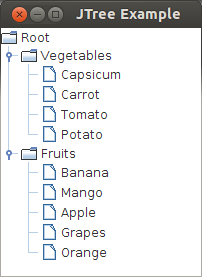
Expanded Tree
Once we expand the nodes, we can see all the items in the tree displayed in a nice hierarchical structure. Also note that the handler is shown with a different indicator icon.
4. Customizing JTree's Display:
Let us now try and customize a JTree's display. Let us now run the program again and click on the handles. Then, resize the frame to use less height. We will get the following output:
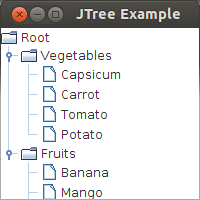
Tree without Scrollbars
As we can see, when the frame is resized, the items are hidden. Instead, we would
want to display a scrollbar and allow the user to scroll up and down to see the entire tree data.
5. Adding a Scrollpane for JTextField
Doing this is very simple. Like many other Swing components, we just need to wrap our tree within a JScrollPane and add it to the frame. Instead of adding the tree to the frame, we add the scrollpane, like:
add(new JScrollPane(tree));
Let us now run the program again, click on the handler icons to expand the nodes and resize the frame. We will get an output like this:
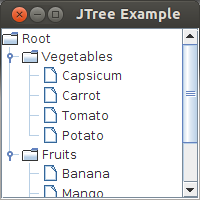
Tree with Scrollbars
We can see that now a scrollbar is added and we can scroll to see the nodes. Now, try and collapse one of the nodes. We can see that the scrollbar disappears. The scroll bar appears when it has items beyond the display area.
6. Showing Root Handles for JTree:
When you have a close look at the output again, we see that the 'Vegetables' and 'Fruits' nodes have the 'handler' icon, but the 'Root' node doesn't. The root node is the parent of all nodes, so, it would be possible for us to expand and collapse this too. If you double-click on the root node, you can actually collapse and expand it. However, this is not very convenient and consistent with the rest of the tree.
So, let us now try and display the handle for the root node. This can be done with a simple API call such as:
tree.setShowsRootHandles(true);
Let us now run the program again. We can see that the root handle is shown:
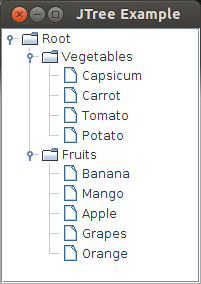
Tree with Root Handles Displayed
7. Hiding Root Node of JTree
The root node is the topmost in the hierarchy. However, the display of root node may not be needed in some cases. For example, we have been using a root node displayed with the text 'Root'. This is not very useful. So, what if we want to hide it? This is possible with a simple API call:
tree.setRootVisible(false);
Let us now run the program. We get the following when the trees are expanded:
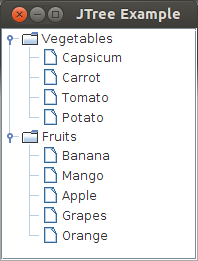
Tree with Root Node Hidden
Note that we still make the call to tree.setShowsRootHandles(true) as otherwise we will not see the root handles for the 'Vegetables' and 'Fruits' node.
8. Changing the Visual Icons for JTree
JTree uses different icons to represent leaf node and nodes with children as we have seen above. What if we need to provide our own icons for this purpose? It is very much possible. We need to make use of the renderer to do this.
JTree Rendering:
JTree delegates the display of its items to Renderers. By default, a renderer is automatically created for a JTree to display all its items. The rendering is represented by an interface called TreeCellRenderer. The Swing API provides a default implementation of this interface known as DefaultTreeCellRenderer. This class has some handy methods which we can use to customize the display.
Using the DefaultTreeCellRenderer:
We will be creating an instance of DefaultTreeCellRenderer class and using the method setLeafIcon() to set the icon for all our leaf nodes. This method takes an instance of ImageIcon class. The ImageIcon class is used to handle the display of images. So, we will first create an ImageIcon instance and then use it with the renderer:
ImageIcon imageIcon = new ImageIcon(TreeExample.class.getResource("/leaf.jpg"));
DefaultTreeCellRenderer renderer = new DefaultTreeCellRenderer();
renderer.setLeafIcon(imageIcon);
The first line uses the standard mechanism to load images where the image is part of the application (packaged within the jar). Then we create a DefaultTreeCellRenderer instance and call the setLeafIcon() method by passing in this ImageIcon instance. Let us now run the program and expand the nodes to see the image being used for the leaf nodes.
Tree with Custom Image Icon for Leaf Nodes
9. Set Event Handlers for JTree
Let us now try and develop event handlers for tree. Knowing the currently selected node will be one of the most useful events to know. Event handling in JTree is very similar to that of other Swing components. We register an event listener and are notified when the event happens.
Developing a SelectionListener:
We need to add a TreeSelectionListener to listen for selection events. This is an interface defined in Swing API and we need to implement the valueChanged() method. The source of the selection is passed as a parameter to this method.
The selection in JTree is handled by a class called TreeSelectionModel. So, the JTree delegates all the selection related work to this class.
We will first add a JLabel to be displayed at the bottom. Whenever a node in the tree is selected, we will display the path of the selected node.
Let us first declare a JLabel instance variable:
private JLabel selectedLabel;
We will then add it to the bottom of the frame:
selectedLabel = new JLabel();
add(selectedLabel, BorderLayout.SOUTH);
We will then add the selection listener as follows:
tree.getSelectionModel().addTreeSelectionListener(new TreeSelectionListener() {
    @Override
    public void valueChanged(TreeSelectionEvent e) {
        selectedLabel.setText(e.getPath().toString());
    }
});
We add a selection listener to the tree selection model. The TreeSelectionListener has one method which we implement. We use the event source to invoke the getPath() method and set it to the label that we added earlier. When we run the program, we get the following output:
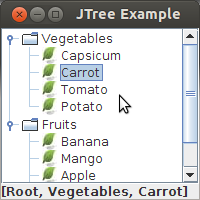
Adding a Selection Listener
An even better usage of the selection listener would be to get the selected node and make use of it. To get the selected node, we can make use of the getLastSelectedPathComponent() method of JTree. This method returns the selected node. We can then invoke the getUserObject() method on the DefaultMutableTreeNode class which returns the actual object we added. Since this method returns an Object instance, we need to call the toString() method on it and add it to the label. We can modify the code as follows:
tree.getSelectionModel().addTreeSelectionListener(new TreeSelectionListener() {
    @Override
    public void valueChanged(TreeSelectionEvent e) {
        DefaultMutableTreeNode selectedNode = (DefaultMutableTreeNode) tree.getLastSelectedPathComponent();
        selectedLabel.setText(selectedNode.getUserObject().toString());
    }
});
When we run the program and select a leaf node, we get the following output:
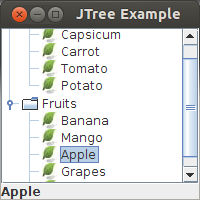
Selection Listener to get the Selected Node
Here is the full source code of our GUI:
package net.codejava.swing;
import java.awt.BorderLayout;
import javax.swing.ImageIcon;
import javax.swing.JFrame;
import javax.swing.JLabel;
import javax.swing.JScrollPane;
import javax.swing.JTree;
import javax.swing.SwingUtilities;
import javax.swing.event.TreeSelectionEvent;
import javax.swing.event.TreeSelectionListener;
import javax.swing.tree.DefaultMutableTreeNode;
import javax.swing.tree.DefaultTreeCellRenderer;
/**
 * JTree basic tutorial and example
 * @author wwww.codejava.net
 */
public class TreeExample extends JFrame
{
    private JTree tree;
    private JLabel selectedLabel;

    public TreeExample()
    {
        //create the root node
        DefaultMutableTreeNode root = new DefaultMutableTreeNode("Root");
        //create the child nodes
        DefaultMutableTreeNode vegetableNode = new DefaultMutableTreeNode("Vegetables");
        vegetableNode.add(new DefaultMutableTreeNode("Capsicum"));
        vegetableNode.add(new DefaultMutableTreeNode("Carrot"));
        vegetableNode.add(new DefaultMutableTreeNode("Tomato"));
        vegetableNode.add(new DefaultMutableTreeNode("Potato"));

        DefaultMutableTreeNode fruitNode = new DefaultMutableTreeNode("Fruits");
        fruitNode.add(new DefaultMutableTreeNode("Banana"));
        fruitNode.add(new DefaultMutableTreeNode("Mango"));
        fruitNode.add(new DefaultMutableTreeNode("Apple"));
        fruitNode.add(new DefaultMutableTreeNode("Grapes"));
        fruitNode.add(new DefaultMutableTreeNode("Orange"));
        //add the child nodes to the root node
        root.add(vegetableNode);
        root.add(fruitNode);

        //create the tree by passing in the root node
        tree = new JTree(root);
        ImageIcon imageIcon = new ImageIcon(TreeExample.class.getResource("/leaf.jpg"));
        DefaultTreeCellRenderer renderer = new DefaultTreeCellRenderer();
        renderer.setLeafIcon(imageIcon);

        tree.setCellRenderer(renderer);
        tree.setShowsRootHandles(true);
        tree.setRootVisible(false);
        add(new JScrollPane(tree));

        selectedLabel = new JLabel();
        add(selectedLabel, BorderLayout.SOUTH);
        tree.getSelectionModel().addTreeSelectionListener(new TreeSelectionListener() {
            @Override
            public void valueChanged(TreeSelectionEvent e) {
                DefaultMutableTreeNode selectedNode = (DefaultMutableTreeNode) tree.getLastSelectedPathComponent();
                selectedLabel.setText(selectedNode.getUserObject().toString());
            }
        });

        this.setDefaultCloseOperation(JFrame.EXIT_ON_CLOSE);
        this.setTitle("JTree Example");
        this.setSize(200, 200);
        this.setVisible(true);
    }

    public static void main(String[] args)
    {
        SwingUtilities.invokeLater(new Runnable() {
            @Override
            public void run() {
                new TreeExample();
            }
        });
    }
}
Other Java Swing Tutorials:
- Java Swing Hello World Tutorial for Beginners Using Text Editor
- JFrame basic tutorial and examples
- JPanel basic tutorial and examples
- JLabel basic tutorial and examples
- JTextField basic tutorial and examples
- JButton basic tutorial and examples
- JComboBox basic tutorial and examples
- JCheckBox basic tutorial and examples
- JList basic tutorial and examples
About the Author:
 Nam Ha Minh is certified Java programmer (SCJP and SCWCD). He began programming with Java back in the days of Java 1.4 and has been passionate about it ever since. You can connect with him on Facebook and watch his Java videos on YouTube.
Comments
is missing