Struts Login Logout Example
- Details
- Written by Nam Ha Minh
- Last Updated on 03 August 2019 | Print Email
- Have the action class implemented the ServletRequestAware interface.
- Implement the setServletRequest() method and obtain the HttpSession object from the request object which is passed by the framework.
import javax.servlet.http.HttpServletRequest;
import javax.servlet.http.HttpSession;

import org.apache.struts2.interceptor.ServletRequestAware;

import com.opensymphony.xwork2.ActionSupport;

public class TestAction extends ActionSupport implements ServletRequestAware {

	@Override
	public void setServletRequest(HttpServletRequest request) {
		HttpSession session = request.getSession();
		session.setAttribute("userName", "Tom");
	}

	public String execute() {
		// do something...
		return SUCCESS;
	}
}
However, this approach is not recommended because it makes the action class ties to the servlet API and difficult for unit testing. Therefore Struts recommends developers to access the session’s attributes instead of the HttpSession object, by providing the SessionAware interface. 1. Implementing the SessionAware interface
The following example shows how an action class implements the SessionAware interface:import java.util.Map;
import org.apache.struts2.interceptor.SessionAware;
import com.opensymphony.xwork2.ActionSupport;
public class MyAction extends ActionSupport implements SessionAware {
private Map<String, Object> sessionMap;
@Override
public void setSession(Map<String, Object> sessionMap) {
this.sessionMap = sessionMap;
}
// action method goes here...
}When Struts found that an action class implements the SessionAware interface, it will inject a map of session attributes via the method setSession(), so we can use this map to add/remove attributes to/from the session. For example:- Adding an attribute to the session:
sessionMap.put("userName", "Tom");That’s equivalent to this call with the HttpSession:httpSession.setAttribute("userName", "Tom"); - Removing an attribute from the session:
sessionMap.remove("userName"); That’s equivalent to this call with the HttpSession:
httpSession.removeAttribute("userName"); So by implementing the SessionAware interface and manipulating session attributes via a Map object, we can decouple the action class from the Servlet API, thus making unit testing the action class easily.
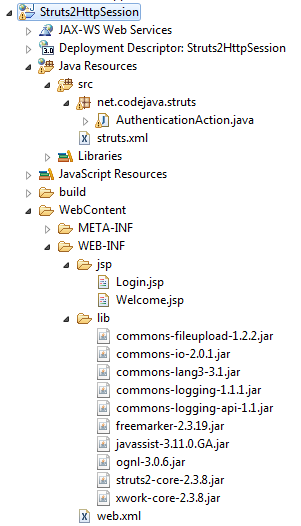
2. Code of login page
Create Login.jsp file under WEB-INF\jsp directory with the following content:<%@ taglib prefix="s" uri="/struts-tags" %>
<%@ page language="java" contentType="text/html; charset=ISO-8859-1"
pageEncoding="ISO-8859-1"%>
<!DOCTYPE html PUBLIC "-//W3C//DTD HTML 4.01 Transitional//EN"
"http://www.w3.org/TR/html4/loose.dtd">
<html>
<head>
<meta http-equiv="Content-Type" content="text/html; charset=ISO-8859-1">
<title>Struts2 Login</title>
</head>
<body>
<center>
<h3>Login</h3>
<s:form action="login" method="post">
<s:textfield name="userName" label="Enter User Name" />
<s:password name="password" label="Enter Password" />
<s:submit label="Login" />
</s:form>
</center>
</body>
</html>This page displays a login form with two fields (username and password). Upon submitting, it will call the action “login”. 3. Code of Struts action class
Create AuthenticationAction.java file under package net.codejava.struts with the following code:package net.codejava.struts;
import java.util.Map;
import org.apache.struts2.interceptor.SessionAware;
import com.opensymphony.xwork2.ActionSupport;
public class AuthenticationAction extends ActionSupport implements SessionAware {
private Map<String, Object> sessionMap;
private String userName;
private String password;
public String login() {
String loggedUserName = null;
// check if the userName is already stored in the session
if (sessionMap.containsKey("userName")) {
loggedUserName = (String) sessionMap.get("userName");
}
if (loggedUserName != null && loggedUserName.equals("admin")) {
return SUCCESS; // return welcome page
}
// if no userName stored in the session,
// check the entered userName and password
if (userName != null && userName.equals("admin")
&& password != null && password.equals("nimda")) {
// add userName to the session
sessionMap.put("userName", userName);
return SUCCESS; // return welcome page
}
// in other cases, return login page
return INPUT;
}
public String logout() {
// remove userName from the session
if (sessionMap.containsKey("userName")) {
sessionMap.remove("userName");
}
return SUCCESS;
}
@Override
public void setSession(Map<String, Object> sessionMap) {
this.sessionMap = sessionMap;
}
public void setUserName(String userName) {
this.userName = userName;
}
public void setPassword(String password) {
this.password = password;
}
}In this action class, we implement two action methods: one for handling login and one for handling logout. The embedded comments are explanatory to help you understand what the code does. 4. Code of welcome page
Create Welcome.jsp file under WEB-INF\jsp directory with the following content:<%@ page language="java" contentType="text/html; charset=ISO-8859-1"
pageEncoding="ISO-8859-1"%>
<!DOCTYPE html PUBLIC "-//W3C//DTD HTML 4.01 Transitional//EN"
"http://www.w3.org/TR/html4/loose.dtd">
<html>
<head>
<meta http-equiv="Content-Type" content="text/html; charset=ISO-8859-1">
<title>Welcome</title>
</head>
<body>
<center>
<h3>Welcome <i>${sessionScope.userName}</i>, you have logged in successfully!</h3>
<h3><a href="/logout">Logout</a></h3>
</center>
</body>
</html>This page simply displays a welcome message which includes the username obtained from the session. The link “Logout” allows the user to logout from the application. In the action side, it will remove the attribute “userName” from the session. 5. Code of struts.xml
We configure this application in struts.xml like this:<?xml version="1.0" encoding="UTF-8"?>
<!DOCTYPE struts PUBLIC
"-//Apache Software Foundation//DTD Struts Configuration 2.0//EN"
"http://struts.apache.org/dtds/struts-2.0.dtd">
<struts>
<package name="Struts2HttpSession" extends="struts-default">
<action name="login" class="net.codejava.struts.AuthenticationAction"
method="login">
<result name="success">/WEB-INF/jsp/Welcome.jsp</result>
<result name="input">/WEB-INF/jsp/Login.jsp</result>
</action>
<action name="logout" class="net.codejava.struts.AuthenticationAction"
method="logout">
<result name="success">/WEB-INF/jsp/Login.jsp</result>
</action>
</package>
</struts>We declare two actions (the first for login, the second for logout) but still using one action class: AuthenticationAction. 6. Code of web.xml
We enable Struts2 to handle requests in web.xml file as follow:<?xml version="1.0" encoding="UTF-8"?>
<web-app xmlns:xsi="http://www.w3.org/2001/XMLSchema-instance"
xmlns="http://java.sun.com/xml/ns/javaee"
xmlns:web="http://java.sun.com/xml/ns/javaee/web-app_2_5.xsd"
xsi:schemaLocation="http://java.sun.com/xml/ns/javaee
http://java.sun.com/xml/ns/javaee/web-app_3_0.xsd"
id="WebApp_ID" version="3.0">
<display-name>Struts2HttpSession</display-name>
<filter>
<filter-name>struts2</filter-name>
<filter-class>
org.apache.struts2.dispatcher.ng.filter.StrutsPrepareAndExecuteFilter
</filter-class>
</filter>
<filter-mapping>
<filter-name>struts2</filter-name>
<url-pattern>/*</url-pattern>
</filter-mapping>
</web-app> 7. Testing Struts Login Logout Sample application
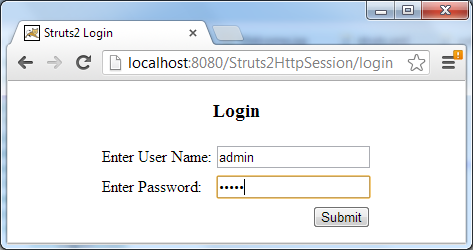
Now let’s do some tests with the application we have built so far. Deploy it on a local Tomcat server at the port number 8080, type the following URL:http://localhost:8080/Struts2HttpSession/login
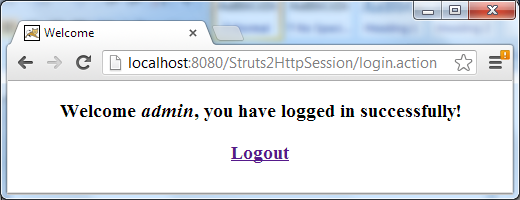
That brings us to the login page: Type “admin” for username and “nimda” for password, and hit Submit. The welcome page is displayed:
 Notice that, once we have been logged in, if we type this URL again:
http://localhost:8080/Struts2HttpSession/login
Then the welcome page will be displayed instead of the login page, because the username is remembered in the session.Now click on the Logout link, the application will remove the username from the session and bring the login page back.Other Struts Tutorials:
- Introduction to Struts framework
- Struts beginner tutorial (Eclipse + Tomcat + XML)
- Struts Beginner Tutorial with Annotations
- Struts beginner tutorial with Convention Plugin (zero-configuration)
- How to handle exceptions in Struts
- Struts Form Handling Tutorial
- Struts Form Validation Tutorial
- Send e-mail with attachments in Struts
- Struts File Download Tutorial
- Struts - Spring - Hibernate Integration Tutorial
About the Author:
 Nam Ha Minh is certified Java programmer (SCJP and SCWCD). He began programming with Java back in the days of Java 1.4 and has been passionate about it ever since. You can connect with him on Facebook and watch his Java videos on YouTube.
Comments
in welcome.jsp
change line.no. 13 from
Logout
(to)
Logout
Just add the welcome-file tag to the web.xml file under the wecome-file-list tag.
Then put the correct path of Login.jsp file.